Reader's Choice


Popular articles
Finish: hem, cords, buttons, loops, elastic bands.
Initial message Ilari
Finishing: edging, cords, buttons, loops, elastic bands, seams 1A series of messages, periodically edited.
A series of "address" messages:
Part 1 - Light and simple two-color cord. Step-by-step photos
Part 2 - A nodule for good luck
Part 3 - Cord of lush columns
Part 4 - MK - knitting pocket + MK - knitting knots
Part 5 - Mia cord
Part 6 - This cord has not yet been: a master class
Part 7 - Knit a cord in a spiral crochet. Video
Part 8 - Knit a tight crocheted cord. Video
Part 9 - Rings on the cord and stem with flowers
Part 10 - Knitted cords.
Part 11 - Crochet cords.
Part 12 - Kumihimo - Japanese lace weaving
Part 13 - method of finishing the neck
Part 14 - Unusual crochet belt
Part 15 - Video Lesson- Crochet Braided Cord
Part 16 - Crochet a flat cord. Master Class
Part 17 - Weave a belt of a round cord on the fingers
Part 18 - Weaving a bracelet-braid made of cord and beads. Quickly!
Part 19 - Original tape. mini-master class ...
Part 20 - flat cord knitting needles
Part 21 - Knitted i-cord
Part 22 - Belt of rope. Master Class
Part 23 - we make a device for weaving a cord. Video
Part 24 - Weaving a cord on a cardboard disc
Part 25 - Lesson knitting (weaving) of the cord on the bobbin
Part 26 - Crochet Crochet
Part 27 - Weave the cord. video
Part 28 - Knitting cords
Part 29 - Weave * monkey cam *. Video in Russian!
Part 30 - Chain * cones * crochet. Video
Part 31 - Tunisian knitting - cord
Part 32 - Decorative cord with a brush. Master Class
Part 33 - a beautiful cord of any thread - quickly!
Part 34 - Spiral Cord Harness
Part 35 - Interesting weaving lace. We weave flip flops and weave a bracelet. Master Class
Part 36 - Cord * wheat grain * crochet. Master class + video
Part 37 - Braided cords with cords knitting from Kati Green
Part 38 - How to knit cords on the needles. Master Class
Part 39 - non-standard techniques and methods, knitting patterns
Part 40 - Knitted trim - crossed flagella
Part 41 - Chinese Luck Knot
Part 42 - Knitting cords on the fingers - 2. Video
Part 43 - Making Leather Braid
Part 44 - Cords knitting needles and techniques for decorating products with cords
Part 45 - Chain - crocheted cord
Part 46 - a nodule * Globus *. Video
Part 47 - Crochet patterns, trim, knitting lessons, friform and much more.
Part 48 - we make a twisted cord with Berroco. Video
Part 49 - Cords and Braid
Part 50 - knitting laces on the needles
Part 51 - 5 ways to weave cords
Part 52 - All About KatV Knitted Harnesses
Part 53 - A very simple way to knit round cords on the needles.
Part 54 - HODS ... curious ... useful for making jewelry ...
Part 55 - Famous * TRACK * video in Russian
Part 56 - Video course on making cords and dressing clothes
Part 57 - Decorative Lace
Part 58 - how to weave a stand from the cord
Part 59 - Twisted Cord
Part 60 - Pearl Cord
Part 61 - the beginning and end of knitting with a cord
Part 62 - version of the crochet cord. 2 videos
Part 63 - knit the famous I-cord with BERROCO. video
A part 64 - cords, plaits, flowers from knitted strips.
Part 65 - ways of tying parts made of leather, suede and drape
Part 66 - Master class on crochet lace
Part 67 - Cord - Bourdon - MK
Part 68 - Crochet Knitting a Round Cord - Video Tutorial
Part 69 - Learning to knit cords. 5 videos
Part 70 - Chain of Rings
Part 71 - Master class on crochet lace
Part 72 - Cords and braid, a lot ...
Part 73 - Solomon crochet knots and a grid of them. 2 videos
Part 74 - Solomon's Strip - knots
Part 75 - Solomon's node - the first steps
Part 76 - Weave * Turkish head *. Master Class
Part 77 - Wide Solomon strip (belts, bracelets, long handles for bags)
Part 78 - Decorative knot * Turkish Head * or * Turk "s Head *
Part 79 - Knit, weave a round lace
Part 80 - Weave a Chinese button. Master Class
Part 81 - Eyelets and buttons. Good to know
Part 82 - Making buttons-columns of ringlets and yarn
Part 83 - Knitting buttonholes
Part 84 - How to make hanging loops in crochet
Part 85 - Video knitting lesson number 48 - Button
Part 86 - Making the buttons (part 1)
Part 87 - Making the Buttons (Part 2)
Part 88 - Celtic knot-button. Video
Part 89 - Dorset wicker buttons. Master Class
Part 90 - Decorative buttons. 2 MK and scheme
Part 91 - Decorative Buttons
Part 92 - Knitted Button. MK
Part 93 - Crochet Rings
Part 94 - How to make a toggle button. Master Class
Part 95 - the original fastener knitting
Part 96 - Knitted clasps for knitted things
Part 97 - Drawstring and crochet hook
Part 98 - Ball knitted * along the equator *
Part 99 - crochet the ball around. Video 2 parts
Part 100 - Master Class: Solomon loops (hook).
Part 101 - Knitted CHAIN
Part 102 - Ball (or button?) Of the cord. Mini MK
Part 103 - Laces - Braid
Part 104 - Master class wide caterpillar and many other MK
Part 105 - Melange button. Master Class
Part 106 - Knit crochet ring. Video
Part 107 - Crochet spiral
Part 108 - How to Knit a Bead Coil
Part 109 - Bindweeds
Part 110 - pompons in a new way
Part 111 - How to make a brush from the thread. Master Class
Part 112 - Knit non-blooming fringe. Svetlana Yurkova
Part 113 - More about crochet fringe. Small selection
Part 114 - Bounding Edge
Part 115 - Pompons for beginners. Detailed master class
Part 116 - Tassels for shawls, shawls, curtains, etc.
Part 117 - video tutorials on knitting. How to tie a ring? Patterns
Part 118 - How to tie crochet beads. MK in pictures
Part 119 - On the crochet tape and its connection. Bruges lace
Part 120 - Braid and cord with knitting needles and crochet
Part 121 - Technology knitting different, knitting needles and a hook.
Part 122 - Knitting BEYOND the edge by Nikki Epstein
Part 123 - 3 books by Nikki Epstein on how to decorate the edge
Part 124 - Knitting book * 350 ways of tying the edge * Nikki Epstein
Part 125 - NICKY EPSTEIN Knitting Block by Block An amazing knitting book by Nikki Epstein (Knitting-150 original models of blocks)
Part 126 - Knitted finish. Niki Epstein
Part 127 - Niki Epstein. Knitting in Circles
Part 128 - Volumetric knitting. Niki Epstein.
A part 129 - Interesting volumetric technique of a decor of knitted products from Niki Epstein.
Part 130 - Decorative knitting. Kate Haxell and Louise Roberts.
Part 131 - Making knitted products. Elena Evgrafova
Part 132 - Harmony Guides: Knit Edgings & Trims - Finish
Part 133 - processing knitted sweaters
Part 134 - under * machine edge *
Part 135 - Bulgarian gum. Options.
Part 136 - hollow gum
Part 137 - Gum
Part 138 - two-tone English gum
Part 139 - Knit gum
Part 140 - gum embossed columns
Part 141 - Knit gum, more than 40 species.
Part 142 - Crochet Eraser
Part 143 - Openwork gum, two-sided pattern
Part 144 - Beautiful ruffles, cuffs and collars
Part 145 - Decorative design knit (knitting needles).
Part 146 - Knitting ruffles
Part 147 - knit gum to choose from
Part 148 - * sewing strap *
Section 149 - Finishing Patterns for Borders
Part 150 - BARRADINOSS - Edging 1
Part 151 - BARRADINOSS - Edging 2
Part 152 - the original border of the rings
A part 153 - we knit with needles ruffles and a border
Part 154 - Beautiful crochet hem
Part 155 - ryushka with knobs
Part 156 - We connect the fabric with knitting. Master Class
Section 157 - Edge Design
Part 158 - Designing the edge of the canvas ruched
Part 159 - crochet hem - beautiful version
Part 160 - pattern * pigtail * for the design of the edge
Part 161 - Closing the hinges with a needle (elastic 2x2)
Part 162 - crochet hem
Part 163 - patterns for slats
Part 164 - Crochet Trim
Part 165 - Zigzag edge. Knitting
Part 166 - A beautiful border with leaves
Part 167 - Crochet Edging
A part 168 - typesetting edge teeths (knitting needles)
Part 169 - Double-Edge Plank (Feierla MC)
Part 170 - Edges and half-edges, 14 types of beautiful processing of the edge of a knitted product
Part 171 - The Original Braid
Part 172 - All for strapping
Part 173 - a tremendous amount of Kai spokes 2
Part 174 - Edge Strapping
Part 175 - crochet patterns for the edge
Section 176 - Border and Pattern
Part 177 - Edge Strapping
Part 178 - Crochet trim the edges. Patterns.
Part 179 - Crochet hem: the options are endless
Part 180 - Good selection knitting edges
Part 181 - Crochet rim.
Part 182 - connecting bands, connected on a fork with loops * broomstick *
Part 183 - Patterns for Edge Strapping
Part 184 - Edge Strapping
Part 185 - finishing products with PIKO teeth
Part 186 - We Tie
Part 187 - Strapping
Part 188 - Strapping
Part 189 - Strapping
Part 190 - Miscellaneous Strapping
Part 191 - Beautiful trim
Part 192 - crochet
Part 193 - trim strips
Part 194 - Openwork, knitting needles
Part 195 - Kettelny seam. How to add a neck in a knitted product.
Part 196 - Kettelny seam. Registration of a mouth.
197 - Knitted trim. Journal Knitted piggy bank № 7 2013 Knitted finish
Part 198 - How to Knit Button Holes
Part 199 - English gum two-color, circular knitting.
Part 200 - elastic neat shoulder (and not only) seam
Part 201 - knitting lessons (in pictures)
Part 202 - How to assemble knitted items (stitches)
Section 203 - Knitted stitch with blind loops when joining webs
Part 204 - making holes for buttons on slats connected * with a hollow * elastic band
Part 205 - How to make a hole for buttons knitting one row
Section 206 - Kettelny Stitch
Part 207 - Relief shoulder seam MK from ENIKI BENIKI
Part 208 - Types of stitches in the assembly of knitted products
Part 209 - We decorate the edges of the fabric with crocheted lace.
Part 210 - Kettelny seam, knitted seam
Part 211 - Video. Knitting for beginners. Gum
Part 212 - Knitted stitches
Part 213 - Button Holes
Part 214 - finish - typesetting edge with scallops
Part 215 - We sew. How to properly handle knitted motifs before stitching
Part 216 - connecting seams
Part 217 - Recommendations for the assembly of knitted products 1
Part 218 - Recommendations for the assembly of knitted products 2
Part 219 - Double or hollow gum (master class)
Part 220 - how to sew a product invisibly, crocheted? video
Part 221 - A little more about knit stitches. Loop in loop and kettle
Part 222 - Buttonholes in the products, crocheted
Part 223 - Crochet hollow gum edge
Section 224 - shoulder seam
Part 225 - How to make a hole for buttons knitting one row
Part 226 - Some knitted stitches. Video
Part 227 - Utility ... classification of yarn, stitches, loops, fringe, etc ...
Part 228 - Types of typesetting edge. Master Classes part 1
Part 229 - Assembling the product: mattress, longitudinal and shoulder seams ... seams * stitch *, * loop in a loop *, shoulder ...
Part 230 - buttonholes and pockets in a knitted product
Part 231 - MK knitting cord
Part 232 - Method of putting beads on with wire
Part 233 - Knitting with beads. MK
Part 234 - knitting with beads with beads
Part 235 - Wrapping Methods
Part 236 - Button Loops
Part 237 - Compound knitted fabrics by the method of * grafting * video
Part 238 - The connection of seamless knitted fabrics: grafting. MK
Part 239 - How to Tie Beads
Part 240- Invisible seam for stitching knitwear. Very simple.
Section 241 - Knitted Stitch
Part 242 - Free closing gum loops 2 * 2. video
Part 243 - Gear edge MK
Part 244 - Making stitches in knitting. Lessons, explanations
Section 245 - Closing the loops with a kettel suture
Part 246 - what you did not know about the assembly of knitted products
Part 247 - How to treat the edge of the product with a hollow cord (I-cord). Video
Part 248 - knitting lessons
Part 249 - How to sew a shoulder video
Part 250 - How to tie a hollow gum
Part 251 - closing needle 1x1 gum
Part 252 - closing needle 2x2 gum
Part 253 - Connecting a 1 x 1 gum along vertical edges
Part 254 - Sew on the edge of the knitted fabric secret stitch, zigzag stitch and stitch * fish bone *
Section 255 - Shoulder stitching for those who do not like to sew
Part 256 - Sew inconspicuously kerchief. Video
Section 257 - Knitted stitch * loop in loop * for dressing and gum. Connecting equity and transverse canvases
Part 258 - Learning to Knit
Part 259 - More about the hook seams
Part 260 - Transition from a 2x2 gum to a 1x1 gum. Closing loop gum needle. Master Class
Part 261 - Elastic edge gum-like in the store!
Part 262 - Stitches, elastic bands, loops, strapping, folding edge, etc.
Part 263 - How to knit knitted parts without an additional thread
Part 264 - edge with open loops. 3 ways
Part 265 - How to run knitted stitches
Part 266 - how to vyvyazyvaniya holes for buttons. Part 267 - how to vyvyazyvaniya holes for buttons. Part 2. 6 video
Part 268- Closing a gum needle
Part 269 - Closing the loops with a needle using a knitted stitch
Part 270 - Tied up! - And how to sew?
Part 271 is an interesting way to connect knitting details ... this is the first time I meet ...
272 - Knitted cords and decoration
Part 273 - Neck and Cuffs - Trim
Part 274 - Encyclopedia of knitting. The best knitting book
Part 275 - Assembling the product: a set of slats, a set of loops
A part 276 - Decorative reduction of loops in an elastic band 2х2. Video
A part 277 - we close loops of an elastic band by a needle
Part 278 - School of knitting (many lessons of all kinds)
Part 279 - Book: Learning to knit easily and quickly. Illustrated courses on knitting.
Part 280 - The Magic Tangles of K. Busse, Basic Knitting Techniques, Assembling, Tips
Part 281 - Master classes on knitting: knitting needles, hook fork
Part 282- Knit knitting, MK for every taste.
Part 283 - 100 knitting lessons
Part 284 - How to knit loops with needles. Video lessons
Reel 285 - Vertical Edge: Slats and Places
Part 286 - Secrets of craftsmanship when knitting
Part 287 - learn to knit-video lessons part 2
Part 288 - Video Lessons Catalog: Learning to Knit Part 1
Part 289 - Needle Closure last row rubber bands
Part 290 - ABC knitting M.V. Maximov
Part 291 - Online tutorial on knitting
Part 292 - tutorial on knitting
Part 293 - Knitting Technique and Tips for Needlewomen (Much)
Part 294 - Free loop closure (elastic 2 * 2)
Part 295 - Walker on the cords
Part 296 - Chinese knots
A part 297 - still braids from a cord
Part 298 - Clasp - Hooked Keyboard
Part 299 - video about cords
Part 300 - Connecting the cord - interesting!
Part 301 - weave a beautiful knot
A part 302 - weave a bracelet from a cord
Part 303 - Beautiful wicker handle for a knitted bag * Solomon strip *
Part 304 - A rare way to crochet lace
Part 305 - How to turn beautiful knots
Part 306 - original crochet cord
Part 307 - How to Tie a Hollow Cord (I-CORD)
Part 308 - How to tie cords on knitting needles
Part 309 - green belt - weave
Part 310 - Knitted cords
Part 311 - All of the Cords
Part 312 - Seamless knitwear blend. MK
Part 313 - how to sew a crocheted product invisibly. video
Part 314 - Double crochet chain. Video
Part 315 - Stacked edge in the form of a cord
Part 316 - Neat crochet placket (YK from MK - Evgenia Thermal)
Part 317 - Crochet Video Tutorials: How to Tie a Ring, Flowers, Loops, etc.
Part 318 - Combined insert on the skirt. Knitting + leather Masterclass. Author: Savelieva Antonina.
Part 319 - Combining fabric (leather) and knitting.
Part 320 - How to tie a cloth or leather yarn
Part 321 - Crochet Belt
Part 322 - lessons on knitting and crochet
Part 223 - Crochet Eraser
Part 224 - master classes
Part 225 - Crochet hollow gum edge
Part 226 - Buttonholes for crocheted products
Part 227 - How to tie a narrow vertical strip on the finished canvas
Part 228 - Crochet beads with flat linen. Master Class
A part 329 - the Way of knitting with beads, sequins.
Part 330 - Crochet with Beads (MK)
Part 331 - Knitting with beads for beginners (small MK)
Part 332 - technology irish lace using beads.
Part 333 - Very Interesting Crochet Lessons
Part 334 - Crochet loops stitches (under the fur)
Part 335 - Strapping * Magnificent Plover Step *
Part 336 - A good idea: how to insert a zipper into a crocheted product
Part 337 - pendant from the cord. Master class + video
Part 338 - Color knitting: two-tone harness and two-tone English gum
Part 339 - Tying the edges with a zig-zag hook. Video
Part 340 - Original patterns * bumps * and * corners * - finish
Part 341 - Crochet trim - SHELL * pattern *
Part 342 - Designer Knitting
Part 343 - Blouse with Irish lace stitching (trim)
Part 344 - Manual seams: new options
Part 345 - a workshop on creating fasteners ...
Part 346 - Knitted cords and Romanian lace. Video
Part 347 - Ruches
Part 348 - Crochet rim
Part 349 - Strapping the edge of the product. An infinite number of options with schemes!
Part 350 - Cherry Belt
Knitted products will have a finished look and look even more beautiful if its edges are decorated with decorative strapping. Crochet edge trimming is used for a beautiful design of the neck, armholes, collars, jacket jackets, cuffs, bottom of the product. In order to strengthen and weft ruffles and flounces, they also use edge strapping. In this article, to help knitters selected design schemes for the fringe of various kinds of products.
Be original! Use different patterns to achieve the most amazing results in your products!
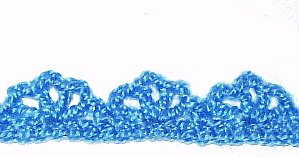
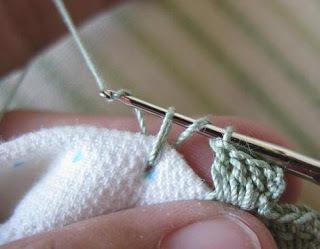
The most popular of the straps is considered the “pitch” scheme. In the photo below you see how the edge of the product, decorated with this strapping.
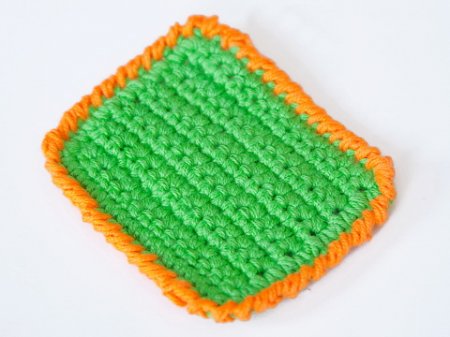
This crocheted edge of the product is done from left to right. Enter the hook into the last loop of the previous row, grab the new thread and pull the loop. Next, knit 1 air lift loop. Then we enter the hook into the loop, which is located to the right of it, grab the thread and pull out a new loop. Now on the hook 2 loop as if twisted among themselves. Again, grab the thread and knit these two loops together. Then repeat the same steps again. More in the video tutorial.
In boutiques we are so often impressed with lace dresses made of thin threads in shop windows! But few people know that such dresses, and even better, are crocheted in one or two evenings by an inexperienced craftswoman!
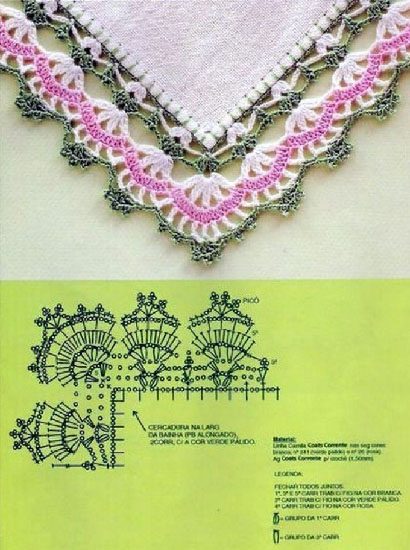
Towels, handkerchiefs, whose edges are crocheted independently, look very beautiful and original. For this design of the edges of the product, openwork trimming of the edge with a hook is used (the diagram below).
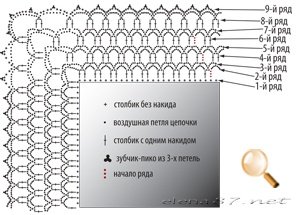
Description of the sequence of execution of openwork strapping.
From * to * - repetition of the motive.
1 row. All loops knit b / n column.
2 row. 3 vp lifting, * s / n, a chain of 2 vp, s / n, a chain of 7 vp, skip 1 loop of the previous row. On the corners of the knitted product between the double crochets, knit a chain of 13 sec. The last chain of 7 vp connect with the first s / n.
3 row. * 1 tbsp. b / n knit in a chain of 2 loops of the previous row, a chain of 4 ce, art. b / n in the middle of the chain of 7 vp, chain of 4 vp * In the corners, knit in the middle of the chain of 13 ce 2 tbsp. b / n Between the columns b / n in the corners tying 3 chains of 5 loops.
4 row. Knit as 2 row.
5 row. From * to * knit like 3 row. In the corners to knit 3 chains of 6 inc.
6 row. From * to * knit like 2 row. In the corners between the double crochets, knit a chain of 15 ce.
7 row. From * to * knit like 3 row. In the corners - 3 chains of 7 inc.
8 row. 3 vp lifting, * s / n, a chain of 2 in. p., * In the corners between the double crochets, knit a chain of 17 in. p.
9 row. Chains of 8 vp knit like this: 4 tbsp. / n., picot, 4 tbsp. b / n., picot, 3 tbsp. n / a., picot, 3 tbsp. b / n
The result, which should get you see in the photo.
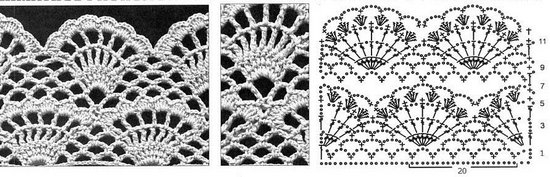
This is a woman’s wardrobe thing that is loved, honored and passed down from generation to generation. She is able to decorate and complement the outfit of a woman. Great look shawls, decorated strapping of arches air loops. To bind this type of strapping is possible even for a beginning woman. In the photo you can see the strapping scheme and the photo of the shawl itself.
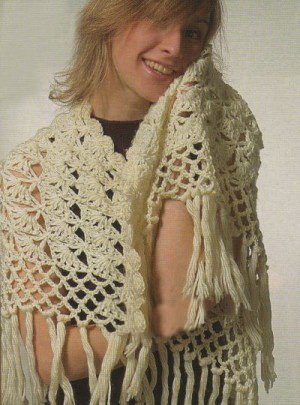
The highlight of the shawl can be a fringe of long threads. But this is a matter of your taste.
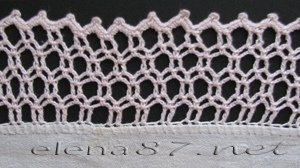
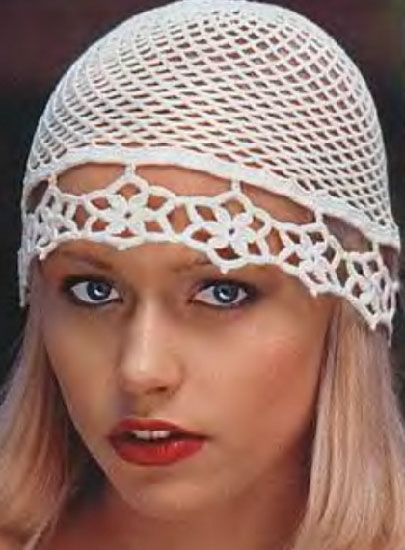
They look more fun and original if their bottom edge is decorated with such type of strapping as festoons. Looking at the following photos, you will see that festoons give a special charm and appeal to women's hats.
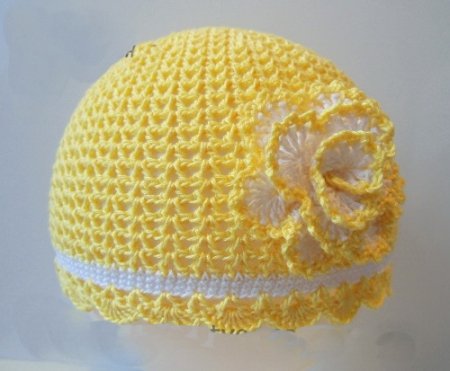
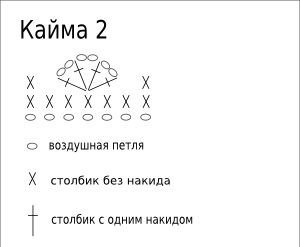
Decorating the edge of the cap in the form of festoons is not at all difficult. We offer to your attention a version of this strapping “Openwork festoons”.
Dial loop number multiple of 6. Knit in a circle.
1 row. Bars b / n.
2 row. * 1 tbsp. b / n, skip 2 stitches of the base, 4 s / n into the next stitch of the previous row (between knots, knit 2 VP each), skip 2 stitches of the base. *
The pattern continues from * to *. Row finish connecting loop.
Our master class for beginners comes to an end, and you can find video tutorials below. We wish you success and inspiration.
Neck:
As you can see, not everything is so difficult, the main thing is to diligently approach the knitting process. In addition, you can come to the rescue. step by step workshopsin which it is in detail told and shown that, how and where to knit, for example, our article. Be patient and forward to the feat!
The skill of crocheting a few decades ago for a woman was considered as necessary as the ability to read or write. And this is not accidental, because knowledge of the rules of weaving the eyelets allows not only to create beautiful products, but also to add special charm and elegance to ready-made outfits or decorations. Therefore, in our days, information on how to crochet the edge of a product will help bring originality to many things.
One of the last stages of the creation of products from yarn is tying the edge. It would seem that this is such an insignificant moment compared to knitting a whole web! However, an inaccurate region can ruin the whole impression even from beautiful pattern. In addition, if we neglect the binding of the finished product, it can simply dissolve during operation. Also, several crocheted rows can:
All these problems are easily solved with the help of correctly selected yarn and hook - a real magic wand.
One of the most simple patterns for strapping is « Rachy step» . To perform it, you need to insert the head of the hook into the first right loop, but for the knitting direction, from the left side to the right. The hook is inserted into all edge loops. They are tied with a single column, in the corner - triple. Especially beautiful this pattern looks on the threads of a contrasting shade. This type of strapping is convenient for functional things (mittens, for example), which are actively exploited.
For products that are tied for decorative purposes, suitable arch of air loops.
Such a picture must be made free, otherwise the product will twist and contract.
Another type of decorative trim - pico Pattern.
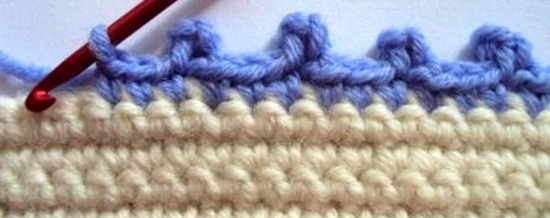
To give a pattern of originality, you can weave beads or buttons into it. You can also vary the frequency of openwork chains.
More difficult option - harness "Shell", giving the edge a rounded shape. In order to knit it, you need to knit several stitch columns in one loop of the base. It is important to consider one thing: before and after each shell you need to skip as many loops as there are in each column. Then the pattern will be smooth.
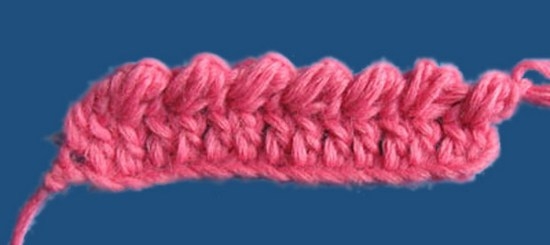
Fans of intricate designs will love it. pattern "Lush columns". Only for him need thicker threads.
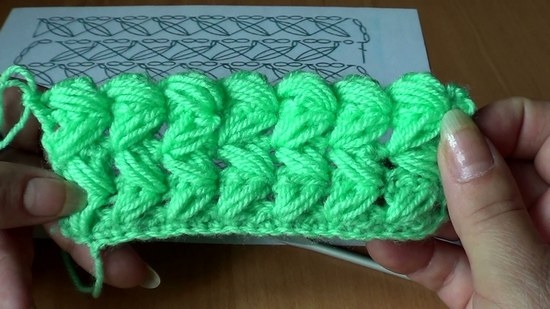
All the above schemes can be made multi-tiered by repeating the same patterns or combining them.
In order for a binding to be aesthetic and functional, it is necessary to take into account some recommendations:
Beginner lovers knitted things that create their own, dedicated. Today I want to show you how to trim the edge with a hook, and Lyubov Titova, who has repeatedly introduced us to her works, will help me in this. With her, we knit, take and.
Four schemes are presented to your attention and descriptions are given that will allow you to understand how to tie up the product and get an original pattern for decoration. The simple schemes were specially chosen so that the aspiring skilled worker could understand everything in detail.
Tying the edges will give any garment originality and some mystery. Sometimes it happens that the favorite knitted thing still looks beautiful and stylish, but still there is the impression that something is missing in it. It is in this case that you can use this way to improve clothes, such as decorating the edges with a crochet, the schemes for which we will look at in detail in this article. You just have to choose the right one and bring it to life.

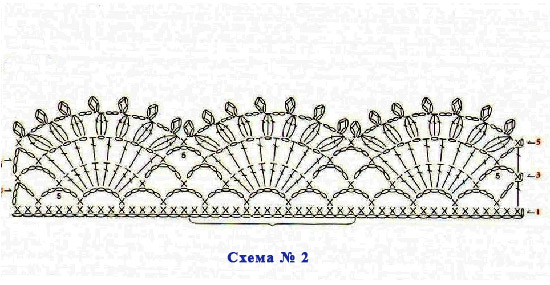
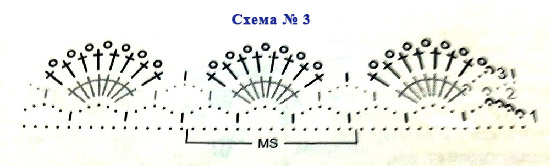
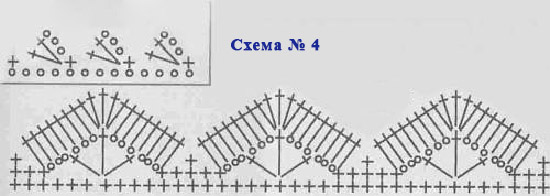
Immediately it is worth noting that the first, third and fourth schemes above are simpler and are more suitable for strapping dresses, jackets, napkins, tablecloths, perhaps curtains. The second scheme is more complicated. This kind of binding can be used for a stylish cardigan.
So, arm yourself with the information given in this article, and you'll know everything about crocheting a product simply and quickly enough. Having learned to make such elements you can easily decorate with openwork hats and scarves, tablecloths and towels, shawls, blouses, skirts, etc. You will see how the appearance of the product will change and how it will become attractive with such a knitted decor.
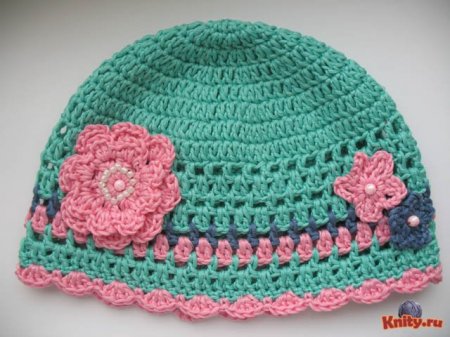
Take a look at this cap for an example. True, unusual?
Or here on such options of a pattern, each of which can decorate the edge of a knitted garment or tableware (clickable).
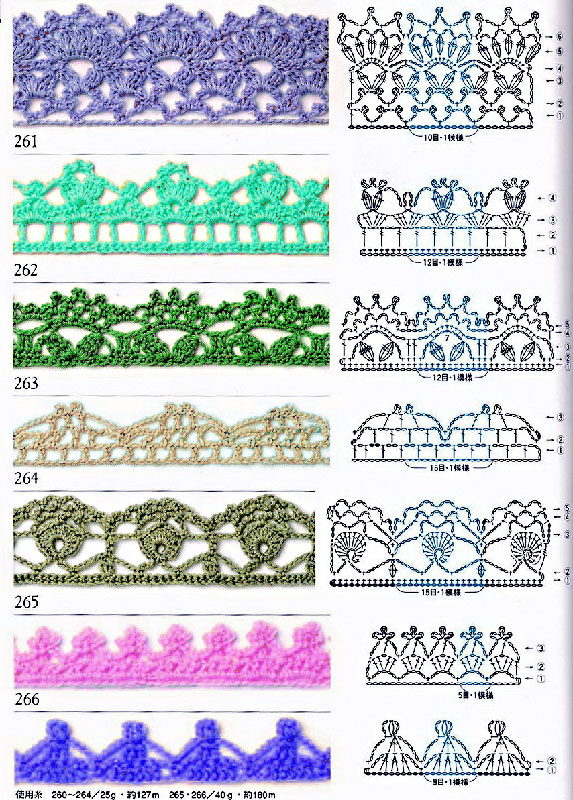
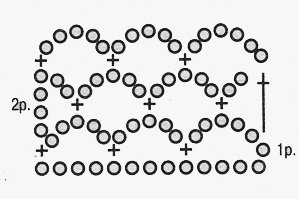
Let's consider in more detail the mechanism for creating a beautiful binding using the example of the first of the above schemes.
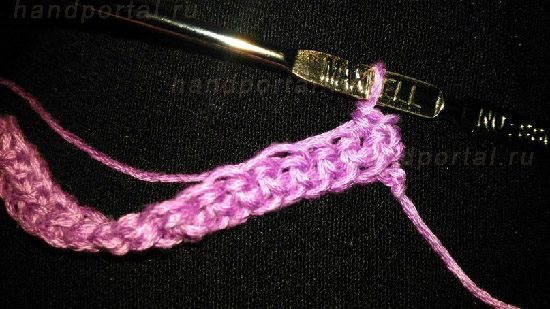
Need to start with provyazyvaniya first row. First you need to dial a number of air loops (rapport in this case will be 22 loops). In the fifth air loop of the chain created, you need to knit a single crochet by repeating the specified algorithm until the end of this row.
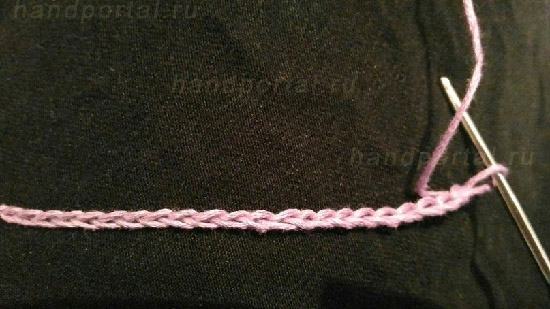
Knit sc.
![]()
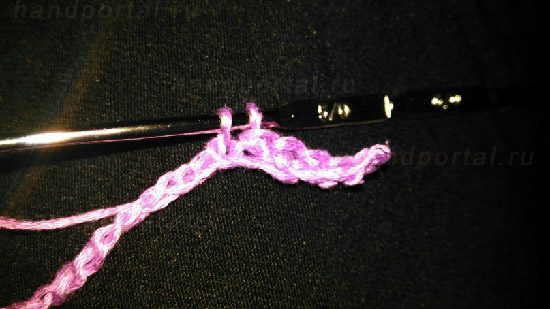
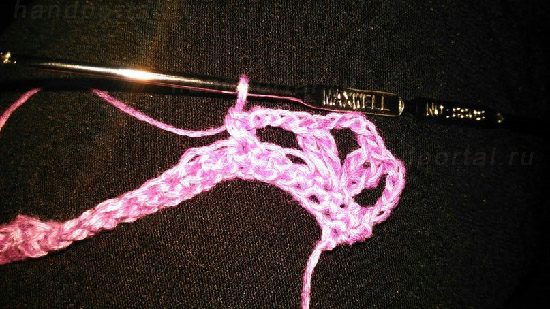
Now turn to the implementation of the second row. To do this, turn over knitting. The first element that will need to be done in the new row is one column without single crochet.
After that, collect four air loops, knitting in the third column (without nakida), which is in the previous knitted row of elements. Then the sequence of actions is as follows: two columns with one crochet are tied, then two air loops, again two crochets. Next, you need to create four air loops, and in the third loop of the previous row knit one column without single crochet. The result should be such arches.
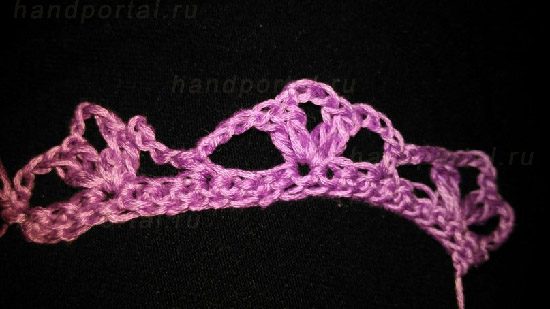
Then everything is repeated in the same way until the element is completed. You will have such a knitted finish for your product - napkins, tablecloths or something similar.
And here is the binding under the scheme number 2.
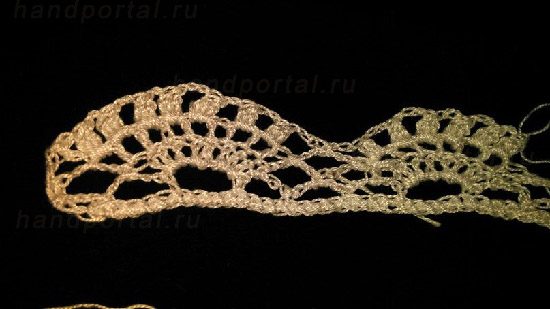
In general, everything is quite simple, you only need to devote some time to the analysis of the scheme itself. Very little effort and the edges of clothing or any other knitted item will gain a beautiful decor with your help.
Tying the edge with a crochet, the scheme with the description of which we gave in the example, is a simple process to execute. Starting with the incarnation of more simple circuits, you will easily cope with even the most difficult ones in the future. Good luck!
Thank you knitter for her story and detailed description the entire process of creating a binding. I think that this information will help beginner masters to take another step in mastering knitting skills. That's all, see you!
Faced with the need to design the edge of the product, a knitter can detect several problems: tying the edge or vice versa, it looks like a “skirt”;
It should be noted that such a task requires patience and compliance with several rules. This article contains a definition of what is crocheting the edge of a product, diagrams describing and general patterns.
Of course, we are talking about the design of canvases connected by hand. Strapping is required to make the neck, open armholes, cuffs and bottom garments look decent.
The first row in such cases should always include only single crochets (STBN). The following proportions should be considered:
However, when processing fabrics consisting only of StN, one should be careful that the strapping does not turn out to be too wide and stretched. Sometimes alternation of two STBNs and one STBN (instead of knitting two STBNs in each loop) helps.
Many craftswomen are attracted to such a scheme with a description of a simple openwork border suggested below. It is suitable for handling towels, napkins, tablecloths, pillows and other items:
To arrange the corners, you will need an unusual crochet edge trim. Diagrams with a description of smooth ornaments, below, are suitable only for straight sections.
To or the lower edge of the shelf, you need an angular pattern. With a certain experience, the craftswoman can independently make a suitable pattern from the material that is at hand. 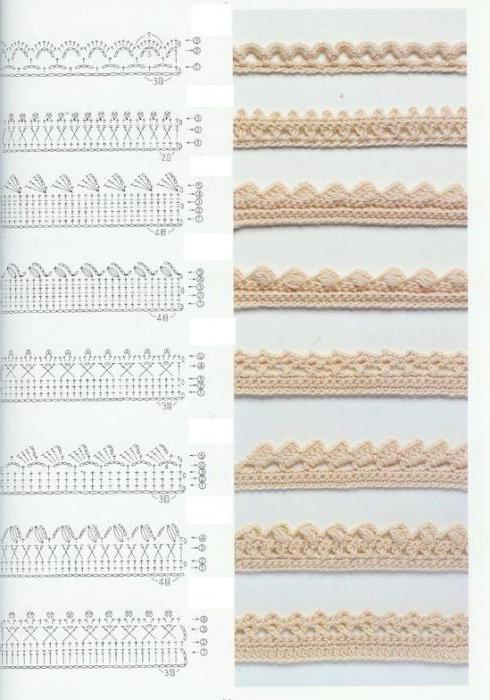
This may require strapping of the edge. Schemes with a description rarely include corner blades, but from the position you can draw as follows:
There is another way how a crochet edge can be tied. Schemes describing only wide patterns can be performed by this method: trim strips are cut at an angle of 45 degrees and sewn. This method is suitable solely for the registration of right angles.
A crocheted edge trim is considered optimal. Schemes describing almost any pattern suitable for such work. The convenient factor here is that you do not need to calculate the length of the first row, therefore, the probability of error is lower.
Also, they often resort to sewing bound separately rims. This method takes more time, but the problem with the stretched or too loose canvas disappears. You can sew manually or on a sewing machine, the main thing is that the product looks neat.
| Related articles: | |
|
Heavy tongue in mouth. Burning mouth
Dry mouth - in medicine is called xerostomia, it is a symptom ... Bitcoin mining: everything you need to know for beginners
Many users experience familiarity with digital currency ... How to choose the color of varnish to clothes?
Selection of lacquer color is not a simple matter, because its shade should not only | |


