Reader's Choice


Popular articles
Good day, dear friends!
Today's article is likely to be useful for beginning knitters. Seasoned needlewomen, perhaps it will be boring. Although, how to know? As they say, everything ingenious is simple, and if you consider how many combinations of knitting patterns you can come up with in combination with simple ones, then I am sure that simple patterns deserve attention.
From this article you will learn:
So why are these patterns considered the simplest? Because they do not differ in complex patterns and their usually consists of 2-4 rows and 2-7 loops. So if you are a beginner knitter, and you have certain difficulties when reading and playing back diagrams and descriptions of patterns, then these knits will suit you perfectly.
Moreover, they look great on knitted things, and you can safely apply them when creating your first masterpieces. Moreover, in recent times simplicity and minimalism can be traced in a knitted fashion in relation to patterns and knittings.
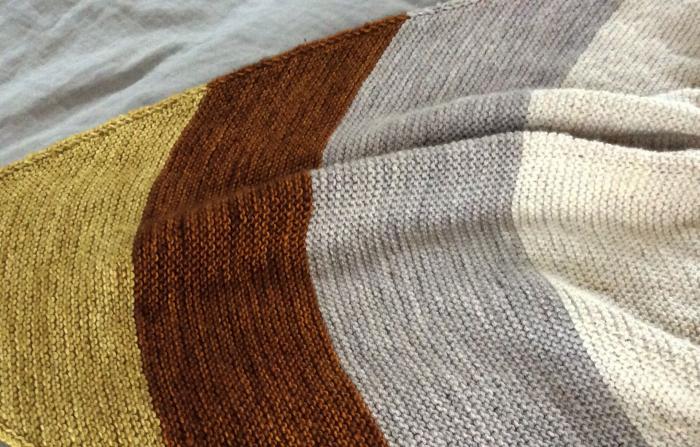
Also often use simple patterns for knitting blankets, blankets, covers on decorative pillows from thick bulk or multi-twisted yarn. And I must say that these things look good.
Although for me personally, as a knitter, for some reason, I am more drawn to “create” with more complex patterns, or to combine, to combine them with simple ones. Often, a complex pattern on the background of a simple background image, or in combination with it looks more advantageous, richer.
There are a lot of simple knitting patterns for knitting. But in this article I will focus only on the most common. So, get acquainted:
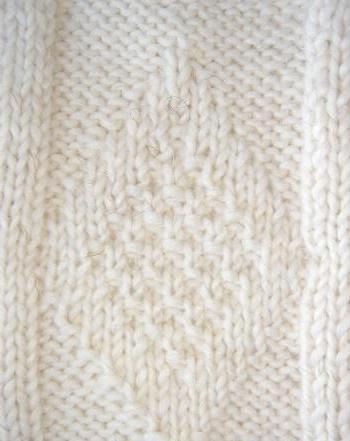
This pattern is suitable for any yarn, but it looks better with tight knitting and thick threads. The thing connected by a “small rice” pattern in combination with braids, harnesses looks just gorgeous! Although you can apply this pattern and completely as an independent, especially when using high-quality multicolor yarn.
ATTENTION! In all descriptions of the patterns, the combination enclosed in between the characters * is repeated to the end of the series.
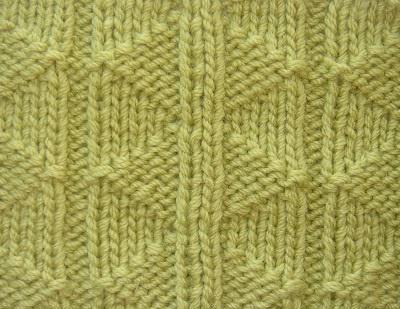
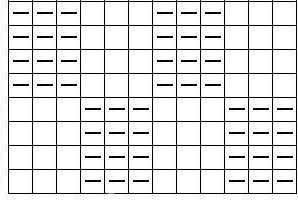
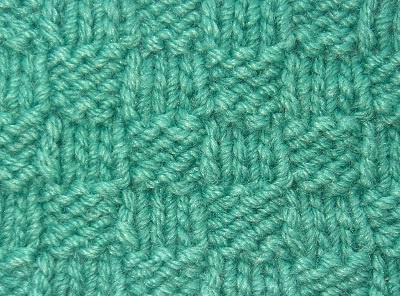
chess 2 by 2
chess 4 by 4
The above simple patterns refer to the category of embossed patterns for knitting, i.e., those that are fairly dense and, when performed, are used, as a rule, only facial and back loops.
I want to say about one feature of the most simple embossed patterns. The paradox is that the simpler the pattern, the better and smoother the yarn should be so that the knitted fabric looks neat.
Now consider the popular light patterns from another series - gum. The simplest "1 to 1, and" 2 to 2 "- are most often used when finishing knitted products. In the first case, 1 facial and 1 purl loops alternate, in the second - 2 facial loops, 2 purl loops. We knit each row, it looks like a knit, that is, we knit facial on the face, and on the back of the purl there are purl loops.
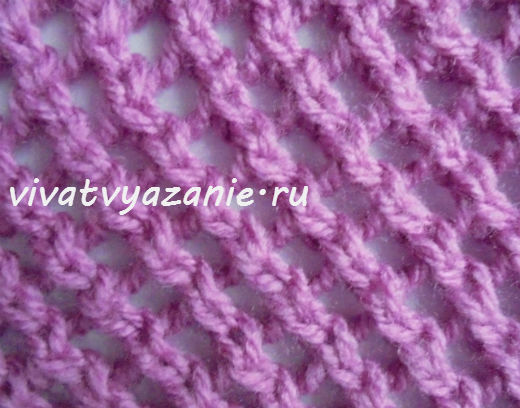
From my openwork patterns, in my opinion, some of the most simple and ideal for beginning knitters are:
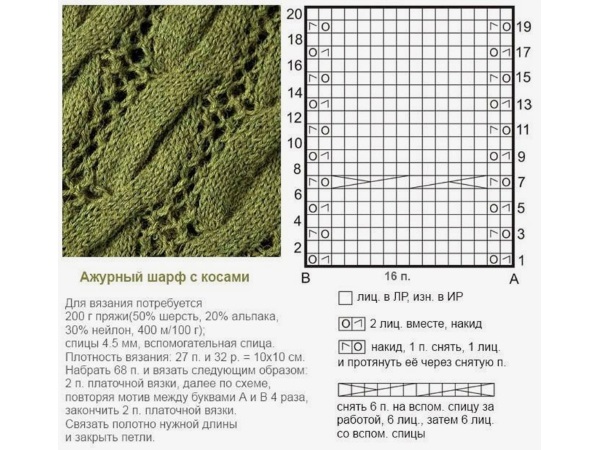
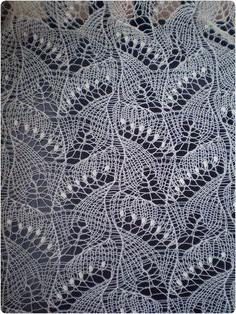
Description of the pattern "Snakes":
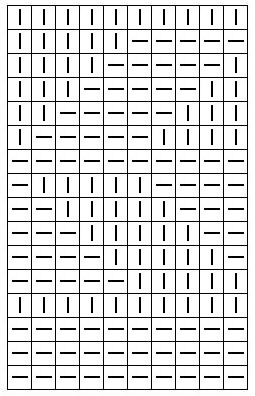
Rapport pattern consists of 4 loops and 4 rows.
1st row: * 1 out., Nakid, 2 knit together the front with a tilt to the left, 1 out. *;
2nd row and all even: * 1 person., 2 external, 1 person. *;
3rd row: * 1 out., 2 knit loops together face up with a slope to the right, 1 out. *;
5th row: repeat pattern from the 1st row.
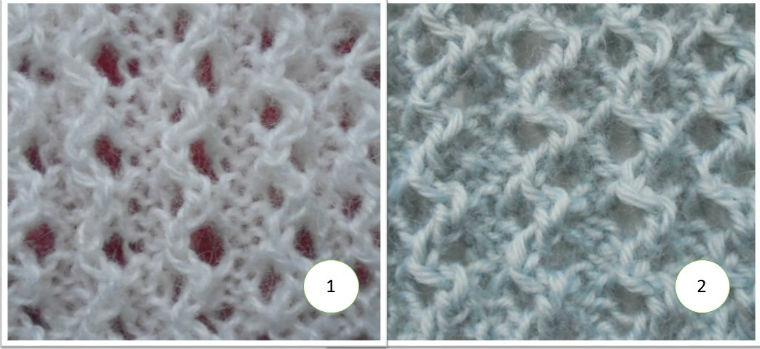
*Note: This pattern can be knitted in a different way - each time 2 loops together with the front knit with a tilt to the left. In my opinion it turns out not less beautiful, and even a little more magnificent. Compare photos 1 and 2.
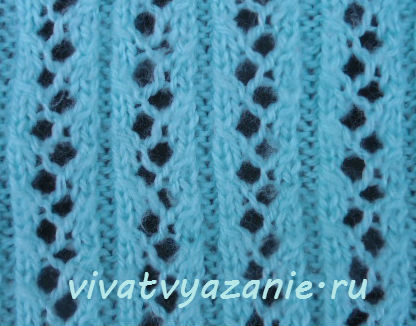
We collect an even number of loops.
1st row: 1 person., * Nakid, 2 loops knit together the front with a tilt to the left *, at the end of a row of 1 person .;
2nd row and all even rows: purl loops;
3rd row: * nakid, 2 loops knit together the front with a slope to the left *;
5th row: repeat from the 1st row.
*Note. This mesh goes well with stocking. Tie, for example, the bottom of the front and back of the hosiery blouse (front stitch), and the yoke and the sleeves of this mesh - and see what a chic thing you get!
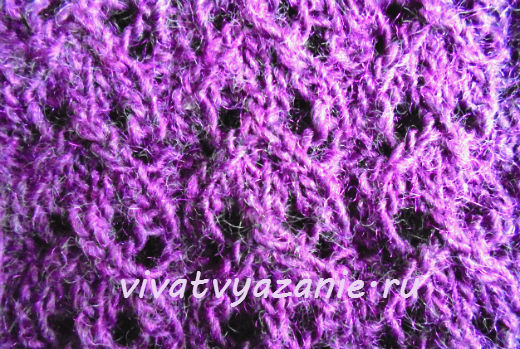
Rapport pattern consists of 6 loops and 4 rows.
1st row: * 1 out., 2 persons., Nakid, 2 loops knit together the front with a tilt to the left, 1 out. *;
2nd row and all even rows: * 1 person., 4 ex., 1 person. *;
3rd row: * 1 out., 2 loops knit together the front with a slope to the right, nakid, 2 faces., 1 out. *;
5th row: repeat from the 1st row.
Rapport pattern consists of 7 loops and 6 rows.
1st row: * 1 out., 5 persons ... 1 out *;
2nd row and all even rows: * 1 persons, 5 external, 1 persons. *;
3rd row: * 1 out., Nakid, 2 loops knit together the front with a tilt to the left, 1 person., 2 loops knit together the front with a slope to the right, nakid, 1 out. *;
5th row: * 1 out., 1 person., Nakid, 3 loops knit together the front (remove the first loop on the right knitting needle unlearned, 2 next loops knit together the front one with a slope to the right and stretch through the removed loop), nakid, 1 persons. , 1 dem. *;
Knitting - creativity, creation and pleasure. The decorative possibilities of this needlework make it possible to make a variety of wardrobe parts from yarn: clothes and accessories to it.
Knitted things are comfortable, practical and elegant. Knitted clothes out of fashion - they always attract the freedom and unobtrusiveness of bulk decisions and soft forms. Moreover, thanks to the ability to knit, we can become the owners of original and unique things. Perhaps that is why today many women seek to learn to knit. Let's try to learn the basics of this magical art, offering to disassemble some types of knitting with knitting needles. Photos of these samples are presented in the article.
The basis for the manufacture of knitted fabric is the initial row. Even the simplest types of knitting needles begin with it. Of existing ways a set of loops consider the most common. We throw the thread on the index and the thumb of the left hand. Its tail and the end of the ball are located in the middle of the palm and adhere to the rest of the fingers. To prevent the row from being unnecessarily tightened, we make a set on two knitting needles: we insert them into the loop at the thumb under the thread draped over the index finger, grab it and stretch it. Release your fingers and tighten the loop. The remaining loops are typed in the same manner. After the set is carried out, one needle is carefully removed.
Dialed loops consist of front (on the front side) and back (behind the spokes) walls. Surprisingly, all types of knitting needles are based on two main loops - front and purl. Combining their combinations and knitting methods, they get a lot of various patterns. Any drawing consists of a repeating part (rapport) and which are not included in its description. Edging - this is the first and last loops corresponding to the height of two rows, since the first, as a rule, is not knitted, and the last one for convenience is carried out in reverse.
The front loop is knit like this: we start the right needle into the loop, grab the thread under the left needle, and pull it towards us. The new loop remains on the needle on the right, the remnants of the knit are dropped from the left needle. No knitting needles can do without a facial loop. Not inferior to her in significance and purl. It fits like this: we start the right needle into the loop above the left, grab the thread from the top right and pull it away from us. The front and can be knit for the back wall, which is behind the knitting needles, getting new patterns of crossed loops, characterized by a special density. Nakid - the simplest loop. It is obtained by one movement of the thread, thrown on the right needle. We have listed the main loops and techniques for knitting them, now we will consider simple types of knitting of knitted fabric.
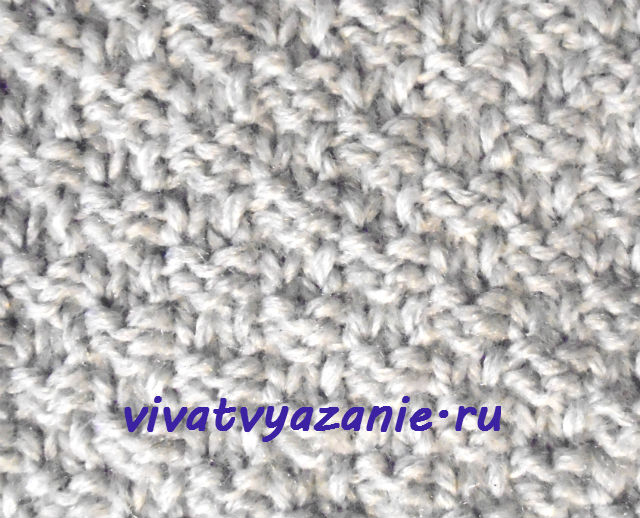
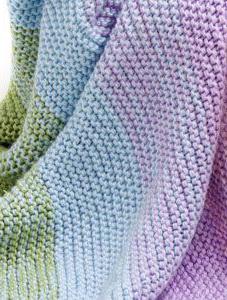
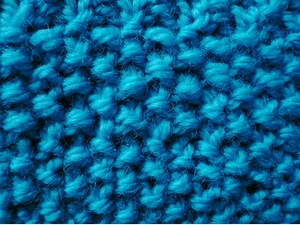
The simplest elastic viscous is the garter, which is performed only with facial loops and forms a double-sided canvas - the same from the face and inside. It is most common and convenient for beginning needlewomen. Despite the simplicity of the pattern, this simple knitting with needles is quite effective in the performance of blouses, booties, socks and is used quite often.
Stocking is less elastic and half thinner than a garter. This is a one-sided canvas, obtained by alternating rows of facial and purl loops. Not very elastic, it lends itself well to stripping and perfectly combines with various types of weaves. The simple hosiery knitting when done in a circle is done only with facial loops. When knitting loops behind the back walls, you can get an elastic hosiery fabric that is denser than usual. Often becomes the basis of a knitwear.
Alternately, the execution of the front and back loops creates different types of rubber bands or eraser. When knitting an elastic band of 1 x 1, one loop is alternated, in the manufacture of 2 x 2, two each, etc. The pattern from the first row repeats in each row and continues to the required height according to the pattern. The most prominent and dense are elastic bands connected by crossed loops. For example, gum 1 x 1:
So you can create other types of rubber bands. These types of knitting needles are less stretchable, do not lend themselves to deformation, which increases the quality and durability of the completed eraser. Hollow gum can be used as a bracket. It runs like this: 
The use of nakidov in knitting gum opens up great prospects in the use of knitted fabrics. They look great not only as an eraser, but are also good as the main motif of the product, since it is quite a spectacular large knitting needles.
Convex gum:
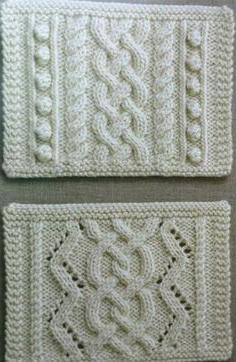
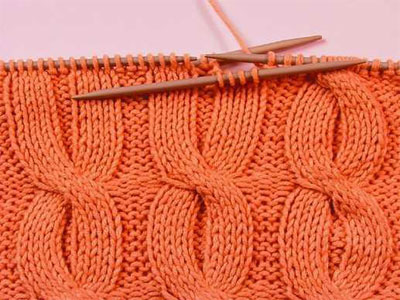
The performance of simple braids and simple Arans is also possible under the novice needlewoman. Usually they are performed with facial loops on the purl. In this way, a large knitted fabric is achieved. For knitting braid is disassembling the loops on the selected pattern. A simple variation of them is done by interlacing the two halves. For example, a spit of 6 loops is knitted like this: 3 loops are removed on an additional knitting needle and are put to work, then the next three loops are knitted, then - three loops with an additional knitting needle. The height of each link is determined by the master. Knit given number rows, braid intertwined again. Similarly, diamonds, braids, aranes, various stalks and snakes, i.e., all the facial fragments on the back side of the field, are knitted. These are quite complex drawings, the implementation of which will require strict adherence to graphic schemes, which can be found in various needlework magazines. The made braid or intricate curls of the author's aran are large knitting, embossed and at the same time elegant, used in cardigans, jumpers or vests.
Special attention from needlewomen always enjoyed openwork knitting. Graceful and incredibly beautiful patterns based on a mathematically accurate calculation. Of course, the beginning master is difficult to cope with knitting a weightless openwork shawl. But it is quite possible to decorate the bottom or the sleeves of the product with an uncomplicated pattern - flowers of 6 nakida, arranged in a circle.
Lace knitting with knitting is a complicated technique, which consists in the fact that one subtract is necessarily opposed to each performed nakidu. As a rule, it is carried out by knitting two loops into one to keep the same number in the canvas. For beginner practitioners to practice, you can knit a small scarf or tippet with a simple openwork pattern. For example, we do a nakid, we knit two loops with one, 3 facial ones, etc. The purl row is performed with the purl loops.
Types of knitting knitting needles, schemes of which are presented in the article, are different in terms of texture and methods of implementation, but all will require patience and endurance. The apparent simplicity and even lightness of this craft is deceptive. To learn to knit beautifully, you should make a lot of effort. True, they will be rewarded a hundredfold, because the possession of a unique wardrobe, created with his own hand, greatly enhances self-esteem and causes some envy of her friends.
If you take a thing like knitting needles in your hands, then you can tie up with your own hands a whole collection of various patterns, which are then used to create wardrobe items - both for yourself and for close people. It is worth knowing that the story comes from time immemorial. It remains unknown the name of the first person who invented how to knit fishing nets, also disappeared into eternity the identity of the comrade who first noticed that with the help of the same loops you can make clothes for yourself. Unfortunately, the name of this genius was lost, otherwise he would have erected a well-deserved monument long ago.
But people very quickly picked up such a great idea. There are a lot of drawings, so any person will calmly choose the one that he likes most. Choosing a pattern for knitting, a master with the help of only one, but using different threads, can make completely different products. For example, scarf, and other similar items. However, despite the ease of this type of hobby compared to crochet, needlewomen say that if a person first picked up the needles for the first time, and had never been able to do it before, he first needed to learn how to knit knitting needles for beginners.
It should be understood that the overly complex pattern of knitting is not necessary to take in the work, and begin with the most simple ornament.
In addition, there are some drawings that may be included in the group. Let's sound these groups in alphabetical order. Among them are the following types of patterns: openwork, jacquard, Irish, multicolored, patent, embossed, patterns of fine knitting, patterns with braids, patterns with ornament.
As the name implies, these patterns are simple. In order for a beginner to be able to easily knit simple patterns with knitting needles, he needs to master everything, that is, facial as well as purl. After all, all the other loops are knitted from the data. Next, you need to understand that basically, all patterns of knitting patterns use a combination of stocking knit and garter.
Hosiery knitting is also called and sometimes sometimes the facial surface. And some fashion magazines speak of it as a jersey. So if you meet such a designation, you will know what it is, and you will not suffer, not knowing how to knit patterns of this kind with needles.
To arrange a pattern, you should alternate the rows of purl and facial loops. If, then all loops are made according to the picture. At the same time, the garter knitting should be knit only with one kind of loops. When a man knits a shawl pattern with his own hands, he either makes facial loops, or purl. The craftswoman can choose the very type of loop, which is obtained from her best. When turning the product, the loops are knitted on the contrary, that is, in the even rows there will be facial ones, and in the odd rows, on the contrary, they will be purlid.
To master the process, try to link the patterns yourself, in which the following photos will help you.
Shawl - scheme on the photo
There are things that can be done and worn in the warm season or on vacation. How nice to walk on the beach in his own pareo! Let the rest suffer from envy, wondering where you got this exclusive. What about a scarf or blouse?
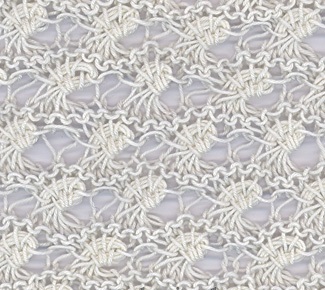
Openwork knitting pattern - an example
For the air-laced patterns will need a thin yarn. And in the drawing will be used nakida. Thanks to this, a canvas will look very similar to lace, which allows you to create a very beautiful thing. For greater clarity, we will try to produce a pattern called “ Sea foam". What we will help and manual knitting.
![]()
Pattern of openwork pattern
So that you can learn how to knit patterns, we suggest you follow the schemes below, which can be linked independently.
Needlewomen, who have long been engaged in this kind of hobby, are advised to start to make a small sample, and not just once, but several. When you have already made it, you can put it into any idea in knitting patterns.
In order to knit relief patterns, facial loops are used, as well as purl, and they go in a certain alternation. And for drawing sites are applied on a cloth - both convex, and concave.
At the same time, you should be aware that it is strongly not recommended to iron things, otherwise the relief may well lose its shape.
When a person creates such patterns when knitting, he should carefully look at the scheme, otherwise he can completely spoil the pattern.
The first we will go pattern, called pearl. With his help, you can knit a cardigan, a children's thing, a sweater for a man. It fit well enough.
Relief pattern
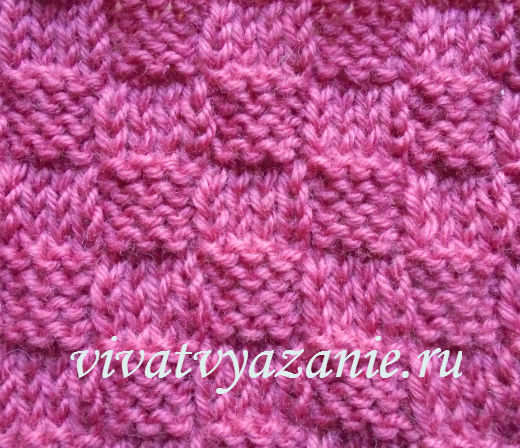
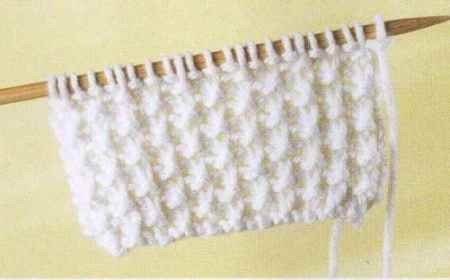
The pattern is divided into two types. Large, sometimes called rice or confused. Well, the second - small, it differs in that it is easier to knit than the first. In order to create such a pattern step by step, we first make a face loop, then a backside, when we turn the canvas, then we make a backside loop over the loop that was a face loop, and vice versa. The rice pattern is made exactly the same, but it will gradually shift. Therefore, when you knit rice pattern, pay attention to the scheme.
To create a rice pearl pattern, we take a string, execute a face. Loop, then purl. In row No. 2, the loops are swapped, first there will be a purl, and then the front one will go. The third line is again the same: where is the purl there is the facial, and where the facial is the purl.
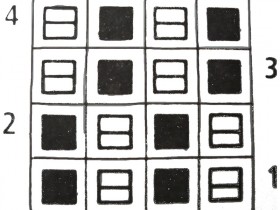
Rice pattern
Such a pattern really resembles honeycombs created by bees. The product is obtained in relief, delicate, voluminous, beautiful. Craftswomen are advised to first tie the sample, wash it, measure the density of the canvas, and then create this pattern. This is necessary because it has been repeatedly observed that the canvas can stretch.
To make a cell pattern, we need loops, and their number should be divided by two. The pattern is quite simple, so even people who first understand how to knit patterns can make such tasty honeycombs themselves:
Asterisks - beautiful pattern in knitting, with which you can create a sweater, cap.
First, we need to collect loops, and their number should be divided by 4, to this we need to add 2 loops, which will be edging.
It should be understood that it can be a canvas, so an asterisk is made a little bit freer than the other loops.
To independently make such a beautiful pattern, really similar to women's braids, we take, in addition to two spokes and another one that will be auxiliary, but it is slightly arched in the middle. This is done so that in the process of knitting the loop does not fall off of it. If you do not have such knitting needles, and you can not buy it, take a stocking.
There are many variants of braid patterns, while you can use these patterns not only for women's and children's clothes, but also for knitting a sweater to your beloved man.
In order to make a knitted braid with needles, take the classical scheme. In this case, we need the number of loops, which should be divided by 11, do not forget to add 4 loops, 2 for symmetry, 2 edge loops.
Knitting needles
For the picture we are looking at our scheme:
Such an interesting pattern will decorate almost any of your products - blouses, jackets, sweaters, hats, blankets or tablecloths. You can use bumps, so to speak, alone, or in combination with any suitable patterns. In fact, it is not as difficult as it may seem, and there are several ways to knit it.
In order for a person to understand how to knit knit patterns, use the following methods and step-by-step recommendations:
If you look closely at this pattern, it will remind you of the delicious and boiled corncob. However, it is a kind of cones. And for his knitting need to remove the loop. It is often used when some outerwear is knitted, for example, a coat, cardigan or something else.
To make a pattern, count the loops, the number of which must be a multiple of three, adding 5 pieces.
There is another way to knit corn, the scheme is quite simple. In the first row we will do as follows: 1 facial, 1 purl, Repeat. The second row - the front surface. 3 repeats from the first.
It should be understood that the jacquard and multi-color patterns are practically the same, but only the front smooth surface is used for jacquard patterns. And for multi-colored any kind of binding. There are multi-color patterns that knit easier than jacquard. And if you apply a new color, it turns out the elements are very winning and bright. See the video for details.
At the beginning of time, jacquard patterns were contacted only with the help of two colors. But now you can apply completely different shades to it. Jacquard looks like a beautiful tapestry. In this case, the Irish pattern is also Jacquard. For it is used stocking knitting. That is, where the facial hinges are the facial row. And, vice versa - where there is a purl row, purl loops. With such a position of the loops, the picture looks very bright, and no additional decoration of the eye is torn from it.
For jacquard used thin thread, but now you can use the thicker for knitting warm clothes. There is only one difficulty - strands are straightened on the seamy side, which should not be overtightened or not reached. Carefully look at the scheme. Try to make a pattern that can decorate a scarf, hat, mittens or even a sweater. We knit jacquard, adhering to the scheme, while looking at the color of the thread.
Jacquard knitting pattern
Such interesting patterns are used most often for small children, but you can also tie something beautiful for adults, because if you use patterns of ornament, it is very similar to embroidery. The ornament looks beautiful, and some folk art is taken for patterns, or you can even take a pattern for embroidery.
Patterns
The basis of the patterns - ornaments is stocking knitting. To link such a pattern, often used thread of two colors. One makes the main canvas, and the second - this is a drawing. If a person masters this technique, he may later include more colors in his drawing.
What is the patent pattern different from other types of drawings? It's very simple, if you look at the front of the canvas, turn it around, look at the wrong side, then you will not find any differences. These products are characterized by the fact that they are very elastic.
To give an example, we take a pearl gum. And you can connect any thing using the patent pattern using the following schemes.
Starting to learn to knit, do not immediately try to carry out ambitious plans. First of all, you need to master simple patterns with knitting needles for beginners and then hone your skills by choosing more and more complex patterns. The knitting process consists of four components:
Figure 1. Knit melange yarn.
Knitting needles are made of bone, wood, metal and plastic, but bone is expensive, and wood is rather fragile, so it is better to opt for metal or plastic. Wood can only be selected with a large diameter used for openwork knit. Numbers of needles correspond to their diameter in millimeters. The smaller the number, the smaller the loops on the finished canvas. If the thread is folded in half, the resulting thickness should be equal to the diameter of the spokes.
In the process of knitting with needles, the facial and purl loops are considered the simplest. A knitter needs to tame her hand in knitting uniformity, because at first the loops are made of different diameters. After washing, the thread in the canvas will be distributed evenly, and all the loops will become the same size, but this does not mean that we should neglect the accuracy at any stage of training.
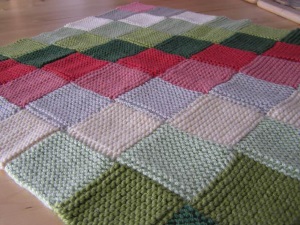
Figure 2. Knitting with facial loops.
In order to practice skills, it makes sense not only to train your hands, but at the same time to tie a rug, a plaid or a cape to a chair made of colored squares, collecting the remnants of knitting threads along familiar lines. If you use multi-colored (the so-called melange), then even from a simple facial canvas you can get fancy things (Fig. 1).
Squares can be made by knitting a straight row with facial, and the reverse with purl loops, then on one side there will be V-shaped loops, and on the reverse side - wavy rows. If, on the other hand, only face loops are used in the process, you will get a cloth canvas that is the same on both sides. In any case, the result of effort will be worth the effort (Fig. 2).
Start learning to knit items of clothing is best with a scarf. It knits in a straight line, and the knitting patterns of the scarf with knitting needles are mostly uncomplicated. Yes, and the resulting product will suit yourself for the winter, and as a gift to a relative for New Year or birthday.
A simple and widely known pattern of "rubber" pattern is knitted by alternating in all the front rows 1 of the front and 1 of the seam loop, and all the back rows must be knitted as the loops look from the inside. The resulting web will be the same on both sides.
Having learned to knit a simple scarf, knitting patterns can be complicated by moving to embossed patterns. They are light in execution, but look very impressive, and consist of various combinations of facial and purl loops. Only by slightly complicating the task, using the simplest relief patterns, you can get a very original thing (Fig. 3).
The knitting pattern of this scarf with knitting needles is simple (the pattern repeat is shown):
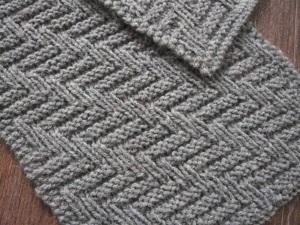
Figure 3. Relief knitting pattern.
Only odd (front) rows are described. Wrong rows of knit how to look like loops from the inside.
In this scheme, rapport is equal to 8 loops, so for knitting a scarf you need to dial the number of loops, a multiple of 8, plus 6 edge, plus 2 edge loops. For example, if the scarf width goes out 64 loops (8 rapports), then the total number of loops scored on the needles should be 72 (64 + 6 + 2).
At the beginning and at the end of each row, 3 loops (not counting the edge bands) are knitted with facial loops on all sides, this will create stripes on the edge of the scarf dressing, which protects the product from twisting.

Figure 4. Light openwork knitting pattern.
A special place among the patterns occupy openwork. Simple openwork patterns with knitting needles are created by a combination of nakida, leading to an increase in the loops in a row, and loops knitted together, absorbing the excess from nakida, which creates tilts of the loops in one direction or another.
Despite the simplicity of execution, amazingly beautiful canvases are created. This technique gives things sophistication and elegance and is more suitable for knitting women's clothing items: shawls, shawls, sweaters and pullovers, skirts and ponchos. Openwork knitting pattern is used for knitting men's clothing items, but extremely rarely.
The threads can be used both thin and thick, taking into account the main pattern: the thicker the needles and thinner the thread, the larger the holes and airy finished product.
To carry out even the simplest openwork knitting pattern, theory is not enough, it takes a lot of practice, especially the initial stage learning (Fig. 4).
In the diagram presented, the pattern repeat is 14 loops. The number of loops to be dialed must be a multiple of 14, plus 1 loop and plus 2 edge loops.
Knitted clothing beauty is not inferior to the stitched fabric. An experienced craftswoman is able to create things fashionable and unique, not only clothing, but also hats and caps, scarves and gloves, bags and toys.
Many women take knitting needles for the first time while waiting for their first child, because it is not without reason that there is a belief that knitwear keeps the warmth of the hands of a skilled worker.
The future mom wants to warm the baby by preparing warm blouses and booties for him.
Knitting is no longer considered a boring occupation, suitable only for "blue stockings" and their grandmothers. This type of handicraft surely occupies a leading position in the lists of hobbies and crafts around the world. Not only traditional shawls, socks and mittens are becoming creations for knitters: now dresses, coats, jewelry, shoes and even swimsuits can be knitted.
For many girls, the motivation to learn hand knitting is the opportunity to dress up their four-legged friends.
Warm clothing in pet stores is expensive, but a skein of yarn, simple calculations and simple scheme Knitting needles can save several times.
Those who wish to learn knitting can find a pile. useful tips. Many pages of women's online magazines are full of photos, diagrams and step by step descriptions manufacturing of a product.
The lion's share of the success of a knitting project is in the correct selection of yarn. Do not rush to the cheapest samples, arguing that for study and it will work. The concept of "thread quality" includes the characteristics of such parameters:
Using good yarn, even the simplest knitting pattern will create a really worthwhile thing.
On next stage you need to choose the right tool - spokes. They should be selected taking into account the type of product that will be connected by them, and the thickness of the selected yarn. The use of knitting needles of the same thickness as the thread is considered optimal (the size in millimeters can be determined by attaching to the ruler). The thickness of the needles, printed by the manufacturer on their packaging, is indicated in millimeters. 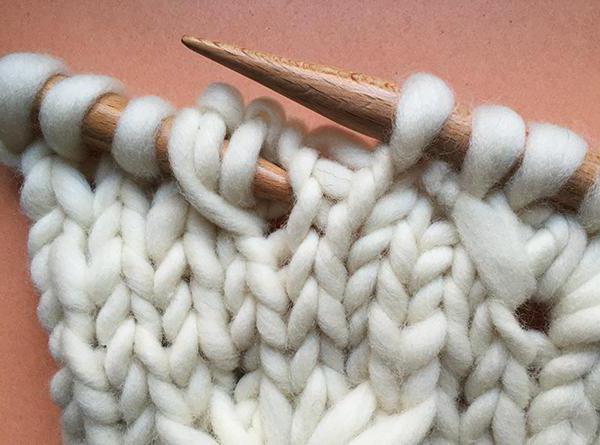
In addition, the label on almost any skein provides recommendations on the size of the needles. Most beginners, until they get used to holding knitting needles in their hands, often knit too tight. Therefore, it makes sense to choose knitting needles of a slightly larger caliber than indicated in the recommendations, then when knitting a web, the loops will be larger and knit more easily.
By following these tips and choosing simple knitting patterns for beginners, you can quickly achieve tangible results.
With all the necessary materials, you can proceed directly to knitting. As a first product, many experienced knitters recommend choosing a scarf, since its straight web does not require complicated calculations and manipulations with the addition / decrease of loops.
In the category “The simplest scheme of knitting a scarf with knitting needles,” various kinds of elastics definitely win. Their essence lies in the combination of facial and various other patterns of these elements are also good. 
The most common pattern remains 1: 1 gum (one front loop, one purse). However, a scarf thus tied may come out too dense and rigid, so it is better to consider the possibility of using a 2: 2 or English gum (including nakida).
To understand the schemes for knitting is not difficult. On the field, marked by checkboxes, there are icons and symbols denoting each loop that needs to be knit. One icon can replace one or several loops.
Some symbols have become almost universally accepted, many publications use them in the same interpretation, others may be the personal invention of the schema developer. In any case, a decoding of the legend is placed near each diagram.
The diagrams indicate the beginning of knitting, its direction and repeat (a repeating element of each pattern). 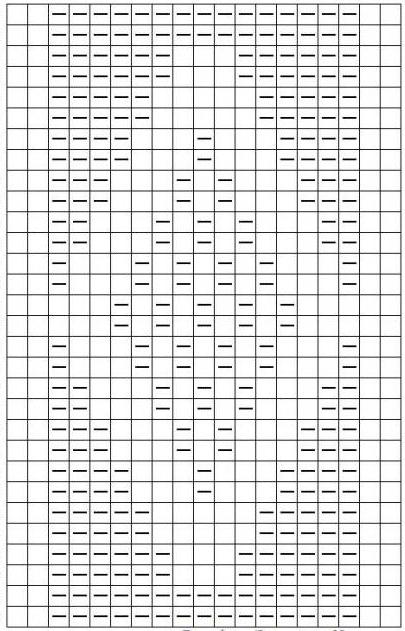
 The horizontal rows in the diagram correspond to the rows of the knitted fabric. Often schemes simple patterns knitting needles are limited to the image of only even or odd rows forming the front side of the knitting. In the other rows, all the loops are knitted as they see (facial or purl). But in some complex schemes, the pattern is formed by working with all rows of the canvas.
To go deeper into the knitting process and get a visible result as soon as possible, it is advisable to use bulk yarn. You can take a smooth thread with a uniform torsion or pick up a "fantasy" - with thin and wide sections. When using such a yarn, even a simple pattern of knitting allows you to quickly get an interesting pattern. 
For you will need to type the calculated number of loops and knit a fabric of the required length using the selected pattern.
The number of loops can be calculated by tying a sample from the thread that will be used to make the product.  Even if the knitting density is indicated on the skein label, this indicator is very inaccurate. It depends on:
The resulting sample should be washed, then stretched and pinned to a horizontal surface with pins.  Thus, drying up, the cloth will not sit down and will become equal. An alternative to washing can be steaming with an iron with a steam effect, but for beginners this method is not recommended due to the presence of many nuances.
The dried sample is measured, count the number of loops and rows per 10 cm (in width and in height) and determine how many loops the canvas should contain.
Even a large-diameter tool and a simple knitting pattern do not guarantee automatic trouble-free scarf production. These factors can significantly ease the work of a knitter, but a successful result also requires attention, patience and perseverance.
Among the aspects requiring the greatest diligence are:
As for the last point, it is best to thread the tips of the threads into the knitted fabric with a large needle. So they will not stand out even after washing.
Having mastered the knitting world, you can begin to manufacture openwork products. This type of knitting involves the presence of holes in the fabric. If we are talking about summer things made of cotton or viscose, the openwork canvas can be almost transparent, consisting of a large number of holes.
Since the recommendations in this article are addressed to newcomers, here you should consider simple schemes for such patterns necessarily include nakida. Knitted in the reverse rows, they just form an openwork. There is also a technique in which two loops are knitted together.
You can practice on such schemes, which offer a solid pattern in combination with small elements of openwork, then it is worth moving on to more complex options. 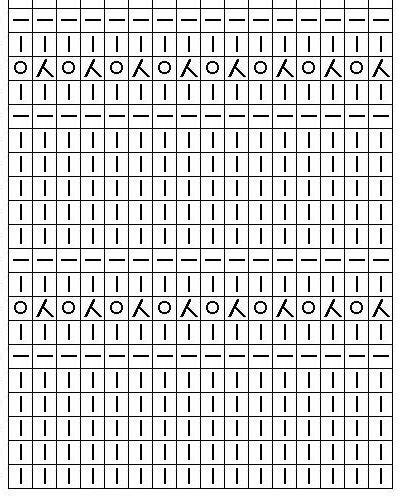
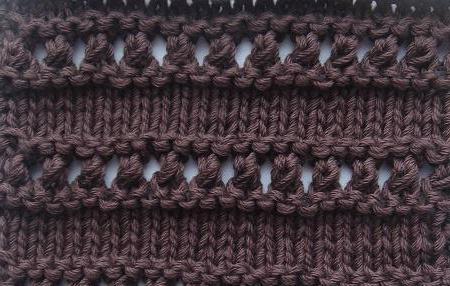
As well as solid, simple openwork patterns for knitting, schemes and descriptions have reports and repeating elements. After knitting several rows, the master remembers these elements and almost automatically follows a predetermined algorithm.
The finished product should be processed in the same way as the sample for the calculation of loops (wash, spread out and dry). After these activities, the binding is leveled, the thing becomes soft and takes on the necessary shape.
With due attention to the choice of yarn, working tools and models of the future product, a simple pattern of knitting will allow you to create a unique product that will become the favorite "highlight" of a knitter's wardrobe. In addition, the popularity of handicrafts adds value to hand-made gifts. Therefore, even with minimal experience in knitting, you can make excellent gifts for relatives, friends or loved ones. 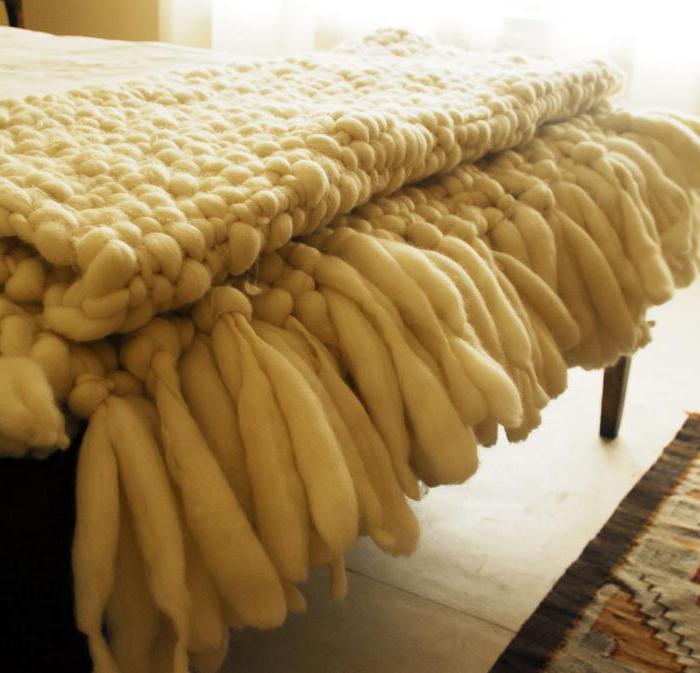
Regardless of the type of knitting, products made by hand need specific care: careful washing with special products in warm (not hot) water, drying in a horizontal position, and avoidance of stretching. Compliance with these requirements will significantly increase the service life of knitted items.
| Related articles: | |
|
Heavy tongue in mouth. Burning mouth
Dry mouth - in medicine is called xerostomia, it is a symptom ... Bitcoin mining: everything you need to know for beginners
Many users experience familiarity with digital currency ... How to choose the color of varnish to clothes?
Selection of lacquer color is not a simple matter, because its shade is due not only ... | |


