Reader's Choice


Popular articles
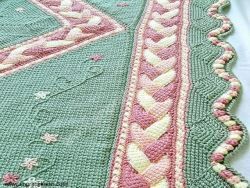
Creating a thing with your own hands - an elegant shawl, a stylish handbag or for your favorite crumbs - you embody creative ideas. Those who contribute a part of their own soul want hand-made products to delight them for a long time. Tunisian crochet is unusual for many needlewomen technique, the development of which does not take much time. At the same time tight and soft, it will not stretch, lose the shape of a rug or hat, children's pants or a trendy swimsuit created by experienced (or not) hands of a skilled worker.
Unusual, resembling a facial surface or patent gum, "honeycomb" and nubs, you can create using an ordinary crochet. True, not quite ordinary, but specially extended - up to 20-30 cm. Afghan, it is also Tunisian crochet is a method of creating a canvas, in which a pattern is formed on the basis of a two-level pattern of rows. One runs from right to left, and the second in the opposite direction.
What is a Tunisian crochet? The first row of each "step" is formed by recruiting the required number of loops with various ways of pulling the thread, affecting the appearance of the pattern. “Pulling” the thread through the loops of the second row, you create a cross-weave, as a result of which you get a light, airy and at the same time dense canvas. The classic combination of weft and warp, characteristic of woven materials, will help things crocheted using Tunisian technology, keep the original look.
Warm jackets and coats based on Afghan knitting will never be stretched on the hips or elbows, even without a lining. The neck and sleeves of sweaters, vests exactly match the pattern, and trend bags will not lose shape. Beautifully look jacquard patterns using multi-colored threads on warm products in the Scandinavian style. The absence of warps, stretching and shrinkage is different napkins and lace, connected by a Tunisian method. Cell-honeycomb, resulting in the creation of "simple braids", ideal for embroidery with beads.
What tools you need:
How to crochet correctly using the Tunisian fabric creation technique? This method has some peculiarities that should be considered for beginning masters:
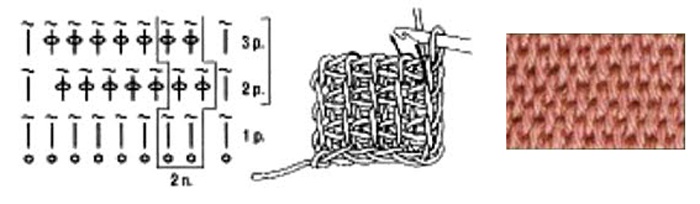
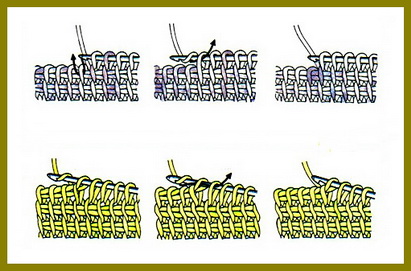
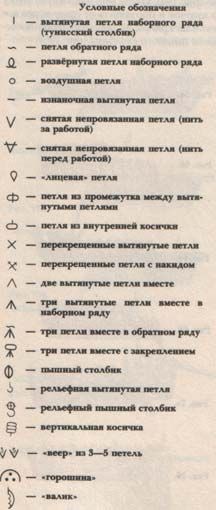
Knitting for beginners in the Tunisian style is the initial acquaintance with the patterns of patterns, symbols. The photo shows a schematic simple weavingwhich is basic for the afghan method:
Try to draw a small fragment (sample) of the canvas, using step-by-step explanations and instructions:
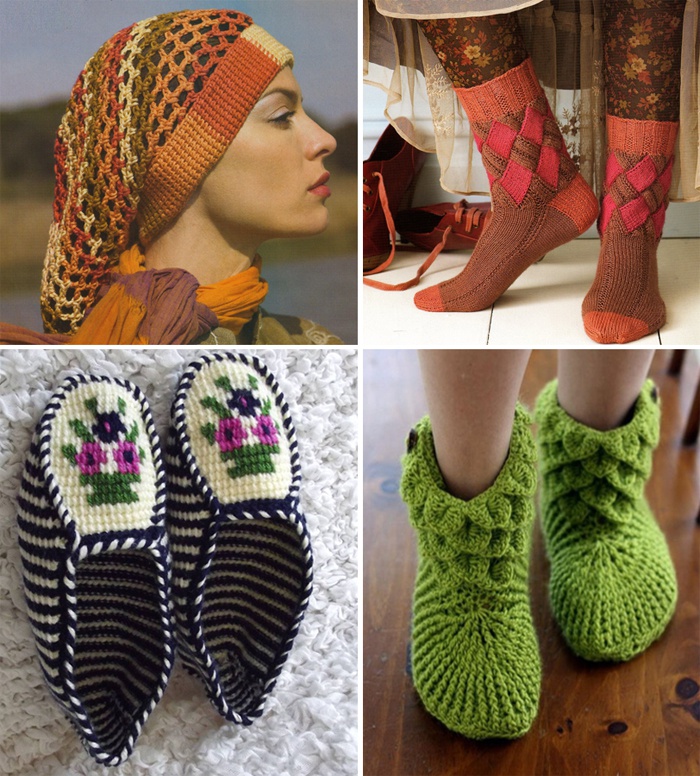
Unusual handbags, socks or knitted boots for the home, scarves, coats - an incomplete list of products for which Tunisian needlework is perfect. Often, even experienced craftswomen wonder how unusual and stylish things made on the basis of this technique look. Among all sorts of patterns the most popular are:
Why should you prefer the first two crochet options, imitating the creation of knitted fabric on the needles? The Tunisian method involves a dense, solid structure of the product, which you can wear for a very long time. Yes, and saving the thread will be at least 20% relatively more familiar to the skilled workers ways. Having mastered the skills of creating patterns using Tunisian knitting, you will be able to create real masterpieces of design art with your own hands:
The peculiarity of Tunisian crochet - a two-step technique - is not difficult to master. It is characterized as “composing knitting”: the first row of each “step” consists of dialed but not knitted loops. Having learned from several video techniques of “simple Tunisian weaving”, you can expand your skills. You will create exquisite flowers for products with a 3D effect, master new patterns and crochet patterns, the order of subtraction and the addition of loops. Video tutorials will help step by step to understand the intricacies of this type of needlework.
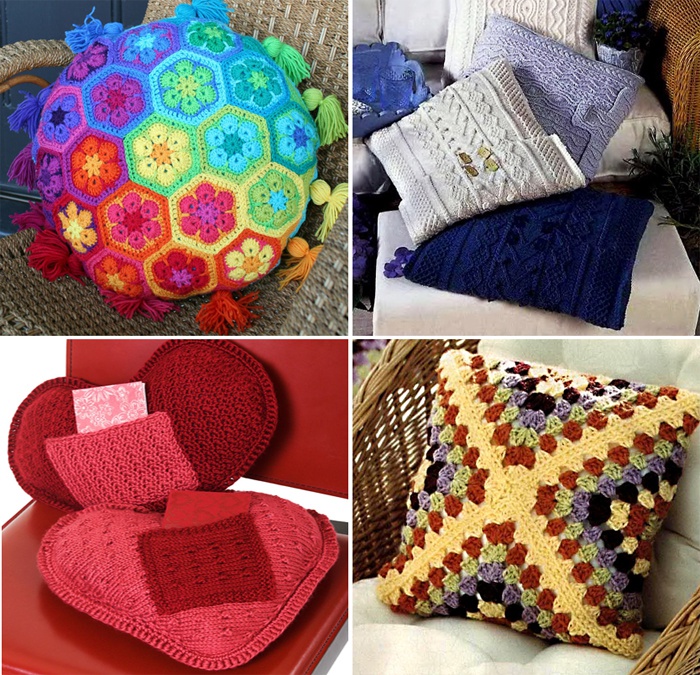
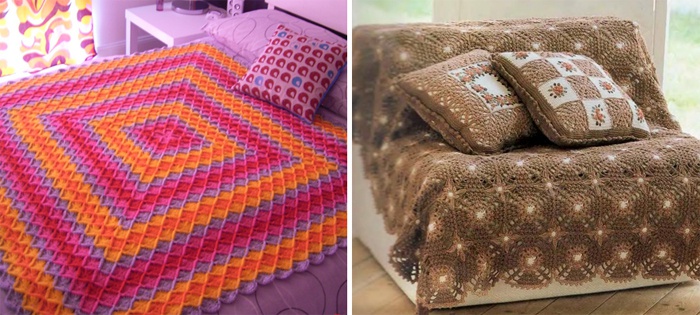
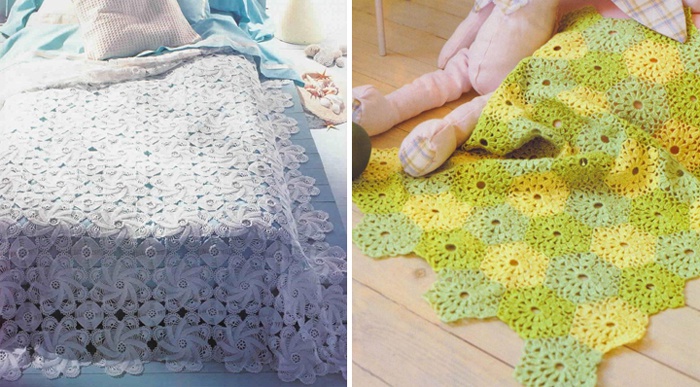
Cozy rugs, tied with caring hands by skilled workers, will warm you on a cold winter evening. Bright Afghan-style cushions decorate the living room interior. Bedspreads with funny cartoon characters or thematic drawings will delight the inhabitants of the nursery. Want to work as a designer of your own kitchen? Tie a set of stylish cotton tacks - durable, reliable, they will emphasize the distinctive style and home comfort.
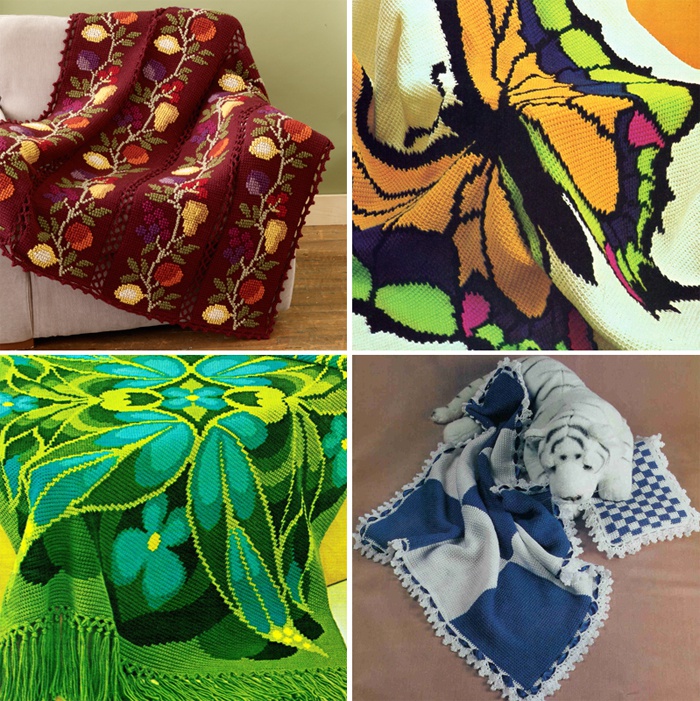
Beautiful and elegant things made by the Tunisian way of knitting will appeal to kids, adult households. Warm slippers, hand-made or boots, uggs will attract young ladies. Mom and grandmothers will appreciate the stylish handbags, openwork napkins, tablecloths. Do not forget about yourself, beloved: knitted coats and cardigans - at the peak of popularity. What to associate - a light headdress, a warm hat or an exquisite tunic - is up to you. Below are collections of photos of crocheted products based on the Tunisian knitting technique.
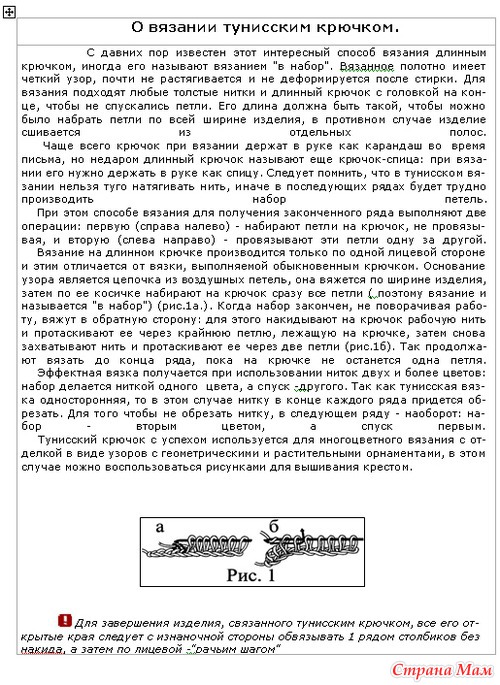
What is Tunisian knitting? This is knitting with a long crochet, it is also called Afghan weaving, Victorian or “tunnel.” The long crochet is always knitted on the front side in the forward and backward direction because the fabric has clearly expressed front and back sides. The products are connected with a long crochet, comfortable to wear because the Tunisian linen does not stretch either in length or in width and practically does not deform after washing.
These characteristics should be taken into account when calculating the product before knitting, increasing the allowance for free fitting.

Yarn consumption in Tunisian knitting is 20% less than when knitting a fabric of the same density with a small crochet. This is due to the usual interlacing of the thread (a single crochet appears in 3, and a Tunisian post appears in only 2 threads). Crocheting st with
Corresponding feature of Tunisian knitting is the execution of each row in 2 steps: the first (dial) - a set of loops on the hook from each loop of the base in the direction from right to left across the entire width of the canvas, and the second (fixative) - sequential tying the dialed loops in the opposite direction from left to right without turning the product.
The basis for all the patterns is a chain of air loops. It is not included in the pattern count and is denoted as the zero row. Above last row knit right from the left to 1 row of single crochet or semi-column posts (see the lessons “Crochet”).
crochet crochet knitting pattern
With a long crochet you can make different patterns; their appearance will depend on how the hook is inserted when looping and how these loops are knitted in the fixing stage. When typing Tunisian columns, a hook can be inserted under one or several vertical threads of the previous row, also under a horizontal chain inside the canvas, or under a vertical thread 2 rows lower, etc. However, you can additionally hook the working thread between the dialed loops ( direct or reverse nakid) or, picking up the loop on the hook, cross them in pairs, also knit in the 2nd stage not only one by one,
crochet patterns of chamomile and 2, 3 and more loops together.
crocheted snail gog
crochet friform patterns and patterns for free
Insert the hook from right to left under the front vertical thread of the elongated loop of the previous row (Fig. 5 a). Catch the working thread and pull out the loop
crochet way slippers (Fig. 5 6).
crochet on adultsCaptured untied loop. Thread at work (Fig. 6 a). Insert the hook under the elongated loop of the previous row from right to left, and leave this loop on the rod of the hook, without pulling out of it a new loop (Fig. 6 b).
crochet bloom
Unplugged loop removed. Thread before work (Fig. 7 a). Throw a thread on the front side of the work, enter the hook under the elongated loop of the previous row from right to left.
Crochet This loop is left on the hook without knitting (Fig. 7 6).
Crochet autumn models "front" loop (Fig. 8 a, b). Hook to enter from right to left between the two threads of the elongated loop of the previous row under the internal horizontal chain.
Tunisian knitting (sometimes called the Afghan) is performed using a special long hook. Thanks to this technique, we can get very beautiful in texture, dense and at the same time soft knitted items. Another advantage of this type of knitting is that the consumption of yarn is reduced by about 20% compared to regular crochet with the same density.
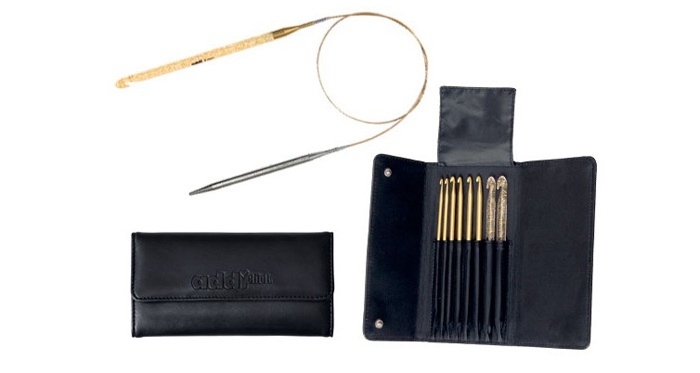
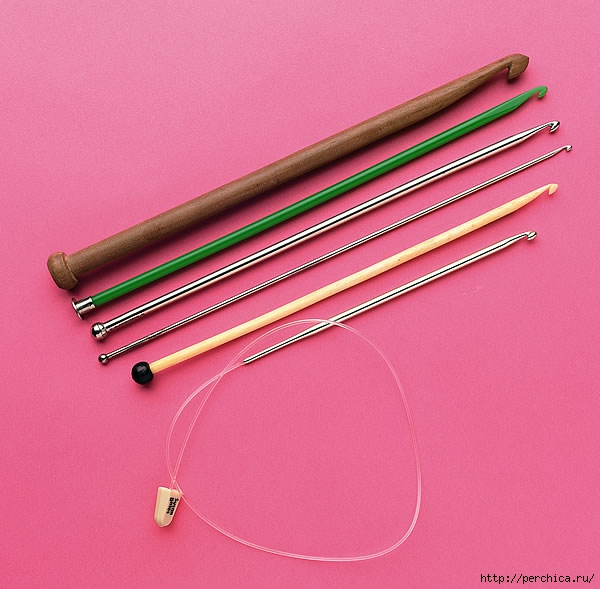
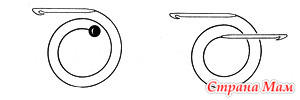
So, as mentioned above, crochet hook need a special. So what is its feature? This hook is longer than usual and at the end it has a ball that allows you to hold the loop and does not allow them to come down from the hook. The length of the hook must be selected depending on the width of the product. If the hook is shorter, then ready product stitched from the bands.
How to hold the hook during tunisian knitting? A long hook is sometimes called a “hook-knitting needle” and this is no accident. Because when knitting it is held like a needle or pencil.
Another feature tunisian knitting is that the canvas when working does not need to be turned over. All rows are knitted from one part of the canvas (We always keep the canvas facing "to ourselves"). We first knit from right to left, then - from left to right. That is why in tunisian knitting It says about a pair of rows.
When Tunisian knitting is very important to remember that you can not tightly tighten the working thread. Otherwise it will be very difficult to put loops on the hook. That is why the hook for Afghan knitting take on half the size more than normal knitting. For example, if the usual crochet yarn corresponds to the hook number 2, then for the Tunisian knitting need to hook number 2.5.
Let's try to tie the canvas in the technique of Tunisian knitting.
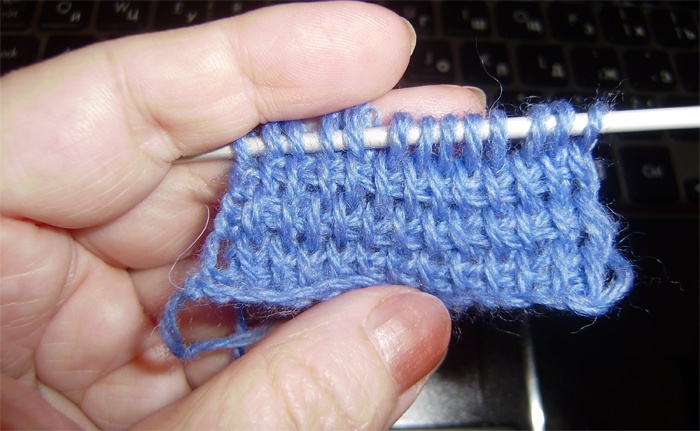
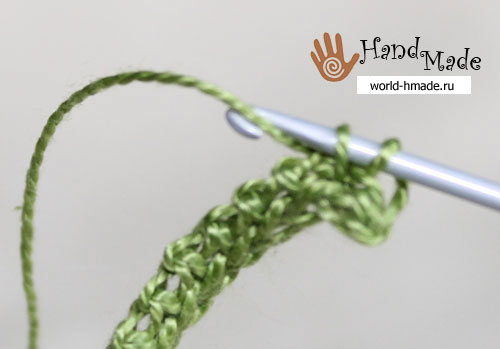
We knit a chain of air loops in the same way as with regular knitting. The number of loops depends on the width of the web you want to receive as a result.
A linked chain has a front and seamy side. On the front side, we can see V-shaped loops, and on the back - small protuberances. The photographs for comparison show the front (left) and purl (sides) dialed chain of loops.
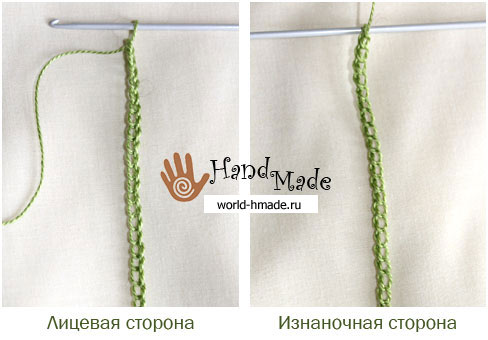
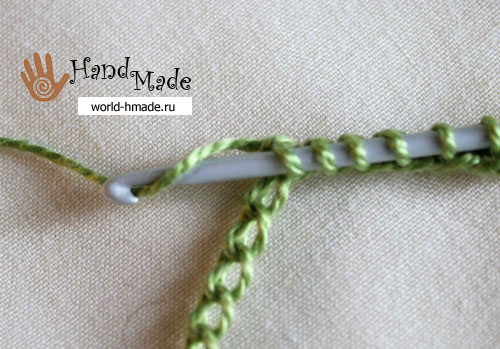
We will start to knit the first row from the wrong side of the chain, starting with the second “bump” from the hook.
Enter the hook into the loop, grab the working thread, pull through the loop and leave it on the hook.
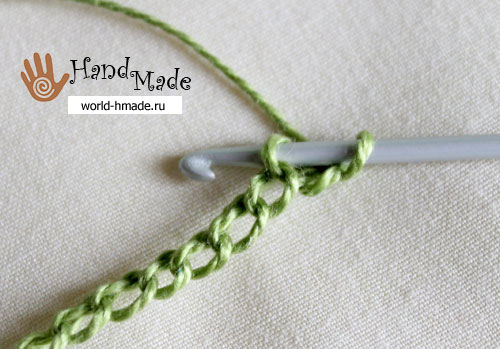
So we hook all the loops.
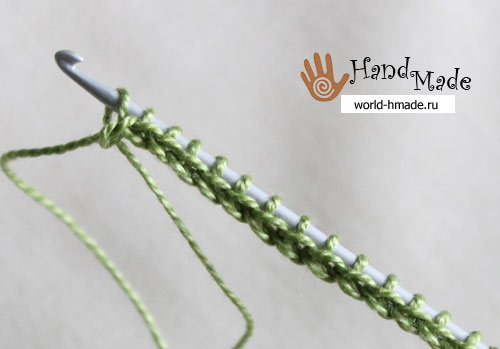
Now turn to knitting the reverse row. We knit one air loop.
Grab the thread with a hook and thread it in two loops that are on the hook.
Knit until one loop is left on the hook.
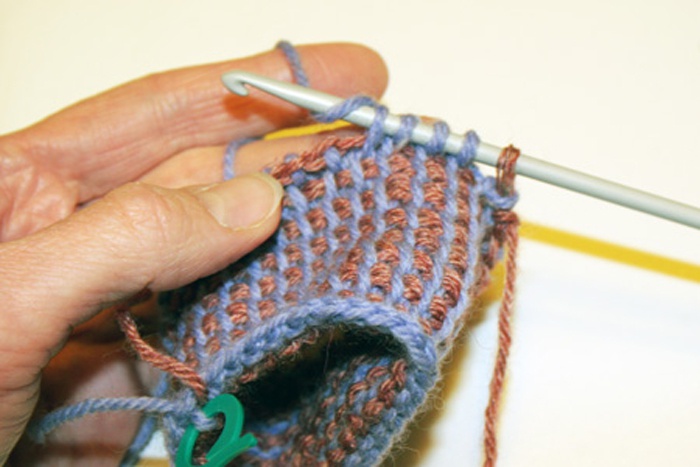
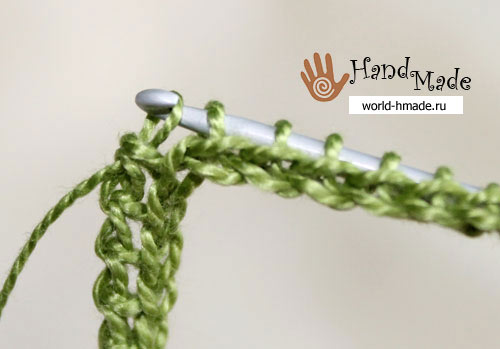
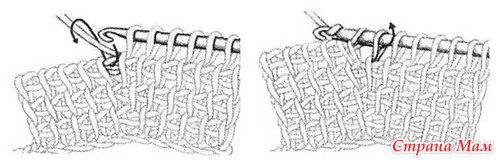
We proceed to knitting the next row. Remember that you do not need to turn knitting over, the web will always be kept facing you.
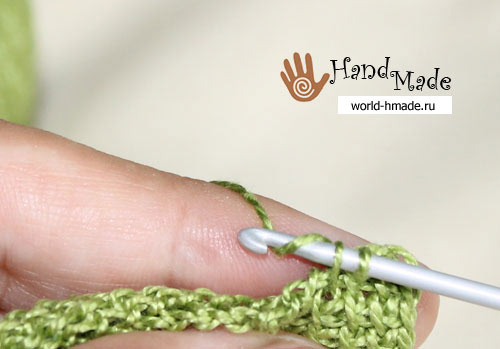
We will thread the hook into the vertical loops created in the previous row. The first two loops are highlighted in pink in the photo.
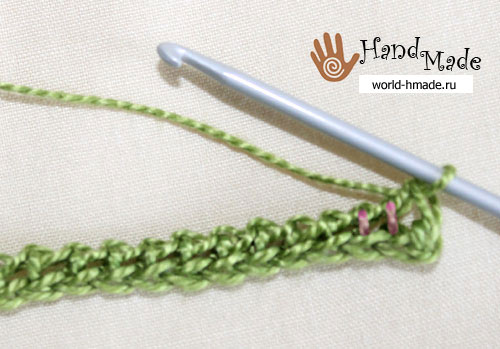
Enter the hook from right to left through the first vertical loop, grab the working thread, drag it through the loop and leave it on the hook.
Thus we knit the series to the end. At the end of the row we pull the working thread through last loop previous row. The arrow points to the photo.
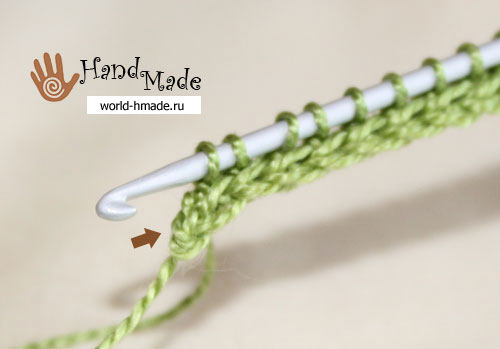
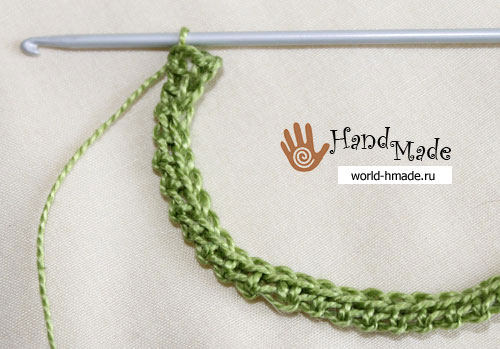
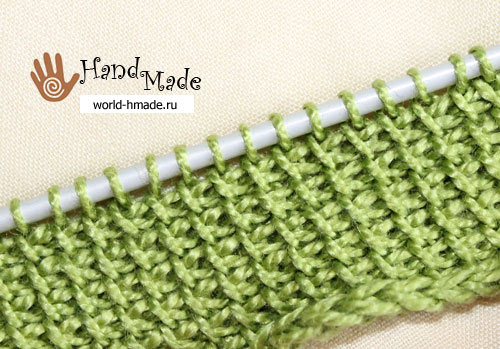
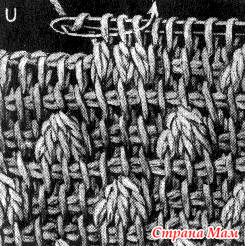
See what a beautiful texture is obtained from the canvas, connected by the Tunisian method!
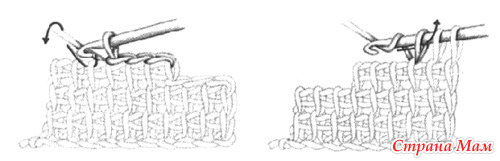
We will close the loops in the front row (that is, we will knit loops from right to left).
Enter the hook into the vertical loop and pull through the working thread through two loops at once - vertical and the one that is on the hook.
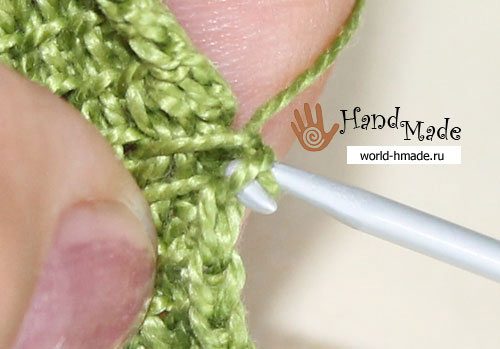
We continue to close the loop to the end of the row. Done!

Tunisian knitting tends to curl slightly, but this is easily eliminated. You just need to steam the knitted fabric with an iron.
When posting material on other resources, an active link to MANDATORY!
TUNISK KNITTING
Lesson 1
The hook must have an even and smooth rod (35–45 cm of length) with a cap at the end so that the row loops, which are dialed over the entire width of the part, do not jump off during operation. The size of the long hook is determined by the diameter of the rod, and it is selected depending on the thickness of the yarn so that the hook is about 2 times thicker than the thread. Hooks for Tunisian knitting can be of normal length (12 - 15 cm) on the rope.
Such hooks are easier, more convenient when knitting items of large width and indispensable for circular knitting.
The consumption of yarn in Tunisian knitting is 20% less than when knitting a cloth of the same density with a short crochet. This is due to the simple interweaving of the thread (the single crochet column is formed by three, and the Tunisian single column by two threads only).
A characteristic feature of Tunisian knitting is the execution of each row in 2 stages: the first (diagonal) set of loops on the hook from each loop of the base in the direction from right to left across the entire width of the canvas, and the second (fixative) - sequential tying the dialed loops in the opposite direction from left to right, without turning the product.
The basis for all the patterns is a chain of air loops. It is not included in the pattern count and is denoted as the zero row. Above the last row, from right to left, 1 row of rows of single crochets or semi-columns is crocheted (see the lessons “Crochet”).
With a long crochet you can make different patterns; their appearance will depend on how the hook is inserted when looping and how these loops are knitted in the fixing stage. When recruiting Tunisian columns, a hook can be inserted under one or several vertical threads of the previous row, as well as under a horizontal chain inside the canvas, or under a vertical thread 2 rows below, etc. Moreover, you can add a working thread to the hook between dialed loops direct or reverse nakid) or, picking up the loops on the hook, cross them in pairs, and also knit in the second stage not only one by one,
but also 2, 3 or more loops together.
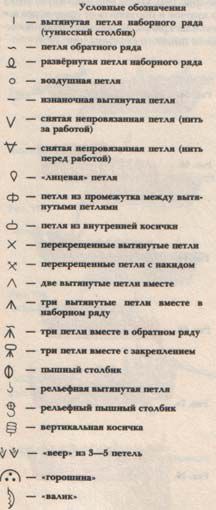
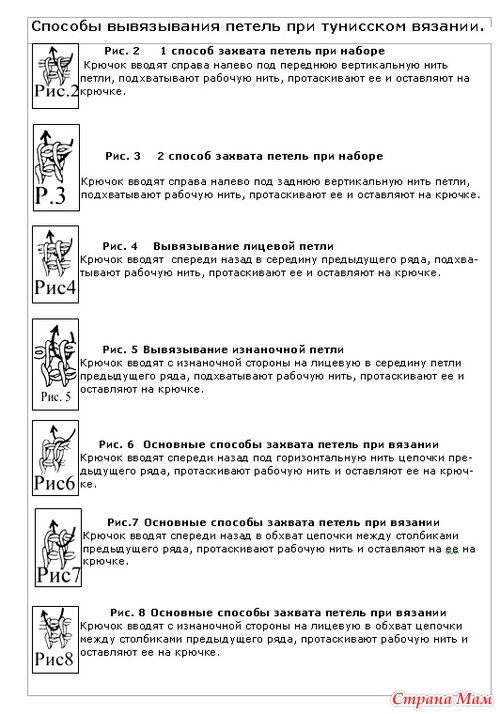
Basic loops and techniques
Elongated loop of the dial series, a Tunisian column.
In the 1st row it is pulled out from the loops of the chain of the base (Fig. 1 a), in the subsequent rows the hook must be inserted from right to left under the vertical loop of the previous row and pulled out the loop
(Fig. 1 6).
Loop back row. After all the loops of the row are gathered, you need to throw a thread on the hook and stretch it through one loop hanging on the hook (Fig. 2 a). So the left extreme loop is knitted.
After that, throw the thread on the hook and stretch it through 2 loops hanging on the hook
(Fig. 2 6). Continue until a single loop is left on the hook.
The expanded loop of a dial-up row. The hook is inserted into the elongated loop of the previous row from left to right (Fig. 3 a), which is why the loop is turning (Fig. 3 6).
Air loop (Fig. 4). In the dial row, it is performed as a direct nakida.
In the back row, it is knit like a regular air loop with a short hook.
Purl elongated loop. Thread to throw on the front side of the work and put on the canvas. Insert the hook from right to left under the front vertical thread of the elongated loop of the previous row (Fig. 5 a). Catch the working thread and pull out the loop
(Fig. 5 6).
Unplugged loop removed. Thread at work (Fig. 6 a). Insert the hook under the elongated loop of the previous row from right to left, and leave this loop on the rod of the hook, without pulling out of it a new loop (Fig. 6 b).
Unplugged loop removed. Thread before work (Fig. 7 a). Throw a thread on the front side of the work, enter the hook under the elongated loop of the previous row from right to left.
Leave this loop on the hook without knitting (fig. 7 6).
"Facial" loop (Fig. 8 a, b). Hook to enter from right to left between the two threads of the elongated loop of the previous row under the internal horizontal chain.
The loop from the gap between the elongated loops. Insert the hook between the elongated loops of the previous row under the inner horizontal chain (Fig. 9 a, 9 6).
Loop of internal pigtails. When looping, insert a hook under the upper thread of the inner horizontal chain (Fig. 10 a, 10 6).
Crossed elongated loops (Fig. 11). First, insert the hook under the vertical thread of the second elongated loop, throw the string on the hook and pull out the loop (Fig.11 a). Then insert the hook into the first elongated loop and pull the thread through it (fig. 11 6). Thus, “crosses” are obtained (Fig. 11c).
Scheme
Lesson number 2 - Tunisian knitting
Tunisian Knitting Lesson 2
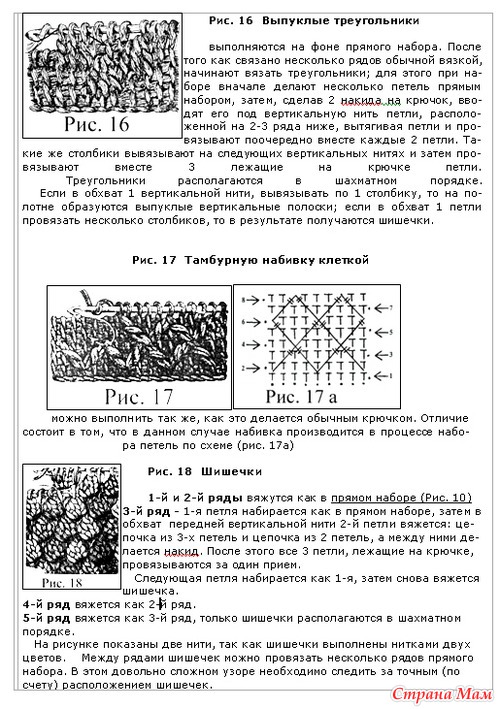
Double crochet loops (Fig. 12).
Throw the thread on the hook, insert the hook under the second vertical loop of the previous row from right to left and pull out the loop. Put the thread on the hook again and stretch it through the loop and nakidov hanging on the hook (Fig. 12 a). Throw the thread on the hook, insert the hook into the first loop of the previous row and pull out the loop (fig. 12 6). Throw the thread on the hook and push it through the loop and nakidov hanging on the hook.
Two elongated loops together (Fig. 13).
Insert the hook immediately under the 2 vertical loops of the previous row, put the thread on the hook and pull it through the 2 loops hanging on the hook.
Three elongated loops together in a dial-up row (Figure 14).
Insert the hook right under the 3 vertical loops of the previous row, put the thread on the hook and drag it right through these 3 loops.
Three loops together in the back row (Fig. 15).
In the back row, throwing the thread on the hook, you need to drag it right through 3 loops hanging on the hook, then knit 2 air loops. So continue to the end of the series.
Three loops with fastening (fig.16).
Insert the hook immediately under the 3 vertical loops of the previous row, pull out the loop and knit the air loop.
Magnificent column (Fig. 17).
Make a nakid, hook to enter under the vertical thread loops of the previous row and pull out
loop (Fig. 17a). So repeat 3-5 times, then throw a thread on the hook and drag it through all the loops and nakida hanging on the hook (Fig. 17 6).
Relief elongated loop (Fig. 18).
Hook to enter from the front side under the "trunk" of the vertical loop of the previous row.
Relief lush column (Fig. 19).
Throw the thread on the hook, insert the hook under the “trunk” of the vertical loop one row below the previous one, pull the loop out, once again throw the thread on the hook and drag it through the loop and put on the hook hanging on the hook.
So repeat several times (Fig. 19 a). After that, throw the thread on the hook and drag it right through all the loops on the hook left over from tying the lush column (fig. 19 6).
Vertical pigtail (fig. 20).
Introduce a hook under the vertical loop of the previous row, insert a string and pull out the loop, then insert the string again and pull it through the new loop. Thus you can knit vertical braids of different heights.
"Fan" consists of 3-5 loops, which are drawn from one loop of the internal horizontal chain. When stretching, the loops alternate with nakida, and in the back row each knit loop is knitted together.
"Pea". In the back row between fastening loops, 3-5 air loops are knitted. When typing loops in the first stage of the next row, skip the air loops, tightening the bars over the “peas”.
"Roller". Dial loops on the hook, pulling them out from under the vertical loops of the previous rows (3-5 loops). They are closed from the bottom up, just as the hinges in the back row are closed.
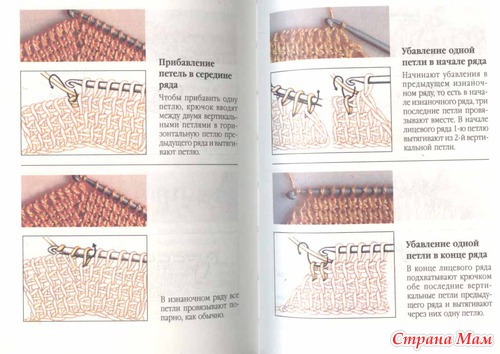
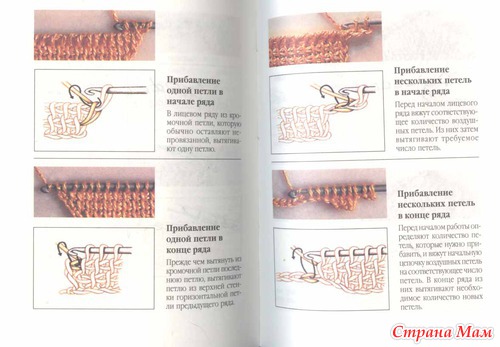
Loop addition:
a) inside the knitted fabric: pull the loop from the middle of the loop of the horizontal chain of the bottom row (Fig. 21);
b) from the right edge of the canvas: pull the loop out from under the first vertical thread of the bottom row
(Fig. 22);
c) from the left edge of the canvas: the loop is extended from the middle of the loop of the horizontal chain in front of the extreme Tunisian column (fig. 23);
d) the simultaneous addition of several loops on both sides of the web: first make an increase from the right edge of the web. To do this, knit the required number of air loops from the last loop of the row (the last one will lead) and first to the left along the chain
From each of its loops pull out the Tunisian columns, and then from the main canvas.
Reaching the left edge, from a separate thread, tie the same chain and attach to last loop bottom row. Working thread continue the set of Tunisian columns from the edge of the canvas along this chain to the left. The number of added loops at both edges of the web should be the same. In the fixing stage of the row from left to right, close all the loops you made. The increase will be in the same row (Fig. 24);
e) knitting out three loops from a single loop from the loop: from the loop of the lower row, over which you need to make an increase, pull the loop, hook the thread with the movement “from yourself” and pull another loop from the same loop.
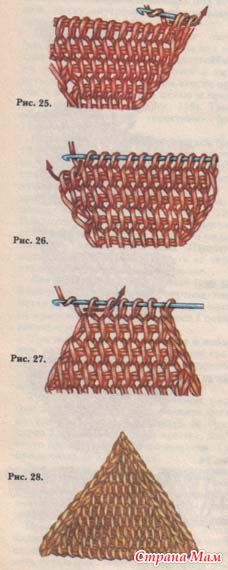
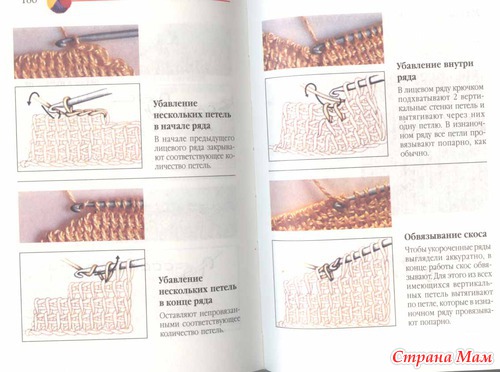
Loop off:
a) decreasing from the right edge of the canvas: closing the loops when knitting the second stage, at the end of the row pick up the working thread and stretch it through 3 loops at once (fig. 25);
b) decreasing from the left edge of the canvas: when looping on the hook in the first stage, pull out the last Tunisian column, introducing the hook right under the two (the last but one and the last) vertical threads of the lower row (fig. 26);
c) simultaneous reduction of the loops at the beginning and end of the row: closing the loops from the left edge of the canvas, pick up the working thread and pull it through 2 loops at once, and from the right - through 3 loops (fig. 27).
In order to reduce the loops from the edge of the canvas was more accurate, it must be done before and after the extreme loops. When loops are set, 2–3 extreme loops from the edges of the canvas are usually pulled out, and in the place of subtraction, the loop is pulled out immediately from under the two vertical threads of the bottom row
(fig. 28);
d) diminishing the hinges inside the row: by closing the hinges, stretch the working thread at once through 3 loops, or in the type set stage of the row pull out the Tunisian column immediately from under the two vertical threads.
Needlework: Popular Encyclopedia / Ch. ed. I.A. Andreeva - 1993
Lesson number 3 - Tunisian knitting
Tunisian knitting. Lesson 3
Vertical cuts.
Knit with a working thread on the left side of the cut along its height the required number of rows. Attach a thread from the other ball on the right side of the cut and tie the same number of rows, and in the last of them just pull out the loops, but do not fasten them. Hook the horizontal chain of fastening of the 3rd row of the left part with a hook and continue to fix the loops of the right part with a working thread. Next, knit a working thread, and cut the additional thread.
Horizontal cuts.
When looping the hook at the location of the incision, skip the desired number of vertical threads. Above the missed loops, make the appropriate number of nakidov movement "on yourself" and continue pulling the loops (Fig. 29 a). In the fixing stage, knit the loops as usual, counting the naquids on the hook for the missing Tunisian columns.
(fig. 29 6). In the next row, the loops above the hole are pulled out of the nakida (Fig. 29c).
The open bottom edge of the cut will turn out loose (for example, for finger mittens, pockets, etc.). For a cut with a tight edge in the typesetting stage of the row, close the cut loops with semi-columns. In the reverse stage, knit an appropriate number of air loops over them.
When recruiting the next row from each cut air loop, pull out the Tunisian column as in the first row. A cut with a closed tight edge can be used without further processing, for example, as buttonholes.
Circular Tunisian knitting crochet on a rope with a length of 50-60 cm. The chain of air loops, which is the basis of knitting, fold into a ring with a half-column.
Pull out the Tunisian posts from each loop. Going to the place where the row is closed, knit a half-column (binding loop) by inserting a hook under the back thread of the first stretched loop of the row, and then knit all the loops from the hook in pairs, just like in the second step of the row when knitting a straight web. When there is only one loop on the hook, close the row again.
To do this, remove the hook from the loop, wind it from the wrong side to the front under 2 threads fixing the last Tunisian column, pick up the loop removed from the hook, pull it out and crochet once, pull the hook again and enter it from right to left under the front thread of the first Tunisian column , pick up the left loop and pull it through the loop on the hook. The first Tunisian tolbik of the 2nd row is connected. Next, follow the usual set of loops. Close each row at the end of the dial and at the end of the clamping steps.
Mating specimens
The knitting below can be made with two or more threads of thread, resulting in interesting colored patterns.
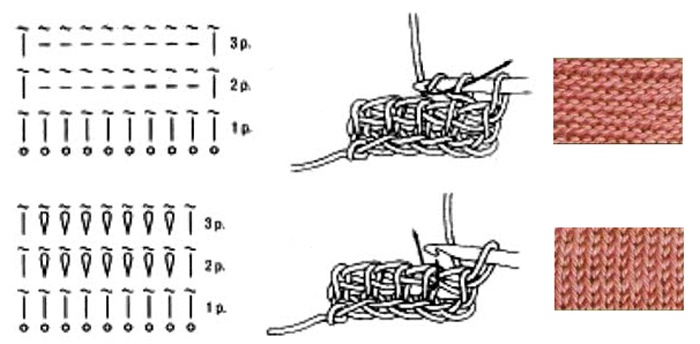
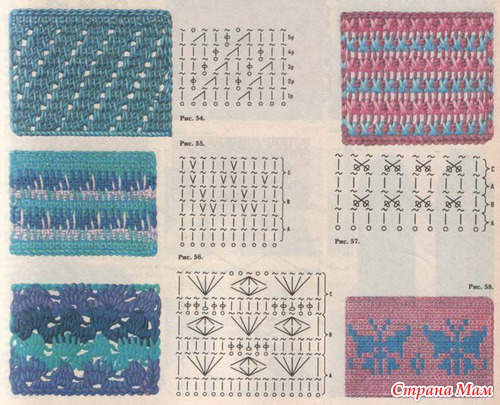
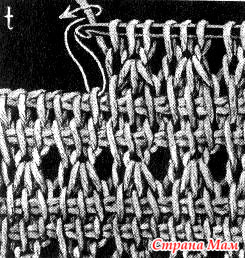
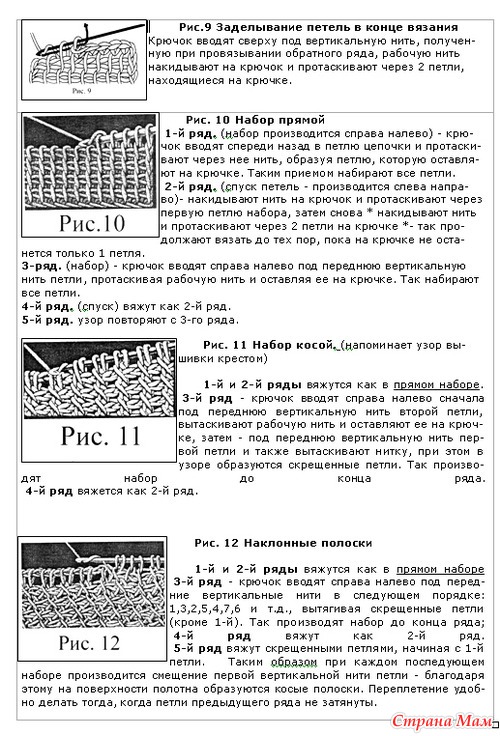
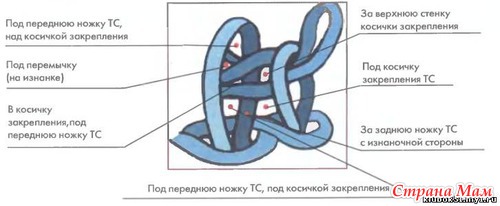
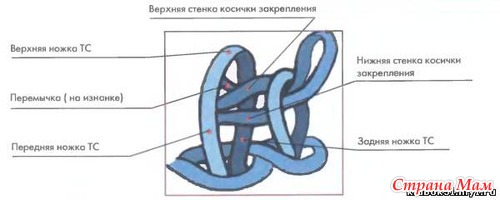
Fig. 30. Simple braid. This mating is the basis for many patterns. On its background, relief bands, colored ornaments, etc. are knitted
Next, knit like 2nd row.
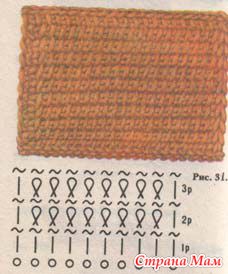
Fig. 31. Oblique braid. It differs from the simple braid in that the vertical threads are slightly inclined to the right.
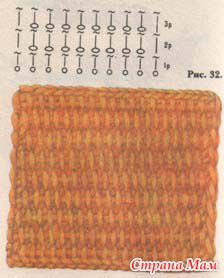
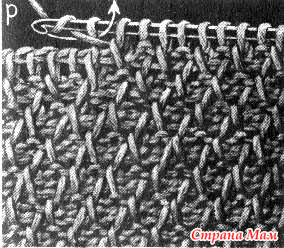
Fig. 32. Dense pattern. When performing this pattern, you need to ensure that the canvas is not shifted to the side.
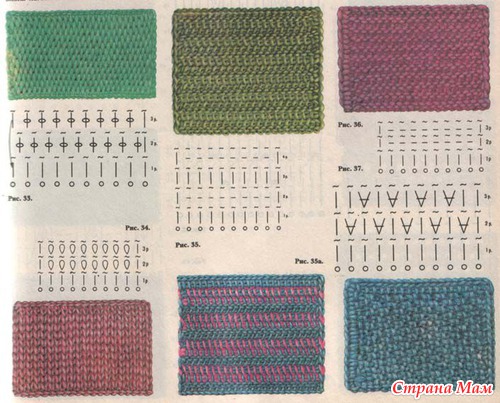
Fig. 33. Gunny. To prevent the sheet from mowing, in the 3rd row it is necessary to pull the first loop out of the second gap between the vertical threads, and skip the last gap at the end of the row.
Next alternate the 2nd and 3rd rows.
Fig. 34. Facial mating. This pattern imitates facial knitting.
Fig. 35. Horizontal gum. Alternate the 3rd and 4th rows. The color variant of the horizontal elastic band is shown in fig. 35 a.
Fig. 36. Purl. The pattern imitates the purl knitting.
Fig. 37. Rice knit. The number of loops should be divisible by 2, plus 1 (for symmetry). Alternate the 2nd and 3rd rows.
Needlework: Popular Encyclopedia / Ch. ed. I.A. Andreeva - 1993
Scheme
Nodule ru / needlework lessons / Tunisian knitting
Lesson number 4 - Tunisian knitting
Tunisian knitting Lesson 4
Mating specimens
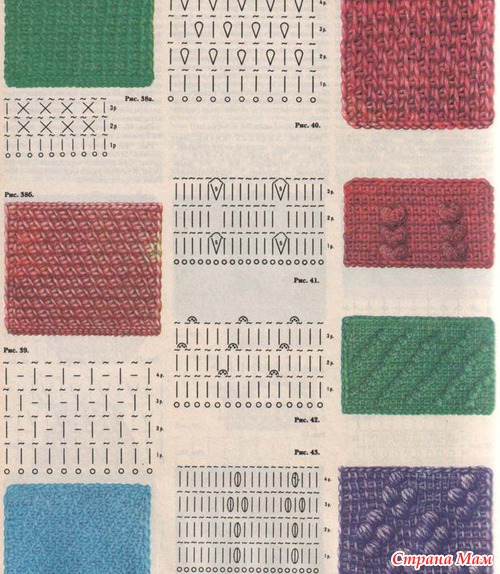
Fig. 38. Crossed loops.
The number of loops should be divisible by 2 (Fig. 38 a). To get a pattern, as shown in fig. 38 6,
need to cross loops in a checkerboard pattern.
Fig. 39. Chess from elongated and purl loops.
The number of loops should be divisible by 2, plus 1 (for symmetry). When knitting alternate 3rd and 4th rows.
Fig. 40. The number of loops should be divisible by 2, plus 1 (for symmetry).
Fig. 41. "Fans." The number of loops should be divisible by 8, plus 2 extreme loops. When knitting alternate 2nd and 3rd rows. In the even rows above the "fans" the posts are not stretched.
Fig. 42. "Pea". The number of loops should be divisible by 5. Next, knit with the “peas” in the form of oblique lines.
Fig. 43. Magnificent columns. The number of loops should be divisible by 8, plus 1 (for symmetry), plus 2 extreme loops.
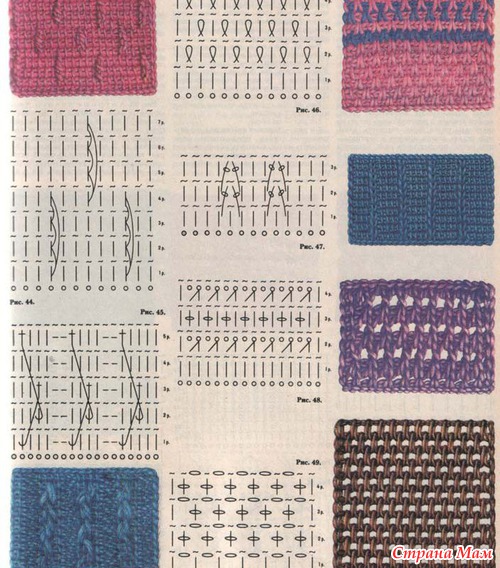
Fig. 44. Relief "rollers".
The number of loops should be divisible by 3, plus 2 (for symmetry). The main background is the “simple braid” pattern, on which “rollers” are performed in the 4th and 7th rows.
Fig. 45. "Braid".
The number of loops should be divisible by 6, plus 4 (for symmetry), plus 2 extreme loops.
In the 3rd and 5th rows, knotted elongated loops: insert the hook into the vertical loop several rows below, pull out the long loop, insert the hook into the vertical loop of the previous row, put the thread on the hook and drag it through 2 loops on the hook. Continue to continue to knit on the scheme.
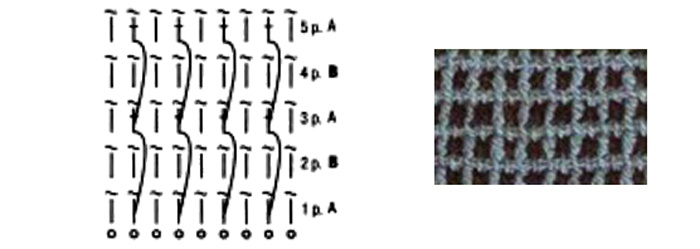
Fig. 46. The number of loops should be divisible by 2, plus 1 (for symmetry).
When knitting alternate 3rd and 4th rows. To get a color pattern, you can change the color of the thread in 2 ways: through a row, starting from the typesetting stage, or through a row, starting from the clamping stage.
Fig. 47. Stripes of "braids".
The number of loops should be divisible by 4, plus 1 (for symmetry), plus 2 extreme loops. Next, knit like 3rd row. Two loops stretched out from under the horizontal pigtails of the previous row are knitted together in the fixing row.
Fig. 48. The number of loops should be divisible by 2, plus 2 extreme.
1st row - according to the scheme.
2nd row - * hook hook under the two vertical loops of the previous row, throw a thread, pull the loop, lay the thread again and knit the loop; make a nakid *, an extended loop of a dial-up row.
3rd row - according to the scheme.
4th row - as 2nd row.
Next alternate the 3rd and 4th rows.
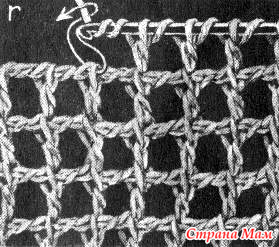
Fig. 49. Grid. The number of loops should be divisible by 2, plus 2 extreme.
Needlework: Popular Encyclopedia / Ch. ed. I.A. Andreeva - 1993
Scheme
Nodule ru / needlework lessons / Tunisian knitting
Lesson number 5 - Tunisian knitting
Tunisian knitting. Lesson 5
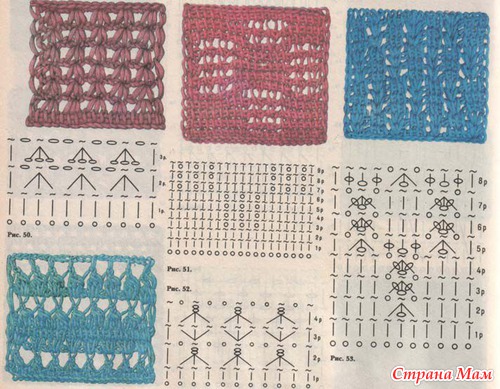
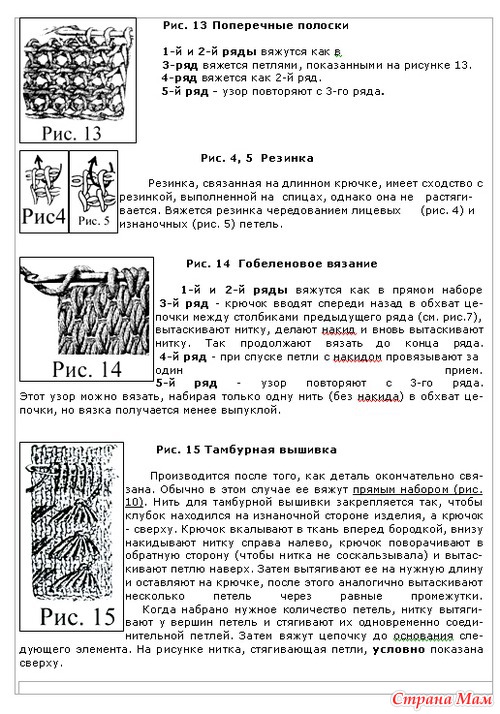
Fig. 50. Openwork. The number of loops should be divisible by 3, plus 2 extreme.
In the 3rd row, 3 loops from the inside pigtails of the previous row are knitted together in the fixing stage.
Fig. 51. Openwork squares. The number of loops should be divisible by 12, plus 7 (for symmetry).
10th row - start from the 2nd row.
Fig. 52. Openwork stripes. The number of loops should be divisible by 3, plus 2 extreme. In the even rows, enter the hook immediately under the 3 loops of the previous row, knit them together and knit a chain of 2 air loops over them. In the 3rd row, pull out 3 loops from one loop of the previous row: a loop, a cap, and another loop. Next alternate the 3rd and 4th rows.
Fig. 53. The number of loops should be divisible by 6, plus 3 (for symmetry), plus 2 extreme loops.
9th row - start with the 3rd row.
Fig. 54. Scythe openwork. The number of loops should be divisible by 4, plus 2 extreme. Two loops knit together in a series of loops.
6th row - start from the 2nd row.
Fig. 55. Color pattern with the "influx." The number of loops should be divisible by 4, plus 2 extreme.
7th row - start from the 1st row.
A thread of new color to enter into the work when tying up the binding phase.
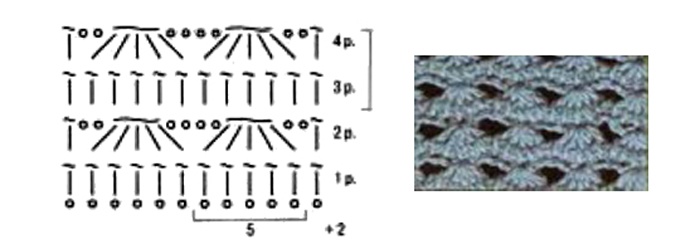
Fig. 56. Colored "seashells". The number of loops should be divisible by 10, plus 5 (for symmetry), plus 2 extreme loops. A new color to begin in the fixative stage and change through the row.
7th row - start from the 3rd row.
In the even rows in the dial-up stage, 5 loops are made of one loop: loop, nakid, loop, nakid, loop. In the forcing stage, they are knitted together.
Fig. 57. Colored openwork. The number of loops should be divisible by 2, plus 2 extreme.
5th row - start from the 3rd row.
Attach crossed loops to the space between the stretched loops of the previous row.
Fig. 58. Ornament. In Tunisian knitting, the ornament is usually performed on a knit "simple braid" or "front". The pattern of the ornament is applied to the paper in a cage just as for cross-stitching. Each cell corresponds to one elongated loop, each row of knitting (1st and 2nd stages) corresponds to a row of the pattern.
When performing the 1st stage of a row, type loops, alternating threads of 2-3 colors, when performing the 2nd stage (knitting with a horizontal chain), knit one or another color with a thread, repeating fig. 1st stage.
When performing an ornament, a free thread that does not participate in the work should be pulled along the seamy side of the knitting. In the transition from one color to another, the threads are crossed. If a colored thread is introduced from the edge, i.e., from the first loop of the row, then in the previous row the last loop of the horizontal braid of the 2nd stage must be knitted with a thread of a new color.
In order to pull out threads from the seamy side from the work, they would not stretch the ornament, when knitting, it is necessary to stretch the fabric slightly, but at the same time, the yarn pulling should not sag. When knitting with a long crochet, it is not recommended to use a pattern with a large pattern of the ornament, so that on the seamy side the broaches do not pass too long. Multi-color patterns are not recommended, since loose threads passing along the seamy side of the knit will create a large thickening of the knitted fabric.
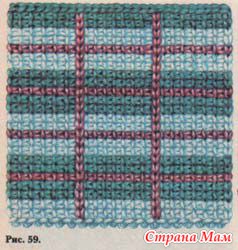
Fig. 59. T he c to. As a background for knitting, the cells most often use a “simple braid” and, when knitting, alternate threads of different colors. Then, on the finished web, vertical finishing strips are performed with chain loops. To do this, hold the colored thread on the index finger of your left hand under the knitted fabric from the wrong side. Hook, located in the right hand, enter into the fabric from the front side to the wrong side (gob down), pick up the thread and stretch the loop on the front side. The length of the elongated loop should be equal to the height of the row. Without dumping the stretched loop, re-insert the hook into the fabric from the front side to the wrong side and, lifting the thread, pull the second loop of the pigtail through the sheet and the loop on the hook. So gradually knit the vertical row of chain chain loops. The loops of the chain should lie on the canvas freely, without tightening it.
Needlework: Popular Encyclopedia / Ch. ed. I.A. Andreeva - 1993
Scheme
Nodule ru / needlework lessons / Tunisian knitting
Lesson number 6 - Tunisian knitting
Tunisian knitting. Lesson 6
Products made with a long (Tunisian) crochet
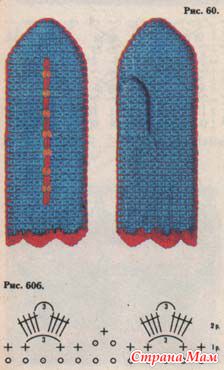
Mittens (Fig. 60).
Material: approx. 100 g of wool yarn 32/2 in 6 additions.
Long hook number 4.
Mittens knit in expanded form on the pattern. Knitting pattern "simple braided pattern". Direction of work from the edge of the mittens to the fingers. To build a pattern, it is necessary to take measurements: the length of the mitten, the distance from the edge of the mitten to the base of the thumb, the circumference of the hand on a hand clenched in a fist (Fig. 60 a).
Since the long crocheted fabric does not stretch, the mittens knit loose, straight shapes. The width of the canvas should be equal to the circumference of the brush plus 2 cm on the free fit.
Dial a chain of air loops along the bottom edge of the mitten (for example, 20 cm is 40 loops) and knit exactly (for example, 10 cm) to the base of the thumb. Make a cut for the thumb (see Horizontal Cuts). After 10 cm after the incision of the thumb, start tying the toe.
Divide all the loops in half (40 loops: 2 = 20 loops) and subtract one loop at the edges of the web in each 2nd step of the row to the 20 edge loops of the palm.
It will be more accurate and beautiful if you knit together the third and fourth loops from the beginning and end of the row. Then, on the 21st loop, grabbing one loop from the palm in the middle of the canvas, follow the toe of the back of the mitten.
Finger knit from two halves. For each type 8-10 elongated loops
(6 elongated loops on the cut and 1-2 from the gap at its edges). Tied to the nail of the thumb, diminish the hinges in the same way as the toe mittens. On the second side of the incision, follow the other half of the finger. Stripped knitted mittens through a damp cloth, sew a finger from the wrong side with a working thread. Mittens sew on the front side of the kettel stitch working or finishing thread.
The edge of the mitten is tied with a short crochet according to the pattern (Fig. 60 6).
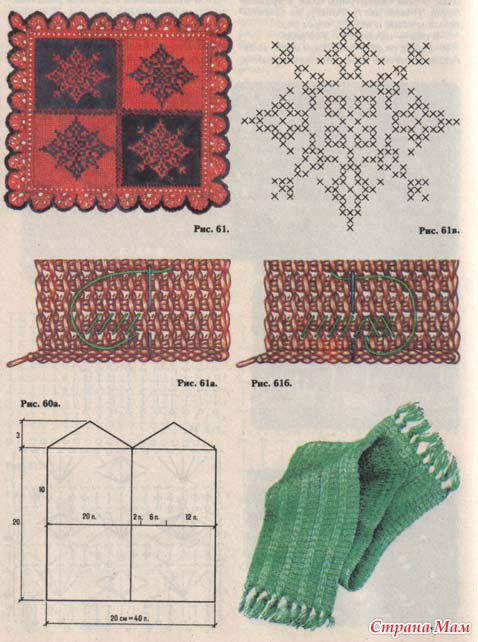
Pillowcase for cushions (Fig. 61).
Size 40 x 40 cm.
Material: 200 g of wool yarn (two colors) 32/2 in 6 additions. Long hook number 5.
Yarn of different colors tie two squares 16 x 16 cm in size with a viscous "plain braid". Finish the finished squares and on the sides on which they will connect, embroidery zigzag stitches. Sew the squares end-to-end with a needle and thread.
Cross-stitching is often used to trim a linen made by Tunisian knitting. This type of embroidery gives a dense convex pattern (Fig. 61 a, 61 6).
Embroider a cross on each quarter of the pillow with a thread of a finishing color pattern (fig. 61 c). Tie the finished canvas around the perimeter with a short hook, making loop additions at the corners.
From the 1st to the 4th rows knit with a thread of one color, the 5th row - knit with a thread of a second color.
1st row - columns without nakida.
2nd row - * 1 double crochet, 1 air loop *.
3rd row - * 7 columns without crochet, 5 air loops, 1 loop at the base to skip *.
4th row - for each chain of 5 air loops, link 4 groups of 2 unfinished columns with 2 naquids and 2 air loops between each group.
5th row - single crochet columns with pico of 3 air loops.
Scarf (Fig. 62).
Material: 150 g wool of medium thickness. Long hook number 5.
Dial a chain of air loops across the width of the scarf (the number of loops of the chain should be divided
by 6), plus 3 loops (for symmetry).
Link the desired length of the scarf (see Fig. 53), repeating from the 1st to the 4th row.
The finished canvas tied with a short crochet; Attach the brushes to the short sides of the scarf.
Needlework: Popular Encyclopedia / Ch. ed. I.A. Andreeva - 1993
Scheme
Tunisian knitting. Long crochet knitting
Tunisian crochet hooks
Tunisian knitting is usually performed with an even hook with a tip about 30–40 cm long. Such a hook can be made from a metal knitting needle by wicking the beard on the pointed end of the knitting needle. In the work of such a long hook seems more laborious than the usual. In addition, many imagine the Tunisian cloth only flat and dense, all this affected the popularity of the Tunisian way of knitting - it is not very common.
Try to use in Tunisian knitting new tools: a short hook on a fishing line 100 cm long, and for more complex patterns and “two-headed” techniques - two short hooks connected by a fishing line. They allow more convenient and easier to perform not only the lobar, but also transverse and oblique fabric, as well as knit round.
Often the question arises: how best to keep a Tunisian hook? A long hook with a set of loops is easier to hold as a needle, and when anchored - like a hook. Hold the short hook as usual with three fingers of your right hand (like a pen while writing).
Shaped lines on a simple braided line
Shaped lines (shoulder, armhole, neck) on a simple braid must be knitted in incomplete rows. The method of vyvyazyvaniya right and left different.
On the pattern to make the calculation of the reductions in the loops and rows (as in the needles or the classic hook).
To decrease to the right at the beginning of each row, instead of a set of loops, make the calculated number of connecting columns, then dial loops as usual.
For declines on the left at the end of each row, do not extract the calculated number of loops; close the row as usual. To fix the loose edge after making the entire line (armhole, shoulder, neck), make a common row with connecting posts, securing at the same time all the rows of the shaped line.
Adding 1 loop
To add 1 loop in the middle of the row, insert a hook between the two vertical loops into the horizontal loop of the previous row and pull the composing loop. In the purl row to knit all the loops in pairs, as usual.
http://crochet.korabel.net/uzori/Tunis/

Circular Tunisian knitting.
Carry out a crochet on a rope 50-60 cm long. A chain of air loops, which is the basis of knitting, fold into the ring by a floor with a column. From each loop pull out the Tunisian columns. Going to the place of closing the row, tie a half-column (a binding loop), inserting a hook under the back thread of the first stretched loop of the row, and then knit all the loops from the hook in pairs, just like in the second stage of the row when knitting a straight web. When there is only one loop on the hook, close the row again. To do this, remove the hook from the loop, start it from the wrong side to the front under 2 threads fixing the last Tunisian column, pick up the loop removed from the hook, pull it out and knit it once, remove the hook again and enter it from right to left under the front thread of the first Tunisian column , pick up the left loop and stretch it through the loop on the hook. The first Tunisian column of the 2nd row is connected. Next, perform the usual set of loops. The closure of each row to do both at the end of the dial stage, and at the end of the clamp phase.
Knitting in a circle
http://s39.radikal.ru/i084/0904/4e/8334cfbb4d8f.jpg
Girls! I tried to collect everything in a heap, to whom it would be interesting, but in my post there is not enough information for you in Yandex, type Tunisian knitting, a lot of any posts will be released.
ENCYCLOPEDIA of KNITTING
Http://klubok51.my1.ru/index/tunisskoe_vjazanie/0-42
Watch the video tutorial to get an idea:
And here are some schematic explanations.
| Related articles: | |
|
How to make a screenshot on the iPhone and edit it: tips for users
. Today, in continuation of the topic, we will talk about how to take a screenshot on an ... Ultrasound of the head and neck vessels - what shows and how much it costs
USDG of vessels of the head and neck (otherwise - Doppler ultrasound) on ... Pokrovsky Stavropegic Convent
One of the most revered and greatest spiritual personalities in Russia is ... | |


