Reader's Choice


Popular articles
The days when knitting was necessary in everyday life needlework, are long gone. Despite this, the number of skilled knitters is only growing. At the peak of popularity, unique hand-made things? Almost all needlewomen are interested in the question: how to finish knitting? There are many ways to close the last row.
The next day, remove excess fat and spend another round. If necessary, repeat this process several times. The leather saddle should be relubricated every 2 months. Note: when pulling in old pants, tighten! If the brakes are worn, bent or creaked, they must be adjusted. For this you need only the corresponding nut or hex key and a piece of cardboard.
To change the rubbers, you must remove the brake cable. This helps to loosen the brake on the adjusting nut on the Bowden cable. Then replace the rubber and reinsert the rope. For some rubbers, a direction has to be given. So that the brake does not creak, the brake gum should not be completely parallel to the rim surface. Brake shoe adjustment is as follows.
Loosen or tighten the nut on the brake shoe until the brake shoe slips off by itself, but can still be adjusted. Position the brake shoe so that it engages with the center of the rim side surface when the brake is applied. A standing brake shoe that is too deep can slip into the spokes, which can also have devastating consequences. Now adjust the brake shoe so that the front edge touches the rim first, but the rear edge of the brake shoe is still 1-2 mm from the rim. Adjustment can be simplified by holding a piece of cardboard or a match between the rim and the rear edge of the brake pad and pulling the brake lever. Tighten the bolt or nut without changing the position of the brake pad. Adjust the brake on the adjusting nut on the Bowden cable so that it does not touch the rim, and the braking point matches your personal habits. He must not crush the tire, otherwise he will be destroyed. . Warning: incorrectly installed brake or forgetting the brake cable fastening can lead to unpleasant surprises.
Loops can be closed on a pattern. So gum 1 on 1 finish in the following way. 1st loop knit facial, 2nd purl. Pull the front through the purl loop. A new loop knit facial, the next - purl. Stretch the purl through the front. Alternate these methods and close the entire row to the end. Thanks to this method closed loops will lie flat along the edge of the finished web.
So try the brakes before driving in a safe area! Spokes wear over time - they become longer. At some point, the wheel gets a side or rash. Then it should be re-centered. To do this, you need a nipple tensioner and a bike with a brake and patience. Better than the rim brake - centering strut.
First, the rash should be eliminated and then by-effect. First disassemble the tire with the hose. Then find the place with the biggest bang. A good comparison provides a brake rim. Felt or chalk can be useful when marking blows as the wheel spins.
A closed edge may look different. If you finish knitting on the front side, then the resulting edge will lie on top. On the wrong side, on the contrary, it will be less visible.
After closing the knitting tail is formed from the thread. It can be used to staple the fabric. In this case, it is better to leave the thread longer. The length of the thread depends on the thickness of the yarn and the diameter of your knitting needles. If you do not need to stitch, then the thread is cut and neatly hidden on the wrong side of the canvas.
Most of them are influenced by several knitting needles, they must all be re-stretched. Ideally, all the spokes have the same voltage. Voltage can be controlled by squeezing two intersecting spokes.
Slide to the right: loosen the right knitting needles, pull the left side accordingly, remove to the left: loosen to the left, pull to the right. Just pinch the needle from the side of the dent with the nipple clip. Do not dress too much at once, rather act in a few steps. If the needle is already very dense, the other side may be weakened.
In some cases it is better to use a needle when closing the last row. This method gives the edge of elasticity, which is simply necessary for some parts of clothing (for example, for neck). In addition, needle-like closures are used when they want the first and last row to look the same.
In order to connect one part with another, it is not necessary to close the last row. There is a method that will facilitate the completion of the product. Knit to the last row. We do not close it, but simply cut off the thread. Knit auxiliary thread another row or even several rows. We remove the canvas from the spokes. The edge of our knitting is subjected to heat treatment. We put a gauze on it and iron it with an iron with steam. We dismiss the rows connected by an additional thread. We have an ironed knitting edge. Hinges slightly elongated. Next, connect the item with another item knitted stitch.
Knitting needle - turn counter-clockwise to loosen the needle - turn clockwise. When all dents have been removed, the impeller should be pressed. To do this, place the wheel on the ground and press on the rim with both hands. Then turn the wheel and press again. Now check if there is a side effect. If so, repeat the center and press again until there are more beats.
To keep the wheel round, the spokes must sit down. A fast lap with maximum air pressure on the cobblestones until the initial groan and creaking is enough. After that, you must re-center and repeat the procedure. The bike was supposed to travel several thousand kilometers again.
In openwork work, the loop is better not to close immediately after the pattern. It is much more convenient to finish knitting, knitting another 1 row of facial ones. Then this row is closed in any convenient way.
If the fabric is connected with a purl, then close the knitting as follows: the first 2 loops are knitted with purl. Further edge pulls through the 2nd. The next loop knit purl. Stretch the previous loop through it. Knit this way to the end of the row.
If the thin brake disc flexes slightly when tightened in accordance with the instructions, you already have a problem: then the pads wear unevenly. It is very stupid if the disc itself has a punch. If you dodge all these measures, you simply lift the lining and rest, but also reduce the braking power.
You knitted a hat with two needles, and you wonder how to close the wool cap? Fortunately, my grandmother offered me not one, but four brilliant ways to close a hat knitted with two needles. Knit your woolen hat with two needles in a rectangular shape, until you reach the desired size. Instead, take a strand of wool and pass it through each of the dots that were set on the needle. Wrap, fasten the seam with several knots. To close it, attach some curls as follows: Knit the first six points of the two points together. In line 25, insert three points together and insert the resulting point near the remaining points of the hat. Knit this point along with the next one and knit the next four stitches in pairs. It closes the closure of the same color or prefers a different contrast color to give a more pleasant shade.
In some cases, the hook becomes an excellent helper in closing the last row. It is especially convenient to pull them through one loop through the other.
In order to finish a row faster, you can replace the working needle with a needle of a larger diameter. For this purpose, you can choose it several sizes larger.
So, when you hear any of these names, you know that they refer to the same point! This tutorial consists of two parts: one in which we will learn to set the points on the needle, and the other in which we will see how to make the right point. Do not worry yet about whether you are getting better or worse, because the first is to free yourself and assimilate the sequence of movements. Already in the third tutorial, you can try to make the samples perfect.
Pull the small wool out of the ball and make a knot, making sure the needle can fit in the loop you left. The easiest way is to make a simple node, for example, close balloon; for this you only need to fold the end of the wool so that it matches twice and makes a knot. You can also make a sliding knot without requiring a calculation to match the size of the needle. Now insert the needle through the hoop, and we are ready to begin!
In some parts it is required to close the hinges at the same time. The easiest way to make it look like this. At the beginning of the row we close the required number of loops, knitting them 2 together. After that, knit on the pattern to the end of the row. At the beginning of the next row, close the number of loops that should have been closed at the end of the previous row. After uneven knitting will be a little noticeable.
Now let's collect the first item. Remember to make the glasses pretty loose, because if you squeeze them too much, it is very difficult to twist them. Thus, you can control the wool well, hold it with the ring and the fingers of a person; this way your thumb, index and heart can freely perform the maneuver.
Now you just need to repeat the operation as many times as you want to knit. In this case, since what we are going to do is small samples, with 20 points there will be more than enough for the samples to shine, and the type of point of each of them will be well appreciated.
How to finish knitting? It all depends on what part you knit. Closing with a needle (Italian method) is usually used to create an elastic edge. The method is suitable for closing armholes and necks. Universal closure method - knitting 2 loops together. At the same time on the edge of the web a pigtail is formed. Also, the method of closing a row depends on how the pattern is related to the part.
Another needle comes into action. Now we are going to make a round, that is, to steal one by one the points that we have set. Starting position: while the left hand holds the needle with the set points, the right hand holds the wool that passes between the ring and small fingers; You can also leave it free and always handle it with a pointer and thumb, it is a question of taste.
Now, if you want to help your left index finger, remove the tip that you have just surrounded with wool, until you see that it has surpassed the left needle. At this time, skip the right needle up so that it is higher than the left. Now all you have to do is insert the correct needle a few centimeters into the point you created, and when you have securely fixed it, pull it from left to right to steal it, that is, remove it from the left needle and translate it into the desired the needle.
In the description of the model it is said that I should close the loops on the seamy side, knitting them with facial ones. What does this mean?
Tie a row of loops on the front side, as usual. At the end of the row, turn the knitting over so that the wrong side is turned towards you. Now close the loops, as usual, knitting each face of the loop, pulling through the previous loop and removing the closed loop from the knitting needle. If you want to close the loops with purses, knit the loops not with facial but with purl; you will have a characteristic chain along the edge on the opposite side from you.
Repeat the same operation until you steal all the points of the left needle. You will see that they are very repetitive movements and that with practice you will make them faster every time. Some people weave the speed of vertigo with the skill that many would like. Here in Spain we have a good example of this, our dear friend Guna Pigita, who is a wunderkind in the art of weaving! But what matters is not so much the speed with which you can do it, but also how you like it.
So many more hills on the left needle, the wider the fabric. To finish, some tips that will allow you to completely control the needles and avoid slipping or allow you to lose your stitches. Remember that from now on the needles are an extension of your hands, and the better the control, the better everything will flow!
In the description of the model it is said that it is necessary to close the loops with an elastic band. How can I do it?
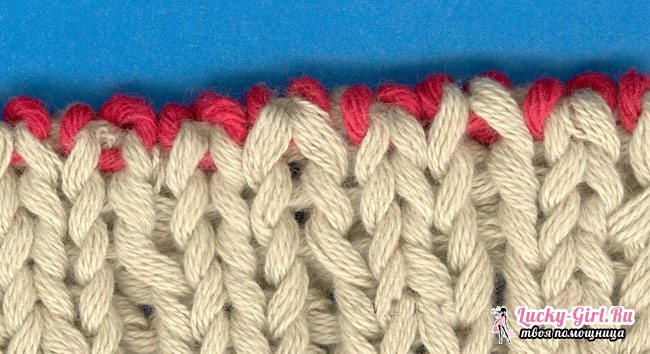
When closing the loops, knit them with an elastic band, knitting facial loops with facial loops, and pursing them with purl. For example, for a 1x1 elastic, knit the front first loop, the next loop, knit it in the wrong direction, then stretch front loop through the purl. The next loop on the left knitting needle is the front one, so knit it with the front one, then stretch the purl loop through the front one. Continue to close the loops along the entire row. If you close the loops with a rubber band, then the chain of closed loops will be located along the edge of the canvas, and not lie in relief along the front side.
The little finger and index finger gently hold the needle from the palm. In step 1, the right hand even completely releases the needle. In addition, the function of the fingers is very similar to the function of the fingers of the left side: the little finger and the ring hold the needle in the palm of the hand; index and heart supported; and thumb presses down to ease control.
In any case, each teacher has a brochure, so over time you will find positions and the most convenient solutions for you. And you will also find that in the art of weaving all the fingers work and that the separation of tasks is fundamental! Hope you enjoyed this introduction to the fabric. Well, tell me how about a punto bobo! There is always a beginning in all knittings. However, we find that installations are sometimes too loose or too tight. Rarely can we get expandable assemblies that restore their elasticity and shape.
I do not like the chain that forms along the edge of the knitted fabric after I fasten the loops. Can I get rid of it?
If you close the loops as standard, the chain will always be formed, but it does not have to be located on the front side. You can close the loops with the purlins (or on the other side of the canvas), and then the chain forms at the back. Or you can close the loop with a rubber band, and then the chain is formed along the edge, and not on the front side. You can also use other techniques, such as looping with a needle or a stitched edge.
On which side should I close the loop - on the front or on the back?
It depends on how you want to see a closed edge. If, closing the loops, you knit them with facial ones, the chain of closed loops will be on the side turned to you. If you want the chain to be on the front side, then close the hinges so that the front side is facing you. If you prefer the chain to be on the seamy side, then close the hinges, turning the knit to the seamy side. Remember that if the edge goes into the seam or becomes the bottom of the hem, it will be hidden, and the look of the closed edge does not matter.
What should I do with a trimmed yarn tail after fixing the loops?
If in this place you will sew a seam, leave a long tail and sew a seam with it. In other cases, closing the edge, hide the ends of the threads on the seamy side of the knitting.
Is it possible to dissolve the last closed row?
Yes. Using the tip of the needle, pull the cut thread through the last loop. Pull on the tail - and the closed edge will bloom. If the yarn is a little tangled (tangled) and does not loose freely, carefully cut only tangled fibers with sharp scissors.
When I fix the last row, the edge turns out to be too dense. What should I do?
This is because the hinges must lie sideways on the edge of the web, but the width facial loops more than their height, so the closed hinges, of course, are a bit more tightened compared to the hinges under closed next. Here are some tips that can help you.
Use the larger number needles (or crochet hook) to close the loops. This automatically makes the loops a little more, so they stretch more along the edge. Be sure to form each loop on the straight side of the spokes, and not on its tip.
Close the hinges loosely. Each time, closing the loop, slightly raise the right needle, straighten the loop, and then knit the next loop. If you knit tightly while closing the row, suppress the urge to tighten each loop.
Try a different way to fasten the loops. Fastening hinges with a double crochet, fastening the loops with a needle or fastening the loops of hollow knitting is much freer and more elastic than the basic method of closing the loops.
What is the best way to fix the last row of lace or lace?
To get a regular, but very free row of closed loops, fasten the crocheted loops. If you crochet, you can close the loops with the same crochet. You can close one loop at a time, or you can work with a group of hinges and decorative trim.
What type of loop fastening is the most stretched?
Fastening the loops of hollow knitting, if you do it freely, although often such fastening leads to a loss of the shape of the product. The fastening of the double-stitched loops is elastic and keeps its shape better.
Is it possible to make the last closed row match the dial edge?
Fastening the hinges with a needle is best combined with a typesetting edge; in addition, you can control its tension, making the edge freer or tighter.
I knitted a pattern with braids. How can I fix the last row so that the edge does not wrinkle and stand out?
Spit significantly retract the canvas. So that the closed edge does not turn out like a fan, reduce one or two loops at the top of each braid. This can be done, either when you close the loop, or in the previous row. You can experiment with loop reduction when you close the sample.
Can I tie the hem by closing the last row?
Yes. Knit the front stitch to the edge of the part. To keep the item neatly folded, just continue to knit the face with a satin stitch. To make a straight and flat fold, knit one or two rows with a purl stitch (two rows form a more embossed edge). To get a jagged edge, on the crotch, the whole row should be knitted with the following repeating pattern: 1 nakid, 2 knit loops together on the front. Then knit again with the front satin stitch until the length of the web above the fold is equal to the length of the canvas under the fold. Cut the thread, leaving the tail, which will be convenient to sew the hem. To join the two layers of fabric, bend the edge inward. Thread the yarn into the needle and insert it into each loop on the knitting needle and into each loop of the knitted piece. You can also very freely close the edge of the web and then sew it to the edge, but then the edge will be more voluminous.
To make the edge less voluminous, tie the inner layer of the edge with a thinner yarn, use fewer loops, or go to smaller-sized knitting needles.
I knitted a pattern with the addition and decrease of loops. How do I fix the last row to make it look beautiful?
You must close "by pattern." As you knit a row, you should not knit the loops with facial loops, but knit them exactly according to the pattern. For example, if you knit a rubber band, continue to knit the front and back loops, closing the row. At the same time, you can continue to partially or completely subtract and add loops.
Take for example tracery pattern "grid". On the seamy side you knit all the loops in the seams. On the front side, your pattern consists of nakidov and decrease loops. Every time you have two loops on the right spoke, pull the right loop through the left loop even if the left loop is a nakid. When you need to turn down the loop, for example, knit 2 loops together with the front one, make a subtraction, then pull the right loop through the subtracting loop. Although the difference between closing loops in a pattern and regular closing loops is almost indistinguishable, loops are less tilted when you close them in a pattern.
How do I get rid of the “ladder” when I close the loops in several rows?
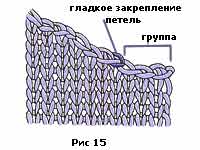
When you knit armholes, shoulders and neckline, you often have to close the loops in groups, as a result, the beveled edge is a “ladder” (Figure 14). On the other hand, if you create a smooth diagonal edge, it is easier to sew and type loops over it.
You can align the edge by removing the first loop of each group and then closing it. To do this, close the first loop group as usual. When it comes time to close the next group of loops, remove the first loop, as with facial knitting. Knit the front face next loop. Pull the loop through the front loop, and then remove it from the knitting needle. Continue to close the remaining hinges as usual (Figure 15).
| Related articles: | |
|
How to choose the color of varnish to clothes?
Selection of lacquer color is not a simple matter, because its shade is due not only ... Contract of sale of an apartment
The package of documents required for the conclusion of the contract of sale ... Annual tax on cars
That each owner of the vehicle, ... | |


