Reader's Choice


Popular articles
In the manufacture of flowers inevitably raises the question of how the leaves to decorate the composition. Of course, green! However, there are lots of greens and shades, including gold, copper and silver. And also there are several techniques for making leaves. Consider some variants of leaves from ribbons.

To make a pointed sheet, fold the ribbon as shown in the first schematic illustration:
Scrape through the bottom edge and tighten:

Wrap the thread tight enough at the base and cut off the protruding ends.

Such leaves can be sewn to the product or attached to the wire and beautifully wrapped with a ribbon or silk thread. Also, leaves of this type can be used as flower petals, creating beautiful flowers according to this principle.
The principle of production is the same as in the previous sheet.

The only difference is that instead of the assemblies on the sheet, folds are made on the right and left.

These leaves have a rounded shape due to the U-shaped firmware.
To throw it along such a trajectory as drawn in the sketch and firmly tighten.

Such leaves are made from a special ribbon with a wire edge.


Leaves can be made from tape, folded and along, and across.
If you fold the tape in width, before that you should take out the wire at the bottom.
Then bend the corners and promet.

Tighten and distribute the folds after opening the tape. Fasten the thread and cut off all unnecessary.

If you fold the tape along, then the wire should not be pre-pulled.

Lower corners gently bend and sew a couple of stitches.

Spent as shown.

Tighten the thread and open the ribbon, distributing the assembly.
I want to devote today's article to a very extensive and sought-after topic - master classes on kanzashi leaves. Practically in every flower arrangement we use leaves, sometimes quite small, barely noticeable, sometimes large, in order to add volume of work, sometimes to hide any flaws. In any case, the leaves need different and large and small and simple and intricate. I collected this collection of microns so that you have a choice of which leaves to diversify your floral arrangement.
We will make leaves of ribbons 5 cm and 2.5 cm wide.
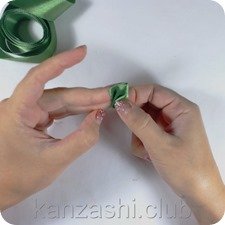
In the first one, we will make simple and versatile leaves of 2.5 cm ribbons, which will fit almost any kanzashi color. Take a satin ribbon of green color, I will not cut it into segments to show that the petals can be made of any size. We turn the ribbon inside out to us, rotate the left edge at a 90 degree angle and place the right edge of the ribbon on it. The result was an angular petal.


Cut the ribbon and make two folds at the base, fix them melted over the fire.


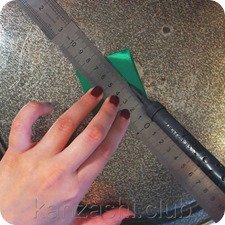
We will make two types of leaves from the 2.5 x 10 cm segment. To do this, fold the segment in half (face to yourself). We impose a metal ruler diagonally and cut the ribbon into 2 parts. We get 2 different leaves.


![]()
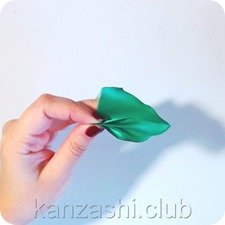
Let's make thin long leaves from a part which turned out in the previous MK.
We take the leaflet made earlier by the base, so that the edges are up, now we lower them down, making a fold on both sides and wrap the remnants of the tape again upward.


We melt the base.


Now we will make the leaves from tapes 5 cm wide.
We cut the length of 5x10 cm in half (facing towards us), put a metal ruler from the bottom edge of the tape to the center of the upper part and cut it with a soldering iron or a burner.


Also cut the sheet from the other side, it turned out two leaves "with a pocket." We don’t throw away the blank left over from the leaves, we will also make a leaf from it.


We will make a piece of blank, which remained from the previous master class.
Cut off one melted edge at the blank and cut the base to form an open part.


We process the edge with a lighter and slightly draw them out, a slight waviness is obtained. At the base of the tape also melted fire.


We make several folds first on one side, then on the other. The bottom of the leaflet is melted and “flattened” with your fingers so that the base is flat. These leaves look great with strawberry berries.


The next workshop is devoted to the leaves of the rose, I will make them double with glue and wire.
We will cut a satin ribbon on segments of 5x7 cm, 2 pieces will be required for 1 sheet. We put glue on the wrong side, I use “Titan”. We will diagonally overlay the wire and cover the top with a second piece of satin ribbon. Smooth the sheet, carefully select the wire, it serves as a central vein. When the glue dries, cut out the form of the leaf from the blank, make the notches.


We carefully process the edges of the sheet above the fire and, while it is still hot, we will give it a slightly curved shape. The leaves can be of different sizes, shapes and with different textures. How to apply such leaves in the composition, you can see in
Kanzashi leaves and petals are the basic technology, on the basis of which beautiful flowers, decorations, and festive crowns are created for young ladies.
Our master class is dedicated to kanzashi leaves: leaf shapes, a set of materials and methods for making photos.
For kanzashi leaflets we will use satin ribbons. For the manufacture of classic flowers, we need a green or light green ribbon. After production, the leaves are decorated with beads, ribbons of bright colors and other light fittings.
While working, you will also need:
Lesson 1. Green leaves to kanzashi flowers
Lesson 2. Ribbon sheet
Lesson 3. Tape earrings

So, take our tape and cut it into 5-7 cm in length. The length depends on what size you want to get the leaves.
Now fold the resulting piece in half and carefully cut along the non-joined edge so that the oval leaf is obtained. If the cut does not work, draw a chalk outline.
Using a candle, scorch the cut edge and unfold the resulting billet. For singing, grab the blank with a pair of tweezers to keep your fingers from burning.

Now on the blank you need to make streaks, like on a real leaf. Such an element in the finished product looks very gently if a blunt knife was used.
Take a thick cloth, better terry towel, and put a leaf on it, only inside out. Now we take a dull knife and properly heat it over the gas. With a heated knife, begin to draw streaks on the satin blank: one will be central, and 3 will go away from the central one in each direction.
You can also clamp a fold on a piece of paper with tweezers, then hold the product a little over the lit candle.
Now turn the workpiece over and draw a vein again with a hot knife. Along the center, draw 2 lanes side by side, and draw the side stripes as on the inside. There are no strict restrictions or schemes, so you can give our leaflet a “live” look, as fantasy prompts.

To create such leaves, you also need to cut out the necessary number of blanks from a ribbon, but here they burn edges by 1-2 cm. Stretch the blank during firing, and you will end up with a beautiful sheet with wavy edges.

Take a satin ribbon and cut a strip from it, the length of which will be 1 times its width. Tape 5 cm wide - segment is 10 cm; if the width is 3 cm, then the length of the segment is 6 cm, etc.
| Related articles: | |
|
Symptoms of lactose deficiency in adults
Lactose intolerance is a clinically significant condition associated with ... How to mine Bitcoins - the essence of the process and where to start, types and profitability of earnings
Surely almost everyone who is just starting to get acquainted with Bitcoin, ... Knitting men's scarf: master classes for beginning needlewomen
So you want to warm your loved ones so that they are not afraid of whims ... | |


