Reader's Choice


Popular articles
Dear friends, today I want to tell you how to crochet a simple leaf. The article will not be big at all, sorry - summer))) and I, like all of you, want to spend as much time on nature ...
By the way, from here, there was a desire to crochet a leaf ... It hurts all right now on the street is beautiful - green ... nature has woken up and with might and main rejoices in the summer sun. And I also found a wonderful scheme, in my opinion, napkins ...
When I bind, I will show you, they use knitted leaves there ...
Well, let's get started, quickly hook a leaf and hook into the fresh air with the children to admire the beauty of nature.
Knitting techniques:
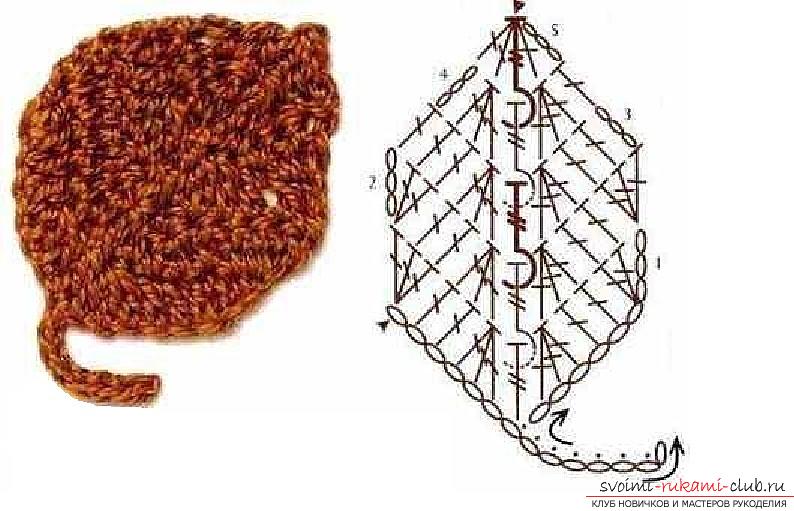
We knit a chain of 7 VP + 1 VP to lift
1 row - we enter the hook into the second loop of the chain and knit in a row 6 columns without a single crochet, then into the next (extreme) loop of 5 sc and again in a row 6 sc. Turn knitting. 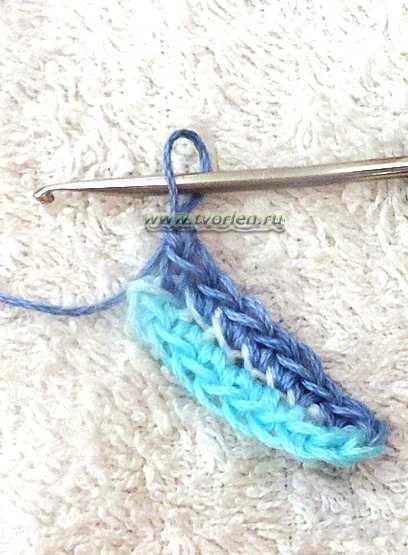 2 row - 1 VP lift, we introduce a hook for the back slice of the loop of the second lower column
 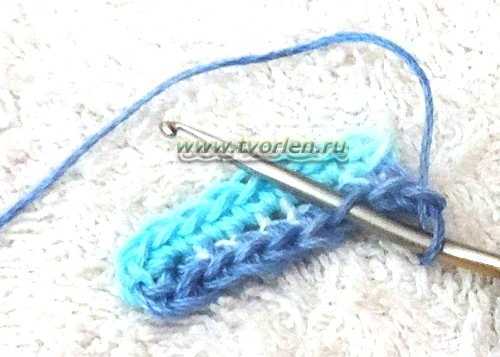 and starting with it, we knit 7 SBNs (do not forget that we knit all the columns behind the back of the loop), except for the central ... The central one is the column from which we knit several SBNs, it is located in the center of the row, therefore I called it so))) .
So, we knit the central column, as usual, for both lobules. We continue ... 3СБН from one loop, 7СБН in a row behind the back wall. Turn knitting 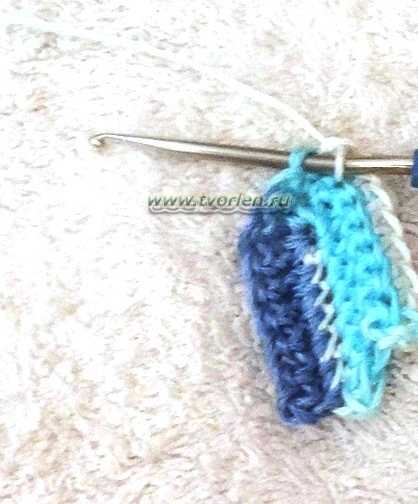 3-13 rows - similar to the second
 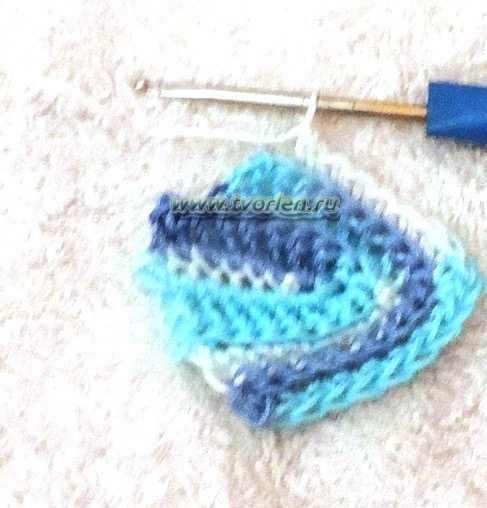 14th row - we knit up to the central loop, into which we make 1СБН and on this we finish the knitting of the leaflet.
 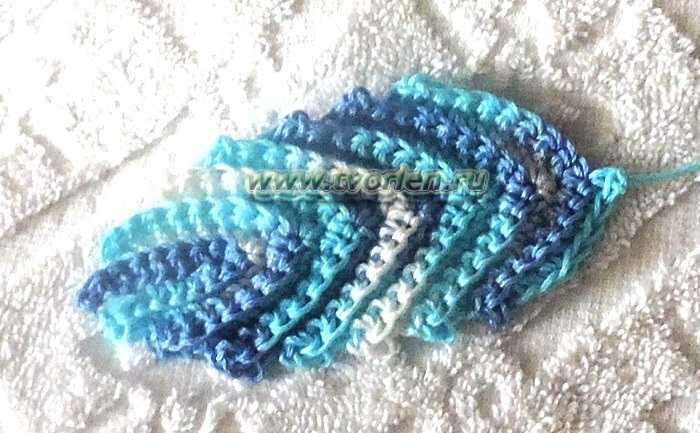 Crocheting like leaves is an element irish lace... You must have all seen such beauty. Honestly, I don’t even dare to start a similar thing ... In my practice, there was an attempt to knit napkins using the Irish lace technique ... The experiment failed ... or rather, it never ended - the entire napkin was not assembled in details in the bag ... and I don’t have the desire to return to it.
The napkin, which I started to knit now, is a rather ordinary thing, a little voluminous, not a lot of strange color for a napkin ... well, in general, you will soon see and appreciate the fruit of my fantasy on the basis of another not clever scheme from the magazine.
A start. The leaf is crocheted.
Here are the leaves I need as many as 16 pieces. True, I have already bound them too ... 
Join now!
And do not forget to leave a comment. Your opinion is important to me!
If you liked the article, then share this information with your friends by clicking the buttons of social networks! Just a huge request! - do not copy the entire material, please use the social buttons! Do not be shy! I will help, what I can 🙂 There was an idea - Share! Find mistakes - write, fix! There was a desire to somehow help the blog - I will only be glad! Hosting costs money, and the materials are not cheap now ... So, if you can, help financially))) 
Ko15shulka 10/08/2014
To the most impatient, and to those who have already decided what they need it for, I hint that the crocheting patterns of the leaves themselves are somewhat lower on the page. You can scroll down, skipping the "unnecessary" text to you. I want to say a few words about the places and methods of applying such leaflets.
Agree, sometimes it happens that by tying, stitching, or even buying a thing, we understand that it lacks some kind of zest. It can be either a hat or a handbag, or clothing. The easiest way is to decorate it with knitted flowers, leaves, or group them.
If an appliqué is more appropriate on clothes, then for the same handbag one can also make a three-dimensional decoration. Although, situations are different, you decide what is best suited.
With the help of such small knitted elements, you can also make a picture or a panel, aligning the leaves with flowers, or from leaflets of different shades and sizes alone, “scattering” them in artistic disorder over the background. For a similar picture-applications are perfect crocheted on stalks.
If knitting colors different types There are a lot of instructions and sizes, the situation is a bit worse with leaves. That's why I decided to present here several crochet leaf patterns that you can use in your work. I divided them into three degrees of complexity, although there is nothing difficult in general.
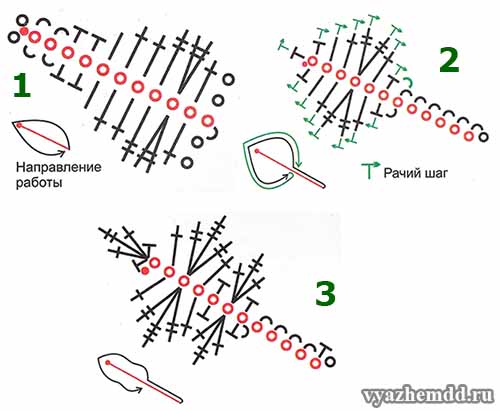
The first group is the simplest:
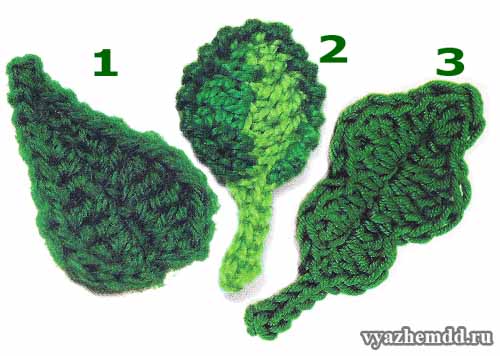
They are based on a chain of loops around which a leaf is formed with the help of columns of different heights. Leaf number 2 in addition, also tied with "stride step."
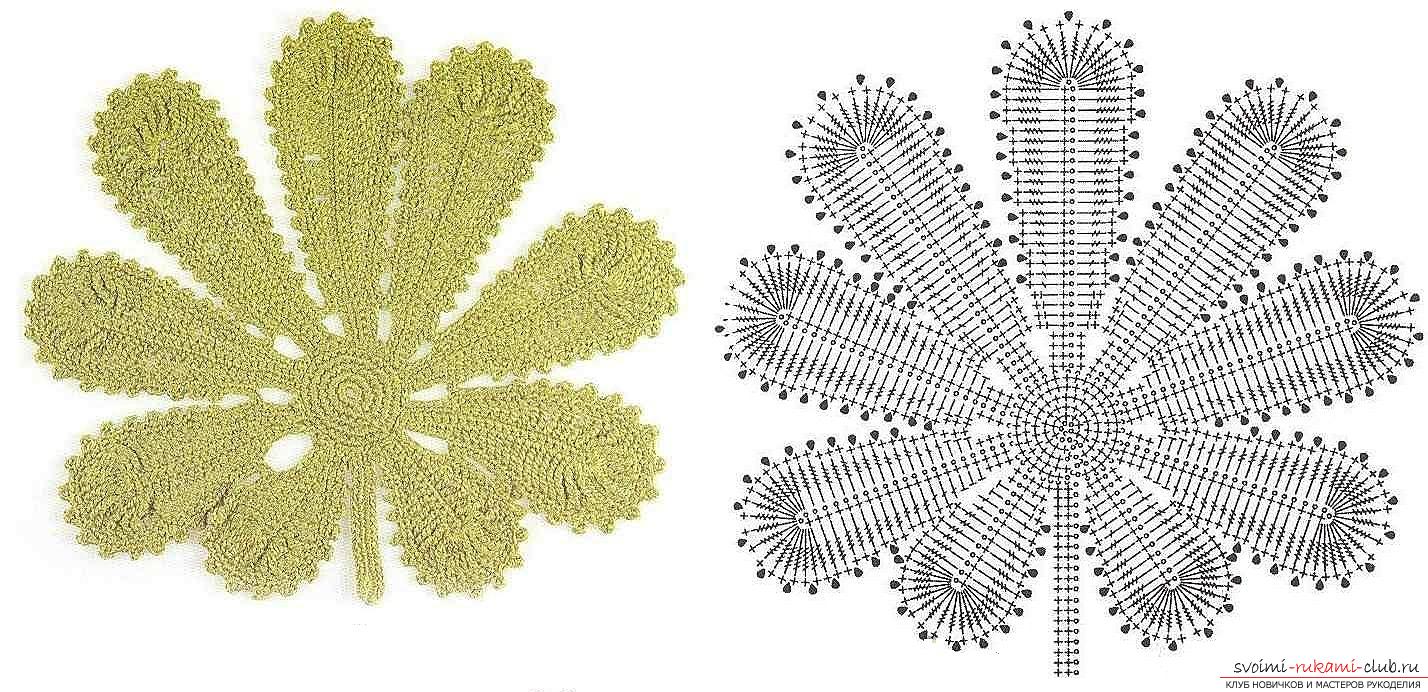
The second group of leaves is a bit more complicated:
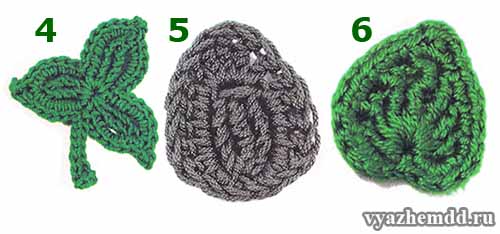
Here, knitting starts from the center point (for leaves 4 and 6, this is a ring of four loops, for leaf 5 - the first (initial) ce).
Ksenia Nikolaeva and her wonderful crochet flowers. 2011
If you have a head like a toilet, get a notebook ... (K.Nikolaeva)
Chronology of creativity of a talented craftswoman from kseniyanik.livejournal.com
2 May 4, 2011 Knitted bracelets
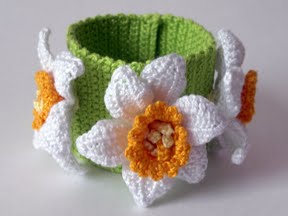
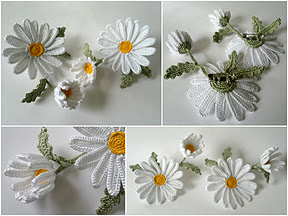
Quite often, posts from handmade_ru I flip diagonally, and then caught my eye on knitted bracelets. And I really wanted to. Highly. While contacted two. With daisies - myself. With daffodils - familiar girl. Fastened with buttons. I pretend who else of my acquaintances "to make happy") 
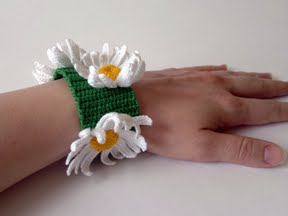
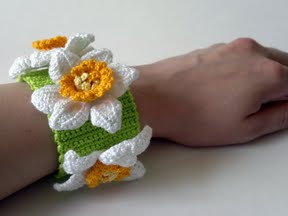
June 7, 2011 Bracelets: daisies and daisies![]()
In daisies slightly changed the scheme of tying petals compared with the previous version. These petals do not twist. Hooray 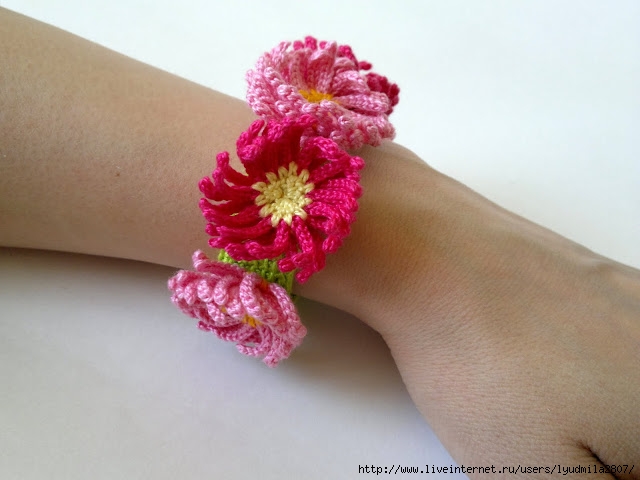
Daisies knitted according to the scheme from the book "100 Flowers to Knit and Crochet". The basis for the bracelet is crocheted from Tunisia.
June 10, 2011 Sunflower
Thread - cotton. The middle of the flower is cotton with lurex. Hook 1.3. Became a brooch. I do not wear brooches; I will give. And I'll make a bracelet with a sunflower. 
June 18, 2011 Sunflower number two
Tied another sunflower. The middle is associated with beads and filled with filler. To the touch the surface is cool and pleasantly springy when pressed. The result is like, and the process of knitting with beads is not very. It is rather dreary to recruit more than two hundred beads on the thread. For now, it's just a flower. I can not decide what to turn it into: either into a brooch, or into a bracelet, or into a hairpin ... 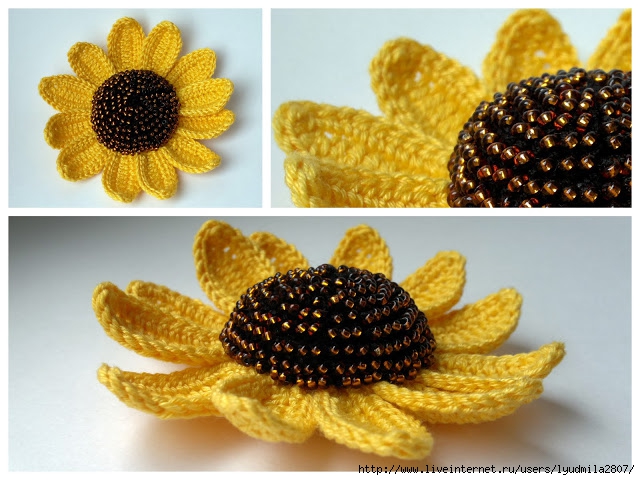
July 21, 2011 Knitted flowers
I found a network of orchids from some French magazine (google "knitted orchid"). In the original description, the installation provided for the fastening of the petals to the wire with glue. I just screwed the wire around the perimeter: I didn’t have to starch and made the assembly much easier. 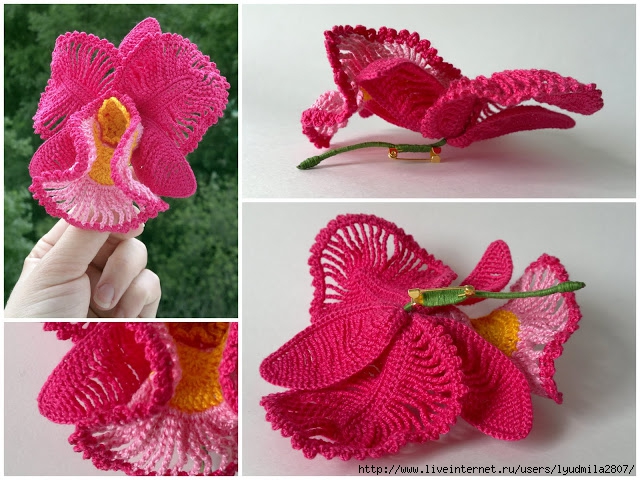
Slightly changing the scheme, tied iris. Next time I want to take a different color: not sky blue, but blue-violet. We must try to engage the wire not only along the edge, but also in the middle of the petal. It seems to me, then it will be more plastic. And, perhaps, an increase in wire cores will help to avoid breaking the wire during installation. 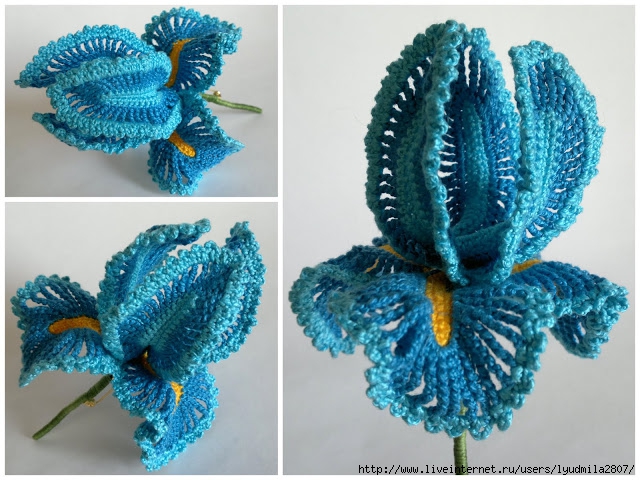
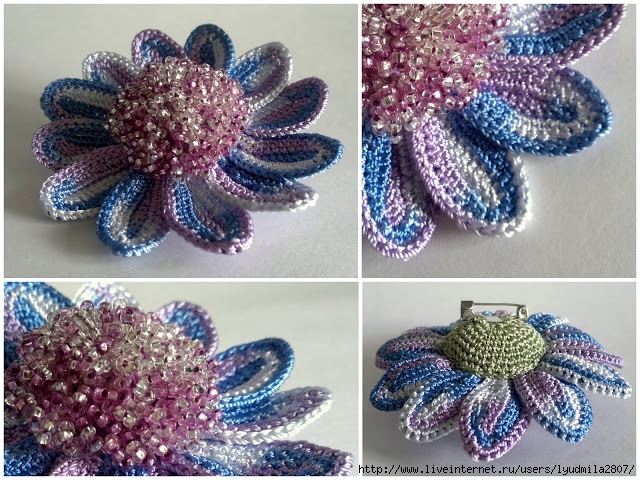
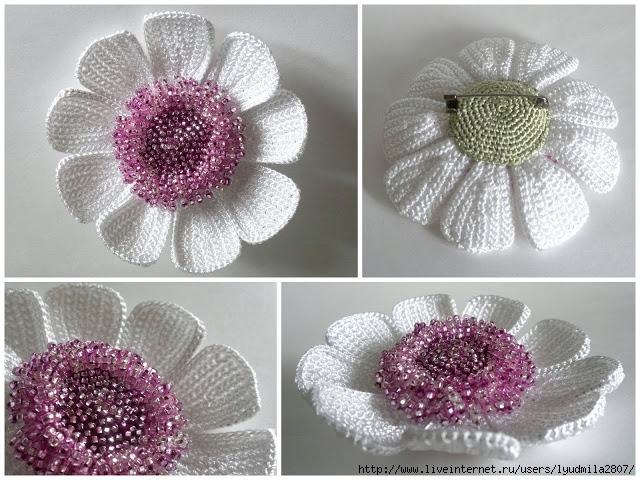
August 21, 2011 Knitted flower brooches with beads
In knitting flowers, I am going farther and farther from nature) There are no more poppies and daisies, instead fantasy flowers with terry bead centers. These centers are surprisingly pleasant to the touch; they want to touch and touch. Still, I kinesthetic)
YarnArt Tulip yarn was also tactilely pleasant, but during knitting it is inconvenient: it jumps off the ball of coils, gets tangled, twists. But the result is good: knitted fabric turns out smooth and shiny.
Along the perimeter of the petals, as usual, let the wire. Without it, the petals twist heavily, and they do not want to starch.
I tried to sew a pin in a white flower, but to tie it into a backing base. Looks neater. On the other hand, if the pin breaks, it will be very dreary to replace it. 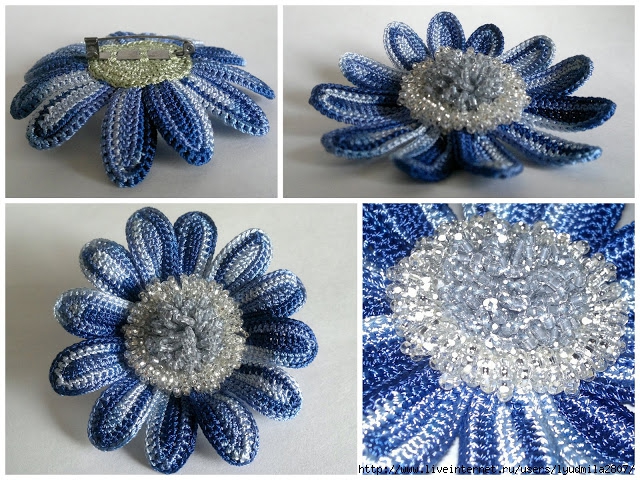
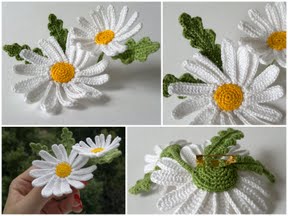
October 9, 2011 Chamomile Evolution
The first daisies were contacted in May according to the description from the book “Crocheted Flowers” by Natalia Kovpak and Olga Chernomorskaya. Quote: "CHAIN (white). Tie a chain of 14 VP. Starting from the 3rd from the loop hook, knit 1 item b / n, 1 pst with / n, 9 st / n, 1 pst with / n. Link 2 chains 12 petals each. "
I knit exactly according to the scheme and the petals twirled with terrible force. What is visible in the photo was taken immediately after the iron) Before each “appearance” I tried to smooth the petals, but literally two or three hours later they twisted again. Husband joked that they are like real ones: they close at sunset).
The second attempt was better. I additionally tightly fastened each petal with single crochets. This strengthened the edge of the petals and did not allow them to curl. Because of the extra row, we had to add one vp between the petals; in addition, there was no need for two tiers of petals, since they already lay overlapping themselves. 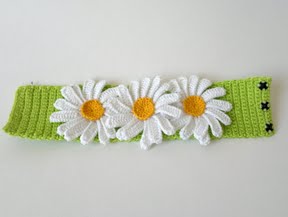
A little later, daisies "migrated" from bracelets to brooches. They had leaves, buds, stems, sepals. To give the elements the necessary rigidity and for ease of installation, I used wire. The wire is tied into the leaves in the center, then it is also tied into the last circular row of the sepal, thereby fastening the elements. 
![]()
The last two daisies were knitted not from cotton, but from microfiber. It seemed to me that the petals were insufficiently tied only with single crochets: they were not very strong, but they were still bent. I tried to strengthen the "strapping" series with wire. I liked the result. Petals are not only not twisted, they can also take any shape and hold it well.
Honestly, I'm a little tired of daisies. For some reason, many people ask to link them. And I'm pretty sad to knit the same thing)
October 26, 2011 Mac crochet: description
Invented and tied a poppy. Admired and decided to make a description to him. It turned out to be verbose, but with pictures. Pictures are clickable. 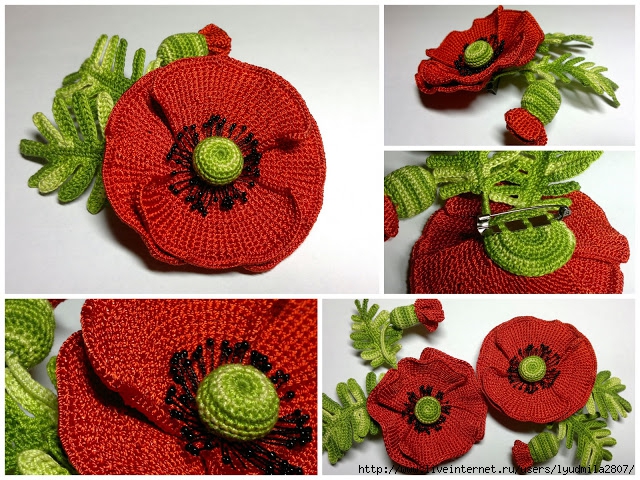
Materials and tools
Red yarn for petals (in this case YarnArt Tulip, 100% microfiber, 250 m by 50 g) and green leaf yarn (YarnArt Violet sectional dyeing, 100% cotton, 282 m by 50 g). Hooks are the right size: in this case, 0.9 for petals and 0.7 for leaves. The wire is red, green and black; black beads, scissors, needle with a wide ear (tapestry); a little filler for packing the box and the bud (in this case, a filler was used for toys; you can do with padding polyester); pin for brooches on the platform with three holes.
Flower petals 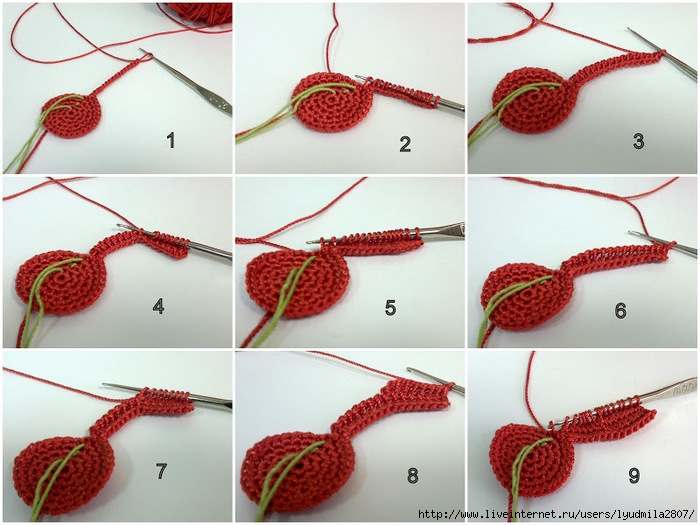
A poppy flower consists of two parts: a pair of lower petals and a pair of upper ones.
For the lower petals, tie a circle with 6–12–18–24–30 circles with single crochets. First row (6 loops) knit in a sliding loop (amigurumi loop); further knit in a spiral (without lifting loops), making even 6 increments in each row. For additions, knit two articles b / n from one loop. Hook to enter under both half-loops. For the convenience of counting loops, the beginning of the row can be marked with a marker (a thread of a different color, a pin). If you perform increments exactly under each other, the parts will show clearly expressed 6 sectors and it will rather have a regular hexagon rather than a circle. For small sizes, this is not critical, but for reasons of perfectionism, the position of the gains can be shifted from row to row.
The resulting round detail - the base of the lower flap circle - has 30 loops around the perimeter. The current loop will be considered first. On the first 12 loops in the Tunisian technique one petal is knitted; then 3 loops knit st b / n (the gap between the petals); on the next 12 loops - the second petal; last 3 loops - st b / n.
For a petal from the first loop of the warp, tie a chain of 15 air loops (photo 1). Loop on the hook count edge. From the remaining loops of the chain pull out one loop, but do not knit; last loop pull out from the first loop of the base (photo 2). On the hook will be 16 loops: 15 + edging. Tie two loops on a hook (a total of 15 “straps” will be released). The first Tunisian series is ready (photo 3).
Dial loops for the second row (pull out the last loop again from the first loop of the base); knit loop on the hook in two. The second row is ready (photo 6). The third row will be shortened: dial 7 loops (there will be 8 loops on the hook, counting the edge loop), knit one (!) Loop, then tie the remaining two (photo 8). For the fourth row, dial the first seven loops from the third row, another seven loops from the second row and draw the last loop from the second (!) Loop of the warp. Knit two loops. To knit the fifth row in the same way, picking up the last loop from the second loop of the base. The sixth row is shortened again. In the seventh and eighth rows, the last loop is recruited from the third loop of the base. 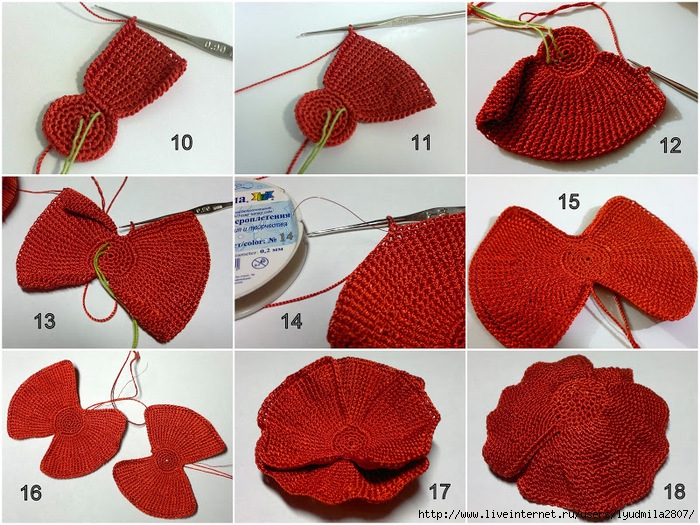
The knitting of the petal continues to the 12th loop of the warp inclusive (on each loop of the warp there are two Tunisian rows, one shortened between them). Having finished the petal, close the row with connecting columns (photo 12), knitting the last into the 12th loop of the base. In the 13th, 14th, 15th and 16th loops of the warp, knit on a single crochet post. From the 16th loop, start knitting the second petal in the same way as the first. The detail resembles the figure eight (photo 13). As a rule, the edges of the petals twist (more or less depending on the density of knitting and the twist of the thread). To impart rigidity and plasticity, the part must be tied around the perimeter with columns without a nakida, and a wire attached to the edge (photo 14). It is desirable to pick up the wire to match the thread. However, with a sufficiently tight binding, the wire completely “hides” inside the last row. In the corners of the petals should knit 3 columns without crochet, to avoid deformation. From time to time it is useful to stretch the canvas in order to tie a wire of maximum length around the perimeter. This will give greater freedom in giving the petals a natural, dynamic form. After finishing the strapping, cut the thread and twist the ends of the wire. The ends of the threads "hide" by stitching a base circle with them. In the same way can be fastened and wire. Lower petal circle is finished.
Top petal circle fit in a similar way. The basis is one row less: 6–12–18–24. Each of the two petals is knitted on 10 loops of the base. In the intervals between the petals in two columns without nakida. For each petal from one loop of the warp, knit two Tunisian rows of 15 loops (plus one edging). Between twos of the full rows knit one shortened row of 7 loops (plus the edge one).
Seal the ends of the threads and sew the parts together.
Box and stamens 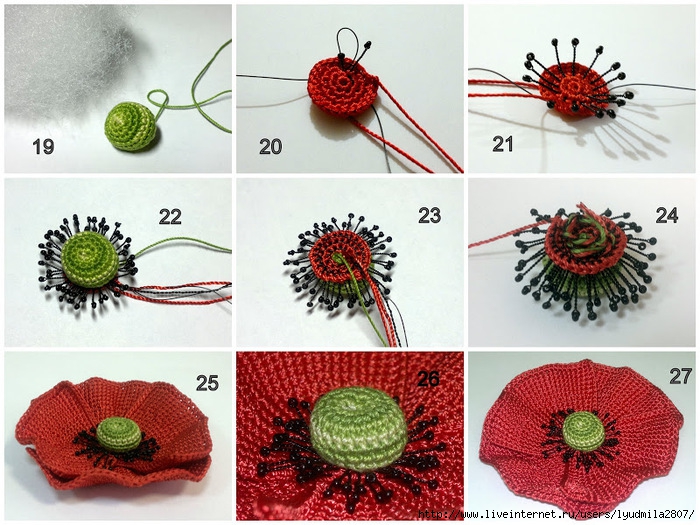
For a box (photo 19), tie a ball in a spiral-free column: 6–12–18–24–24–24–24–18–12–6. Increments are performed evenly. To knit down two loops: insert the hook into the first loop, pull the thread, insert the hook into the second loop, pull the thread, knit three loops on the hook. Before last rowwhile the dimensions of the hole still allow, tightly fill the ball with filler for toys. Then knit the last row and cut the thread, leaving a sufficient end for attachment to the heart of the flower.
For stamens with red yarn, tie a circle according to the size of the warp of the upper lobe circle: 6–12–18–24. Cut the thread, leaving a long enough end, then to sew the part with stamens to the petals. Cut a piece of black wire with a length of 70–80 cm (this length is not enough for all the stamens, you will have to grow it, but it is extremely inconvenient to work with longer wire). Loops of the first row must be skipped; a box will be sewn to them later. But of all the other loops stamens will "grow". Insert the wire into the first loop of the second row from the bottom up (from the wrong side to the face), leaving a short end of 7–8 cm. With this end, attach the wire to the base, wrapping the nearest post with it. Dial the black bead on the working end of the wire, bring the wire through the same first loop to the wrong side, leaving a loop with a bead about 1 cm high on the face. Twist the loop to the base: you will have a bead on the wire "leg" - the first stamen. Introduce the wire from the inside to the face in the second loop, strung the bead, through the same loop to bring the wire to the wrong side, leaving the loop; twist the loop. Total stamens get 12 + 18 + 24 = 54. The stamens of the first circle are about 1 cm high; second circle - a couple of mm more; the third is a little more. If you want to make the stamens thicker, you can “grow” not one but two stamens from every second or third loop. To build up the wire, it is enough to twist the ends of the “old” and “new” wires from the wrong side.
Sew it from the box to the first row of the circle with stamens. Then, piercing the box through, bring the thread to the top of the head and, hooking a pair of threads, again in the bottom. Tension the thread so that the box flattens slightly and the top of the head is concave. Make a couple more of these stitches, tightening the top and bottom. Secure the thread and cut. Sew in the center of the flower circle with stamens.
Leaves 
For a large sheet, tie a chain of 29 VP. A green wire about 30 cm long should be folded in half. Attach a wire to a pigtail from the front and knit the first loop from the hook with a single crochet by inserting the hook into the wire arch (photo 29). Tighten the wire and continue to tie it, introducing the hook into the next loop of the chain under the wire veins. 2–4 loop - st b / n, 5–8 loop - pst c / n, 9–20 loop st s / n, 21–24 loop - pct c / n, 25–28 loop - st b / n. Expand knitting. Attach the wire coming from the coil to the pigtail (do not cut the wire; it will be a shame to overshoot with the size). In the first three loops knit on the pillar without nakida. Connect only on the wire 7 st b / n (the wire and the loops on it are arranged perpendicular to the previous row, photo 31). Bend the wire immediately after the last loop, putting it on the bottom edge of the dialed seven loops. To knit 6 items b / n by inserting a hook under the wire core between adjacent loops on it. 7th column knit from the 3rd loop basis. To knit the next three loops of the warp with single crochets, continuing to “hide” the wire frame inside. Then only on a wire to bind 1 st b / n, 6 pst c / n, 1 st b / n. Bend the wire and knit in the opposite direction 1 st b / n, 6 pst with / n; another st b / n knit in a loop basis. The next three loops basics knit with columns without nakida. For the third branch of the sheet dial on the wire 9 loops: 1 st b / n + 7 pst c / n +1 st c / n. Bend the wire and knit the loop in the opposite direction symmetrically. Continue to knit the branches from each 3rd loop of the base. At the same time, the 4th, 5th and 6th leaves should be tied on 10 loops (1 st b / n + 8 pst c / n + 1 st b / n), the 7 th leaf on 9 loops, the 8 th on the 8th, 9th on the 7.th 10th - the “apical” leaflet - knit on the loop from the butt of the base of 7 loops. The left part of the sheet runs symmetrically.
For a small sheet, tie a chain of 20 air loops. Attach double-folded wire; to knit 3 items b / n + 3 ps with / n + 6 st with / n + 3 ps with / n + 4 items b / n. Expand knitting, attach the wire without cutting it off the coil. Knit 3 items b / n. For the first branch, tie the toshok on the wire to 6 st b / n, bend the wire and tie the 6 st b / n in the opposite direction, tying the last column from the loop of the base. The next three loops basics knit st b / n. For the second branch, type on the wire 1 st b / n + 5 pst c / n + 1 st b / n and knit symmetrically in the opposite direction. To knit another 3 items b / n and for the third branch dial 1 wire b / n + 6 pst with / n + 1 art b / n on the wire; knit in the opposite direction. Link the 4th branch in the same way; 5th - as the second; 6th - as the first. The upper leaf tie at the end of the base of 6 columns. The left part is knit symmetrically.
Bud 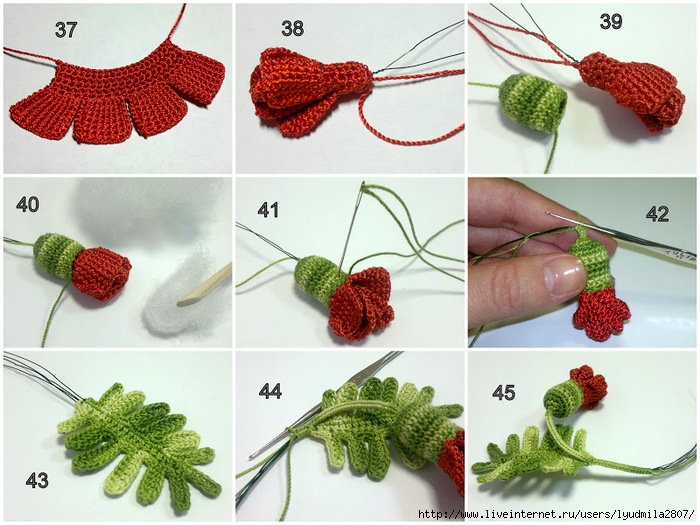
For petals with single crochets, tie a rectangle with a length of 19 columns and a height of 5 rows. Further, in the Tunisian technique, knit 4 petals with a height of 7 loops and a width of 8 rows (2 rows from each loop of the base). The gap between the petals is 1 column (4 + 1 + 4 + 1 + 4 + 1 + 4 = 19). Having finished the last petal, with the help of connecting posts, go down to the first row of the rectangle and cut the thread, leaving the end about 30 cm (photo 37). Collapse the part with the straw (face out) and the remaining thread to fix the base of the resulting cylinder.
Tie up the flower for the bud with columns without crochet: 6–12–18–18–18–18–18–18–18–18. Before starting knitting, leave the end of the thread about a meter long; bring it to the front. When finished, trim the thread, leaving the end about 30 cm.
A piece of green wire about 35 cm pierce the base of the petals of a bud. Arrange the part in the middle, twist the wire ends by 3-4 mm. Seal the ends of the threads.
Insert the petals of the bud into the sepal, moving the wire through the bottom of the sepal to the front side (photo 39). The gap between the base of the petals and the walls of the sepal filled with filler. Thread from the edge of the sepal sew it to the petals. To tie a thread from the bottom to tie up the wire with single crochets. At a distance of 3-4 cm from the bud to attach to the stalk small sheet (wires from the sheet will become part of the stem) and continue strapping by another 3–4 cm. Attaching the sheet to the stem, it is important not only to tie the ends of the wire together, but to knit the very first post after the joint by inserting a hook into the end loop of the sheet. Otherwise, there is a risk of "losing" the sheet during operation: the wire may simply slip out of the strapping.
Assembly 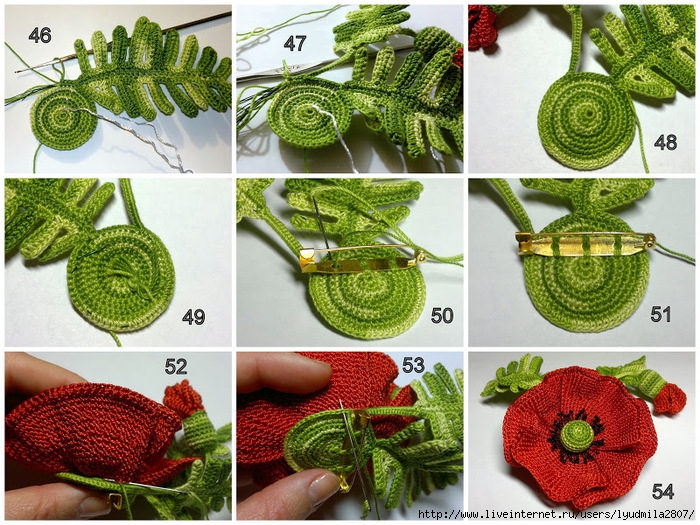
Separate the flower for the flower (it is the base of the brooch) in a spiral-free column: 6–12–18–24–30–36–42–48–54. Increments within each row are performed evenly, but from row to row, their location is better to shift, so that the part turns out to be round rather than hexagonal.
Before the last row, attach a large sheet to the base (with the seamy side towards you, face it away from you!), And continue knitting, placing the wire and thread from the sheet around the base of the base (photo 47). Through 7–9 loops, attach the stalk with the bud to the wrong side, facing away (photo 48). Having finished the last row, trim the thread, leaving a rather long end to sew a pin to the sepal and sepal to the flower. Sticking the ends of the wire, if any, twist between each other, roll the ring and put it in the detail plane. Sew a brooch pin to the sepal, placing it slightly above the center. If it is sewn exactly in the center, it can “hang out” on clothes. Sew a flower to the sepal. Rejoice.
October 27, 2011 In pursuit of the post about poppies (why I do not knit for sale)
While I was knitting a second poppy and preparing a description, I tried to calculate the flow of time. Each pair of petals takes about two hours; box with stamens almost 3 hours; leaves by the hour; bud for about an hour; and at least an hour to build. Total 11 hours. Probably, it can be faster, but now I'm counting my time costs, right? 11 hours is a little less than one and a half working days. If my total monthly income is divided by the number of working days, it will be about 2000 rubles. Even if you do not add value to the materials (although some beautiful threads or Japanese beads are worth hoo!), To save financial position in the case of leaving the main place of work, the poppy would have to stand for 2500 p. For this price, no one will buy it, but for less I feel sorry to part with it. Therefore, I do not take orders and prefer to give my flowers. Here and poppy going to let go today. I really hope that he will like the future owner.
November 3, 2011 Crochet snowdrops: debriefing
The last work - snowdrops - left a feeling of dissatisfaction and annoyance. I did not allow such a number of shoals in any other product. Nevertheless, I still decided on the description. First of all, I photographed the stages of work and do not want the pictures to be a dead weight on the hard drive. Secondly, from unsuccessful experiences it is possible to draw useful lessons. In the description in green italics, reflections on possible improvements in the next version are highlighted. 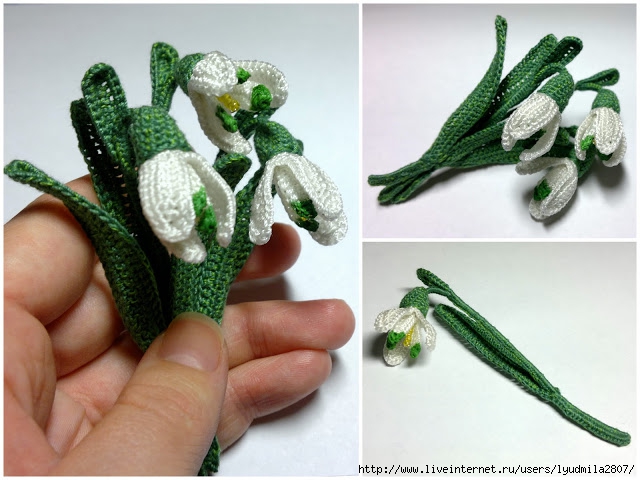
Materials and tools
For leaves, bobbin threads (polyester + silk), hook 0.5; green wire. Admittedly, the choice of threads is not entirely successful. Below I will set out in more detail my thoughts on this.
For flower shoe capron 7K; hook 0.7; white (silver wire); some yellow beads.
To assemble the needle with a wide eye, pliers, side cutters.
For one flower, you need to link three inner petals (one piece), three outer petals (one piece), a bract, a large leaf, a calyx. All posts are knit for both half loops.
Inner petals 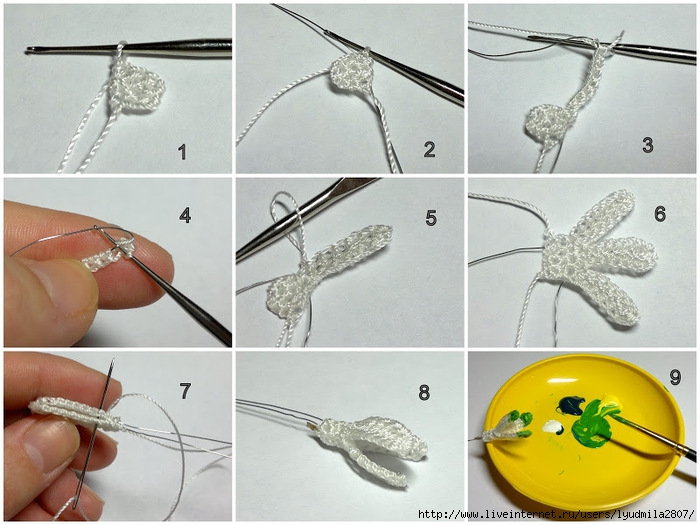
Tie a 3 by 3 rectangle with crochets (photo 1). Attach the wire, leaving the end about 10 cm (do not cut the wire from the coil), knit the st b / n into the loop of the previous row (photo 2), dial only 1 st b / n on the wire, 6 ps s / n, 1 b b / n (photo 3). Bend the wire, putting it on the edge of the newly assembled loops; to knit 1 st b / n and 6 ps c / n in the opposite direction, inserting a hook between the loops under both wire cores (photo 4, 5). Knit st b / n in the 1st loop basis, st b / n in the 2nd loop. Similarly, tie the 2nd petal on the wire, then the 3rd. Knit another 2-3 st b / n along the edge of the rectangle to go down to its base (photo 6). Fasten the thread; cut the thread and the wire, leaving the end of the wire 10 cm long, the threads 15-20 cm. With this thread sew the edges of the rectangle so that the tube with petals turned out (photo 7.8). Seal the ends of the threads (nylon can be simply knotted and melted with a lighter). Petal tips need to be toned in green. You can embroider them if you can do it carefully. I do not know how, so I decided to paint them (photo 9).
The first mistake was to take the usual acrylic paints instead of special paints on the fabric. The paint did not spread, as I feared, but it significantly changed the texture of the canvas: the tips of the petals became rough, tactilely unpleasant. The second mistake is that when mixing colors, I tried to achieve only a pleasing shade of plausible, not checking with existing stocks of green thread. Naturally, I missed. Not a single tone came up, I had to buy more.
Outer petals 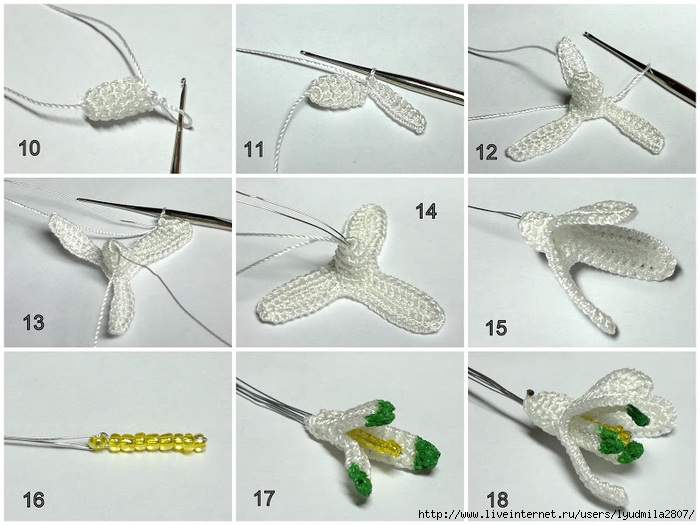
Spiral in crochet without crochet tie the tube 6-9-9-9-9 (photo 10). Last knit loop count first. Dial a chain of 11 VP. Starting from the second loop from the hook, knit 1 st b / n, 2 pst c / n, 4 st s / n, 2 pst c / n, 1 st b / n (photo 11). To crochet the posts without nakid in the 1st loop of the warp (in the very one from which the petal grows), in the 2nd, in the 3rd and in the 4th. From the 4th loop, knit the second petal; from the 7th - the third (photo 12). Attach the wire and tie the petals around the perimeter with single crochets (photo 13). Leave 10 cm long wire ends for the stem; lead them through the initial ring to the front side (photo 14). Seal the ends of the threads (photo 15).
I still do not see an opportunity to tie up authentic stamens for pistils for a snowdrop. It is possible to depict the yellow center (photo 16) like this: put a bead on the middle of a wire about 25 cm long, bend the wire in half and string the beads on both ends in such quantity that this bead is flush with the inner petals (or even slightly lower). To fix the "column" nanizhizite last bead only one end of the wire, and the other end pass through it in the opposite direction. To assemble, you need to insert a beaded column into a small petal circle (photo 17), all together - into a large petal circle (photo 18).
Leaves Assembly
For the leaves, in this case, bobbin threads (polyester + silk; in two threads) and a hook 0.5 were used.
I didn’t like the result very much: two threads of different shades of green didn’t give any noticeable color transitions and all this green looks rather sad. The thin sectional dyeing yarn would fit in perfectly here, but the YarnArt Tulip and YarnArt Violet section I had turned out to be too thick for such a miniature flower. For the future, I think about how to dye kapron threads myself, but for now I tell you how I knit it this time. 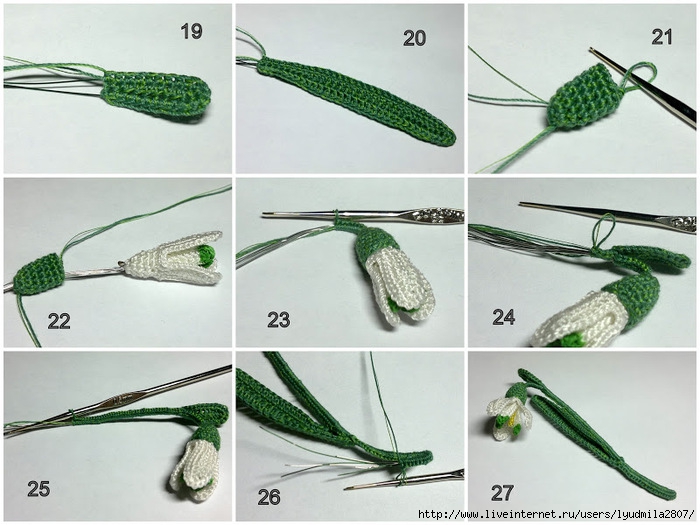
For the bracts (photo 19) to link a chain of 11 VP. Starting from the second loop from the loop to knit 2 items b / n, 2 ps s / n, 2 st s / n, 2 pst c / n, 2 st b / n. Expand knitting, attach a wire to the edge of the part, leaving the end about 10-12 cm long, and tie a sheet around the perimeter with crochets. From the butt knit in one loop three columns. Cut the wire, leaving the end about 10-12 cm.
For a large sheet (photo 20) tie a chain of 31 VP. Starting from the second loop from the hook loop, knit 3 items b / n, 3 ps s / n, 18 st s / n, 3 ps s / n, 3 items b / n. Expand knitting, attach a wire to the edge of the part and tie a sheet around the perimeter: 4 st b / n, 4 pst c / n, 14 st c / n, 4 pst c / n, 3 st b / n, in the loop at the top - 3 st b / n; symmetrically tie the second side of the sheet. Cut the wire, leaving an end length of 5-7 cm.
A cup (photo 21) knit in a spiral with single crochets: 6-12-12-12-12-12-12. To reduce the number of connections during assembly, it is better to unwind a couple of meters of thread from the spool and knit a cup with this end. Closing the first row in the ring, it is necessary to bring the thread from the spool to the front side.
Insert a flower into the cup (photo 22). Sew the edge of the cup to the petals. To tie a wire stem - a flower stalk to the thread coming out of the bottom of the cup (photo 23). After 1-1.5 cm from the flower, attach a small sheet (photo 24). After another 5-6 cm attach a large sheet. After 1.5-2 cm from a large sheet, bend the wire (you may have to use pliers) and knit the posts on the stem in the opposite direction to the sheet (Photo 26). Excess wire bite sidecutters; end of the thread to close up.
I described this method of forming the stem, since I used it myself in this version of the snowdrops. I can not say that I am quite pleased with the result. The braid of the columns does not work on the coil threads as smooth as we would like. When the ends of the wire cores become quite short, they "crawl" onto the surface of the stem. It is practically impossible to bite them off at zero: even if the “hemp” is not observed visually, they are felt tactilely. It is difficult to gently bend a bundle of 10 wire cores.
What other option do I see? You can try not to crochet the wire stem, but simply wind it with a thread. I did this when mounting flowers from beads. Naturally, the winding should be tight, the coils should be stacked one after the other. For reliability it is possible to process the thread of PVA as winding. What will it give? The stalk will be thinner and more elegant, without excessive thickening at the end. Wire ends will not stick through the thread. Choosing this method of manufacturing the stem, you can not embed the ends of the threads from the sheets. The fact is that when tying the stem, the leaf is attached to it "for meat". When winding the possibility of such a connection is not and there is a risk that the sheet will crawl along the wire frame, exposing it. To avoid this, it is necessary to wind the stem along with these threads coming from the part being joined.
Just a few words about my unsuccessful attempt to collect three flowers in a brooch. 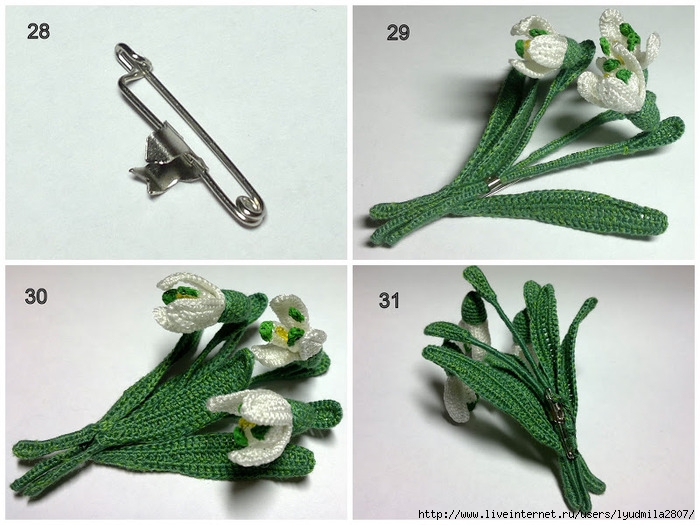
Especially for this purpose, I purchased a "vertical pin for flowers" (photo 28). By design, it is a safety pin, on which a non-closed ring is attached. Flowers should be inserted into this ring and clamped with pliers. In theory, everything is fast, simple and reliable. I made a bunch, put it in the ring, clamped the ring with pliers. After this manipulation, the ring, which had previously been firmly seated on the pin, began to move freely along it up and down and turn left and right. I had to get out, fix the pin with thread and wire. As a result, the wrong side looks quite unpresentable (photo 31).
Another nuisance with a pin was that the metal ring “hugging” the stems was visible on the front side of the bunch (photo 29). I had to tie additional sheet and sew to the stalk to cover the ring. No matter how hard I tried, I failed to make the junction invisible (photo 30). Options? First, look for quality fittings that will behave decently. Secondly, the "camouflage" leaf should be attached to the stem directly during the assembly of the flower, and not to the already prepared bouquet. It should be understood, however, that if the stem is not wound, but tied, then it is practically impossible to arrange it at the right angle without tilting the "pigtail".
P.S. Now I try to take into account all the bloopers and knit a third version of snowdrops.
November 4, 2011 Crochet snowdrops: work on the bugs
Tied the third version of snowdrops. Corrected some errors.
I already wrote that monotonously dyed green threads in a snowdrop look rather dull, but there is no sufficiently thin section for sale. I haven’t gotten to self-dyeing of a shoe nylon that I have fallen in love with, but I bought the necessary colors for the floss. Cotton, in 6 threads, 8 m in a hank. 6 threads is, of course, too much. I rewound three. Three large leaves for a snowdrop come out of 8 meters in three threads. Expensive obtained, frankly; but the leaves look much more elegant.
As I was going, the stalks were not wrapped this time, but wrapped. They turned out thin and neat. And now the inside is not ashamed to show. 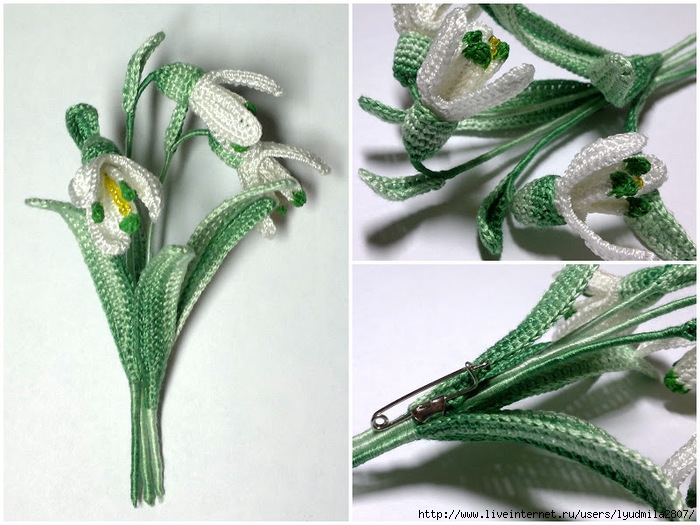
The issue with the furniture is still open. This time I acted as carefully as possible and the ring on the pin does not move up and down, but to the right and left, although with a small amplitude, it is spinning.
November 27, 2011 Blooming apple tree
Another brooch - a blooming apple twig. For petals: shoe capron 7K and hook 0.9. For leaves: polyester Micron 20s / 3 and a hook 0.5. The leaves are embroidered floss in 2 addition. Bead and wire stamens. The result does not quite suit me, but, that is the problem, I cannot understand what it is with. Maybe I tortured them too long) 
December 1, 2011 Camomile hair ties
Knitted at the request of a good friend for the birthday of his daughter. 100% cotton and this time no inner frame: you want to do without wire in children's hair accessories. Now I want to try other flowers in gum. I only doubt whether it will be possible to completely eliminate the skeleton and preserve the shape without starching. 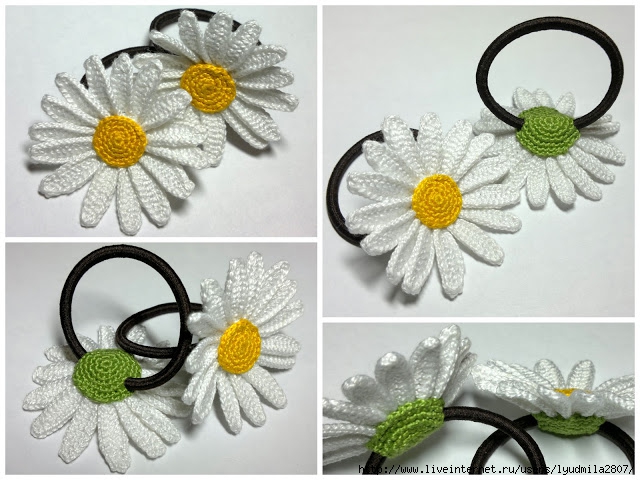
December 8, 2011 Chamomile crochet: description
I share the description of daisies. A lot of words. Pictures are clickable. 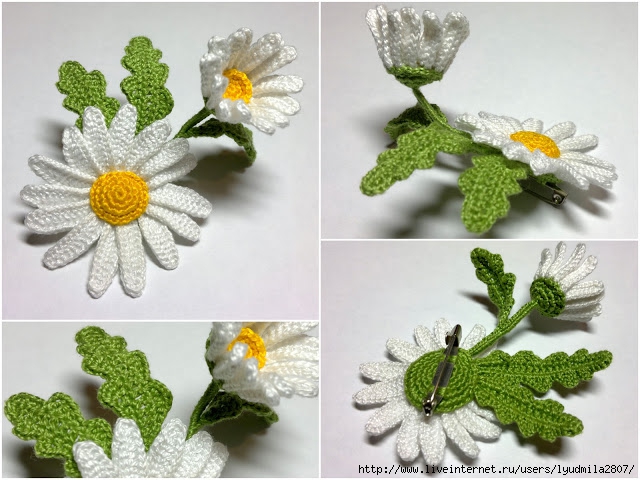
You will need threads "Iris" white, yellow and green colors, hook number 0.7, green wire, the basis for the brooch, a needle with a wide eyelet. 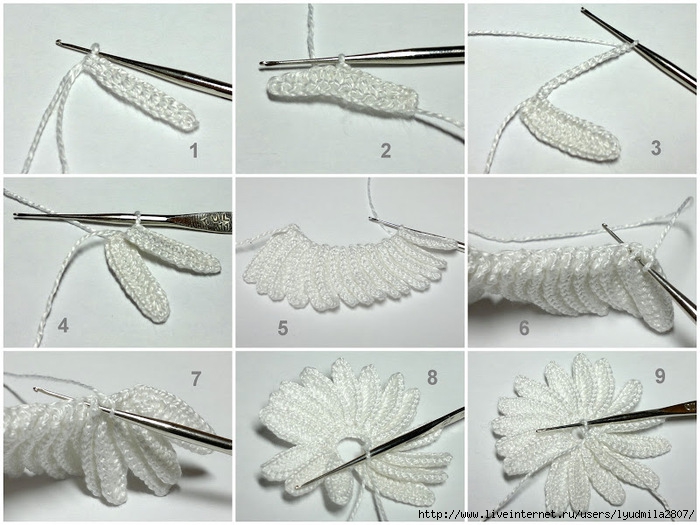
For petals dial a chain of 13 VP. Starting from the 3rd from the loop hook, knit 1 stbn, 1 pstsn, 7 stsn, 1 psn sn, 1 sbn (photo 1). Turn the knitting and tie a petal around the perimeter with connecting posts (photo 2). Tie 2-3 columns in the end loop so as not to tighten the canvas. The first petal is ready. Without breaking the thread, tie a chain of 13 VP for the 2nd petal (photo 3). Run it exactly like the first one. Just bind 15 petals. The result will be a bunch of 15 elements, in which each petal is partially superimposed on the previous one (photo 5). Tie 1 in for lifting. Tie the bases of the petals to stbn so that each column fastens the left half of one petal with the right half of the previous one (photos 6, 7, 8). A total of 15 stbn, according to the number of petals. After finishing the binding, close the detail with the petals into the ring and continue to knit the stbn, uniformly performing the reductions until the hole in the center is completely closed (photo 9). In the first row, repeat five times: 1 stbn - 1 decrease. In the second row 5 down. Just in case, let me remind you how to perform a decrease: insert a hook under both half loops of the column of the previous row, pull the thread, do not knit, enter the hook under both half loops of the next column, pull the thread, knit all three loops on the hook. The side on which the ends of the filaments are located is a purl. 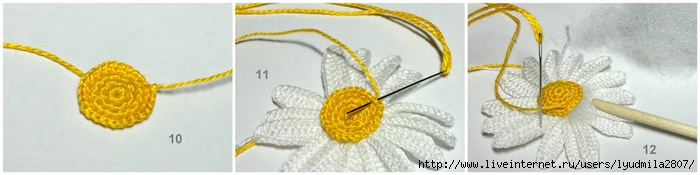
The yellow center (photo 10) is knitted in a spiral with single crochets with uniform increments: 6-12-18-24. The hook is inserted under both half loops. For addition from the loop of the previous row, tie two stb. First row: 6 stbn in a sliding loop (amigurumi loop). Second row: 6 increments. Third row: increase - 1 stbn (repeat 6 times). Fourth row: 2 stbn - increase (repeat 6 times). Trimming the thread should be left with an end that is long enough to sew the core to the petals (photo 11). To make the middle one convex, you can fill it with filler (photo 12). Bring the thread on the wrong side, knot all ends and cut. 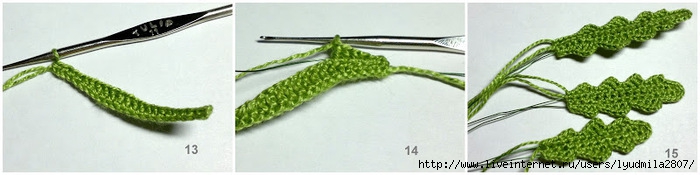
For a sheet, dial 22 VP. Starting from the 3rd from the hook of the loop, knit 2 stb, 3 st, 10 stsn, 3 st, 2 stb (photo 13). Expand knitting, attach a green wire about 25 cm long to the edge of the part. Tie the part around the perimeter with the wire as follows:
2 stbn, 1 pstsn, 1 stsn, 2 vp, 1 cn in the base of the last column;
1 stbn, 1 pstsn, 1 stsn, 1 sts2n, 3 vp, 1 cn in the base of the last column;
1 stbn, 1 pstsn, 1 stsn, 1 sts2n, 1 sts3n, 4 vp, cn in the base of the last column;
1 stbn, 1 pstsn, 1 stsn, 1 sts2n, 3 wp, cn in the base of the last column;
3 stbn, knit out 2-3 stbn from the leaf butt, 3 stbn;
1 stbn, 4 bp, 1 sts3n to the base of the chain from bp, 1 sts2n, 1 stsn, 1 pstsn, 1 stb;
1 stbn, 3 bp, 1 sts2n to the bottom of the chain from bp, 1 bsn, 1 pstsn, 1 stbn;
1 stbn, 2 bp, 1 stsn to the base of the chain of bc, 1 psn, 2 stb.
According to the same principle, to bind 2 more sheets of smaller size (make the initial chain shorter, "cloves" - lower and in smaller quantity). 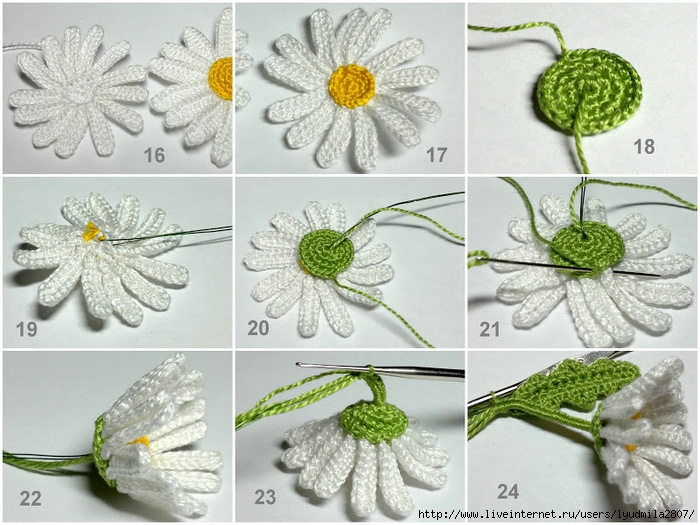
A bud fits like a flower, but its petals are shorter (instead of 13 wp for the initial row, you can dial 10), thinner (instead of stsn and psnn knit stb) and they are smaller (13 will be enough). Yellow middle: 6-12-18. Green cup: 6-12-18-24. Sew the middle to the petals. Sew a petal circle from the inside out about 25 cm with a wire, hooking several threads (photo 19). Bend the wire in the middle, folding the ends together. Put a cup on the stem, sew it to the petals (photo 21). Attach a green thread to the base of the cup and tie the wire stem to the desired length rather tightly (photo 23). In the process of tying, attach a small leaf to the stem (Photo 24). 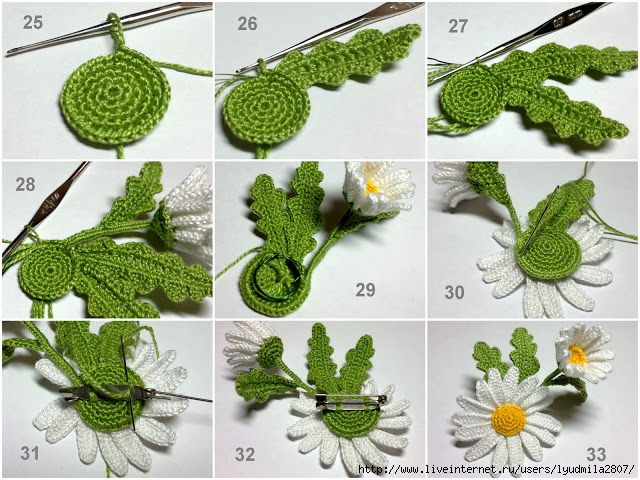
Bind a cup: 6-12-18-24-30-36 (photo 25). Before the last - the sixth one - attach a stalk next to it, knit 2-3 stbs, attach a leaf, knit 2-3 stbs, attach the last leaf, tie a row to the end. The ends of the threads on the wrong side knot and trim. Twist the wire ends together and lay a ringlet (photo 29). Sew a cup to the petals. Sew a brooch base. Done)
December 15, 2011 Elusive color
Tied a brooch. And I can not take a picture. I tried all the settings available to me. Color is distorted beyond recognition. At best, it turns out almost black and white shot. And she is a wonderful brilliant lilac-blueberry color. I will try, of course, to wait for the resurrection and take it off under natural light, but I strongly suspect that it will not become much better. About a year ago, I already faced a situation when the camera "did not take" the color. It was a felled red poppy and more or less tolerably it was managed to be removed only by a “SLR”.
Out of almost a hundred frames, the color most resembles itself in cases where the brooch does not lie on a sheet of white paper, but lies on the sofa next to the multicolored balls.
Peressella on a black background. It turned out better than on white, but it is very "brilliant." The flash gives a glare on a smooth thread. And without a flash in artificial light, even on a black background, even on a gray-brown-crimson color, the color is completely implausible. 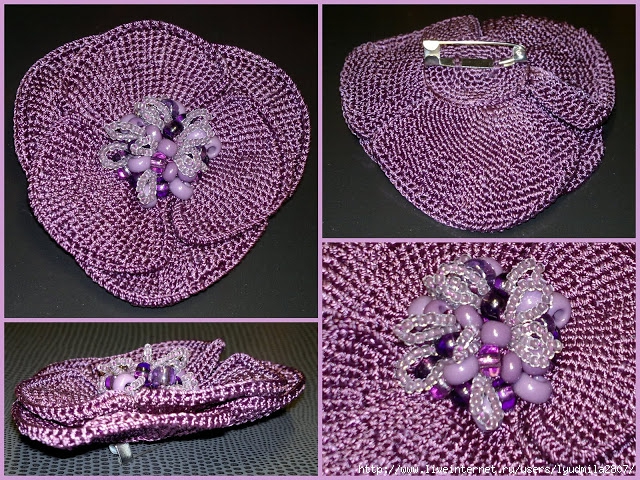
December 30, 2011. Madeira Decora Flower Brooch
A couple of months ago, I bought Madeira Decora No. sectional dyeing in Leonardo. 6 and everything did not dare to touch them, because one coil costs nearly 200 rubles, and in that one there is 100 meters. So without inventing anything amazing, she tied another flower brooch based on a cornflower, but without realistic stamens. The summer thing turned out: bright, juicy, graphic and a bit cartoonish. One problem: again I can not take a picture normally. In the blue thread there is a section of the same elusive purple hue, which I wrote about a couple of weeks ago. In all the photographs, this section is almost completely merged with blue-blue.
And I liked the threads, by the way. It will be necessary to repeat. 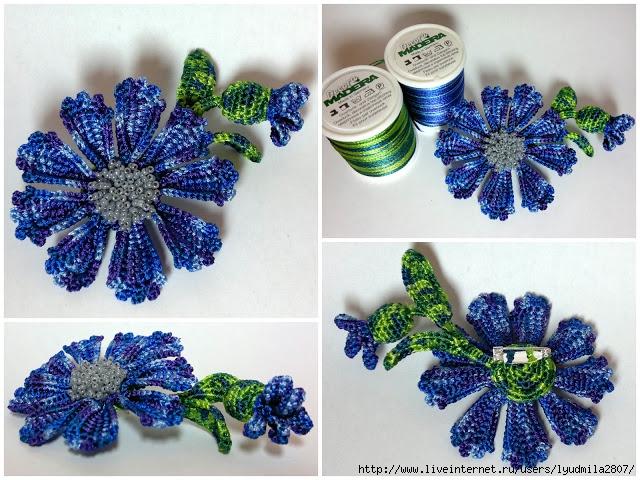
The diameter of the flower is 6.5 cm. A wire frame is tied into the stem and along the perimeter of the leaves and petals. The petals are connected in one detail: first the circle STBN (6 - 12 - 18), then the petals on a chain of 10 VP, Tunisian rows (between two full rows - one shortened by 5 loops).
The use of flowers and leaves for decoration by people is conducted from the very beginning of the world. In those ancient times, the plants were depicted in temples and palaces; certain types of flowers and leaves were used by shamans and priests of various cults. Plants were symbols of many ancient gods. Certain types of flowers and foliage endowed forces to bring good luck, victory in battle, profit, and even love. With the advent of needlework, their images were embroidered or knitted on clothing or objects of the situation and were convinced of their wonderful power. Some beliefs about their magical properties have survived to this day, for example, the belief that clover trefoil brings good luck.
Now needlewomen crochet leaves, as decorative elements or components of a dress, shawl or other things. Openwork and dense products, created by hand, show the whole world a miracle of craftsmanship and beauty.
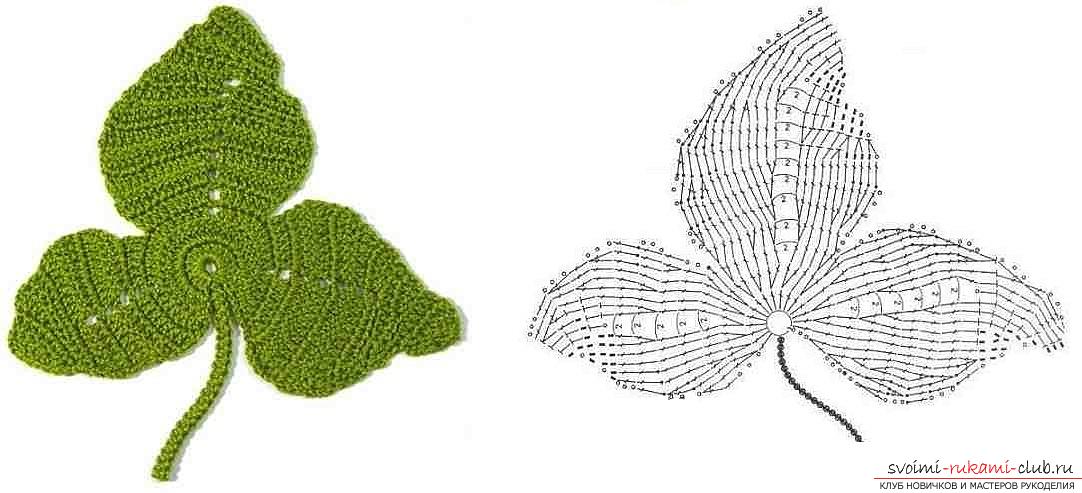
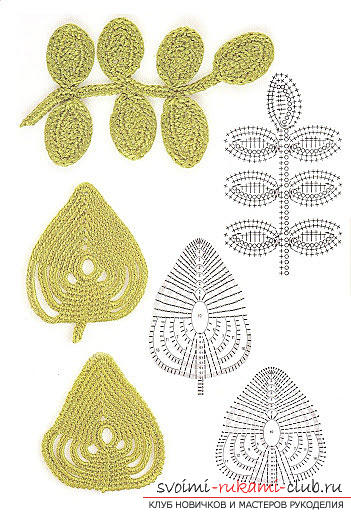
Clover trefoil.
Highly simple scheme it will be understandable even to beginners, and an elegant trefoil can be used as an element of Irish lace or to create a composition of volumetric flowers.
Little leaf.
When knitting this leaf, embossed columns with 2 nakida are used.
Embossed columns are convex and concave.
Convex embossed column. Make the required amount of nakidov, then enter the hook not into the loop, but from right to left into the row row below so that the “body” of the lower row column is in front of the hook, pull out 1 loop and then knit like a regular double crochet.
Concave column. Knit, like convex, but the “body” of the bottom row should be behind the hook.
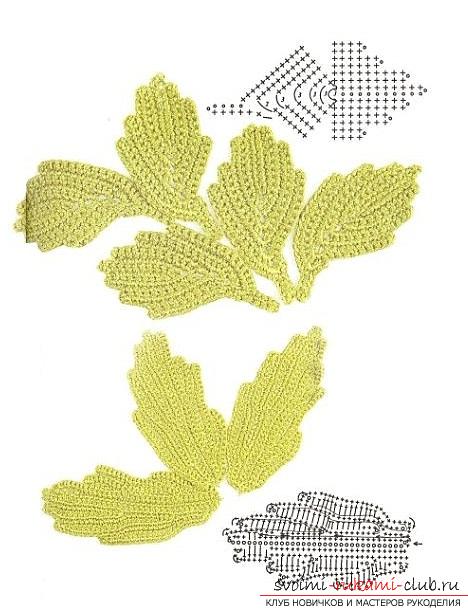
Chestnut leaf.
Starting from the 5th row of the middle, the petals are knitted each separately. The length of the leaves varies due to the number of loops in the chain. For example, considered the smallest leaf. Initially recruited chain of ce. for the stem and the middle. Next midpoint fit in a circle in rows back and forth.
The middle.
Knit the remaining air. loop 2 rows of art. without nakida, each time tying to the middle of the connecting column.
Leaf. Right bottom.
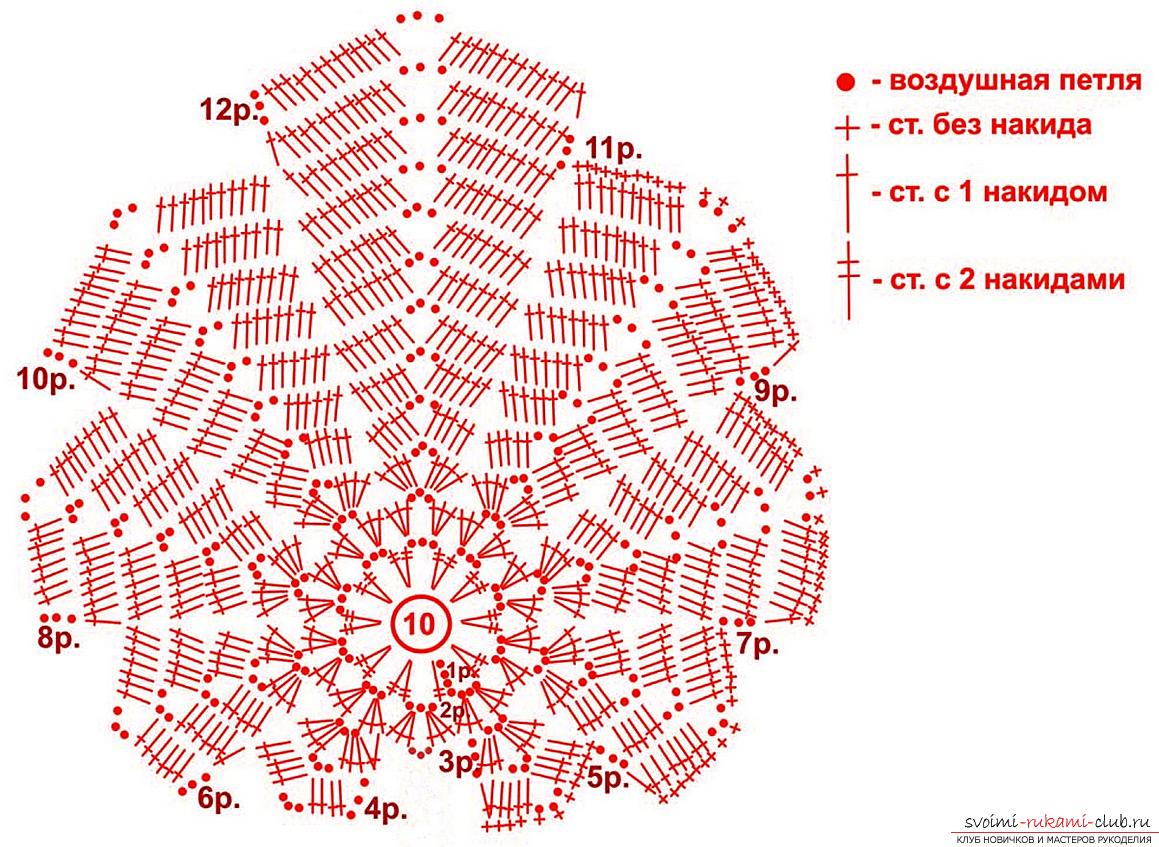
Beautiful maple leaf.

Such a motif, knitted of fine yarn, will be an excellent element of the dress, it can be used as a component of a shawl or tablecloth. If you tie such a maple leaf from thick threads and attach to the fabric, it will become an excellent stand for hot, and various shades of yarn will allow you to choose a color suitable for the interior of the kitchen or dining room, and make the room more comfortable.
Maple leaf in the original technique of unseparated knitting.
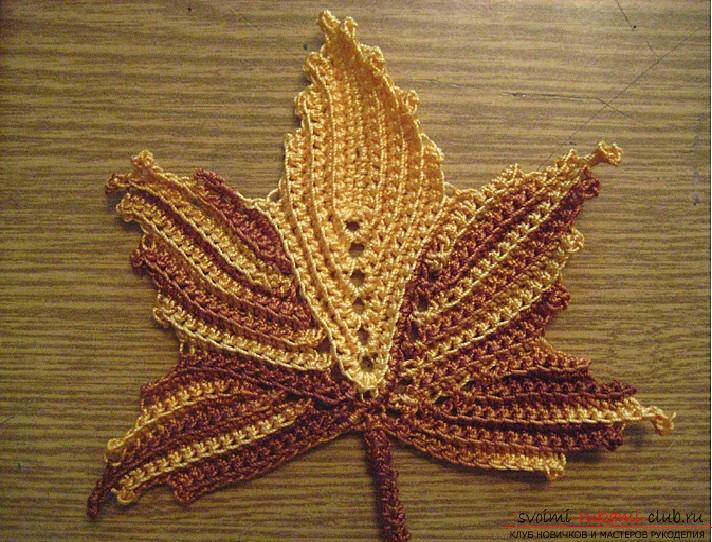
You can use it as a component of Irish lace, or create a shawl by attaching it to a fillet net. Perfect for bag decoration.
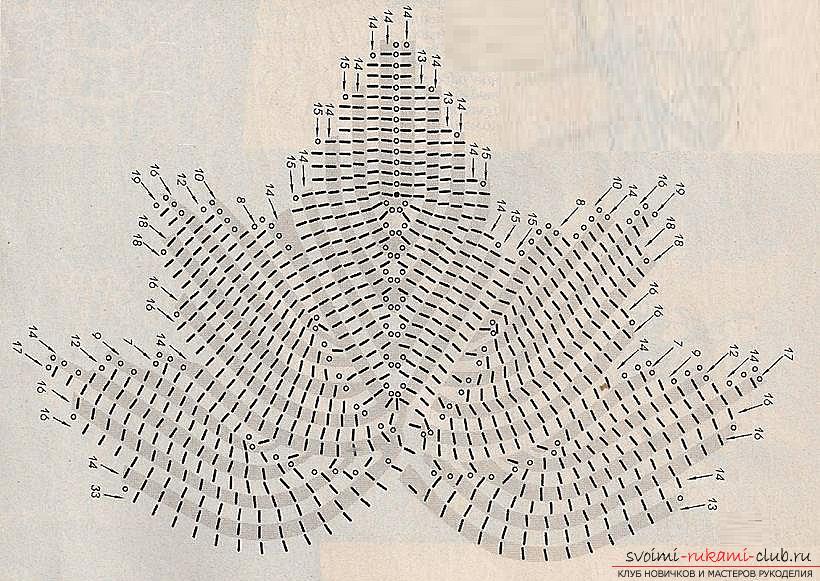
The black dot marks the beginning of work.
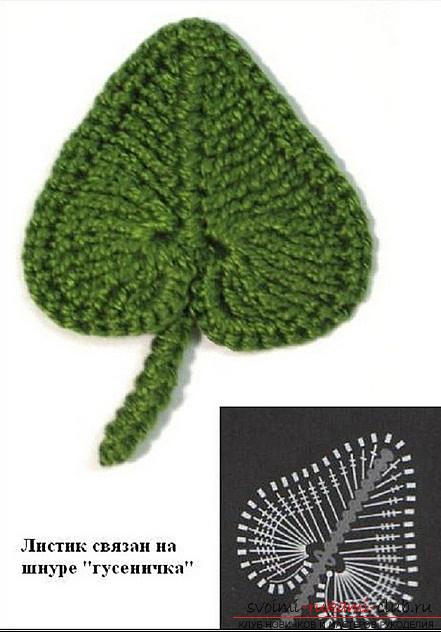
A few more schemes crochet leaves.
The original leaf is tied on a cord "caterpillar".
| Related articles: | |
|
Symptoms of lactose deficiency in adults
Lactose intolerance is a clinically significant condition associated with ... How to mine Bitcoins - the essence of the process and where to start, types and profitability of earnings
Surely almost everyone who is just starting to get acquainted with Bitcoin, ... Knitting men's scarf: master classes for beginning needlewomen
So you want to warm your loved ones so that they are not afraid of whims ... | |


