Reader's Choice


Popular articles
Embroidery is one of the most beloved and common types of needlework. In the old days in Russia, all women owned this art. Embroidery was associated with the ancient customs and rituals of the Russian peasantry. With the help of a needle and various threads, Russian women turned simple fabric into a work of art. A girl of seven - eight years old began to prepare a dowry for herself, and by the age of fifteen and sixteen she was supposed to have festive and casual clothes, tablecloths, valleys, towels, which should have been enough for several years. They prepared towels with which the relatives of the groom and guests of honor were presented at the wedding. Before the wedding, an exhibition of products was arranged and by their number and quality they were judged on the skill and diligence of the bride.
The art of embroidery has a long history. In ancient times, when people lived apart, every nation, and sometimes a small village had its own characteristics in embroidery and other types of folk art. With the expansion of links between individual areas, local features enriched each other. From generation to generation, patterns and colors were worked out and improved, embroidery patterns with characteristic national features were created.
By the nature of the patterns and methods of their execution, Russian embroidery is very diverse. It is known that each region, and sometimes the region has its own, only here are the existing methods of embroidery, its motives of the ornament, color solutions.
Russian embroidery is different from the embroidery of other nations. Geometric ornament and geometrical forms of plants and animals play a major role in it: diamonds, motifs of a female figure, a bird, a tree or a flowering bush, and also a leopard with a raised paw. In the form of a diamond, circle, rosette depicted the sun - a symbol of warmth, life; the female figure and the flowering tree personified fertility, the bird symbolized the coming of spring.
The location of the pattern and embroidery techniques were organically linked to the form of clothing, which was sewn from straight pieces of fabric. The seams were performed by counting the threads and were called countable. They adorned the shoulders, the ends of the sleeves, the incision on the chest, the hem of the apron, the bottom of the clothes, and were also located along the connecting seams.
In embroidery "free", on the drawn contour, patterns of plant character prevailed.
The ancient Russian seams include: a seam painted or semi-cross, set, cross, countable smooth surface, "goat", white small line.
Later there were cutouts, color translate, the cross line, guipures, chain embroidery, white and colored surface.
Russian peasant embroidery can be divided into two main groups: the northern and central Russian. To the north are the works of the Arkhangelsk, Novgorod, Pskov, Vologda, Kalinin, Ivanovo, Gorky, Yaroslavl, Kostroma, Vladimir; to the Central Russian - Kaluga, Tula, Ryazan, Smolensk, Oryol, Penza, Tambov and Voronezh regions.
The most common northern embroidery techniques are: cross, painting, cutouts, white stitching, through-stitching, carried out on a grid, white and colored surface.
Northern plot compositions were most often performed by seams painting and typing. In some areas of the Russian North, patterns on an apron, hem of shirts and towels were embroidered with a cross, usually in one color: red on white or white on red canvas. In the patterns of pictorial motifs prevailed over geometric. Complex compositions were transmitted in silhouette, contour, in one color, in a single step. Here, along with women's costume and small household items and embroidery, decorated with decorative items: towels, valances, etc.
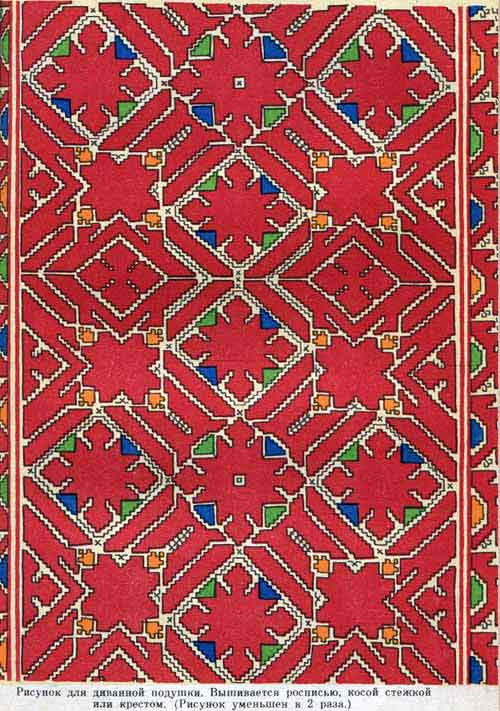
Peasant embroidery of the Central Russian strip was significantly different from the Northern. The patterns were dominated by geometric shapes with the shape of a comb-shaped rhombus with "marks", that is, with two protrusions at each corner, called "burr" or "open". They differed an unusual variety of patterns and color options.
Embroidery Central Russian stripes multicolor. The background is viewed as the ornament itself. In addition to embroidery in the design of the product there is a patterned weaving, stripes, pockets, colored fabrics, as well as lace and braids.
In the southern areas it was used mainly for decoration. women's clothing and towels.
One of the most interesting and widespread embroideries of the Central Russian strip is the color transform of the Smolensk, Tula, Kaluga regions. In addition to inverting, there are seams: set, painting, "pigtail", "goat", cross, countable surface, merezhki.
Based on the study of traditions and the experience of old masters, creative teams of art crafts create decorative items that meet the aesthetic requirements of modern art.
Modern embroidery can be used to decorate children's and women's clothing, as well as household items: curtains on windows, napkins, pillowcases for cushions, rugs and panels, towels, aprons, bags, souvenirs, etc.
So, embroidery is the art of decorating fabrics or knitwear with stitches that enrich its surface and emphasize beauty. For centuries, embroiderers experimented with suitable materials, developing and perfecting their art, drawing inspiration from the world around them, in art, and ornaments from other times and cultures. Embroidery was used for many purposes: to perpetuate the memory of events in private or public life, to express all sorts of political or spiritual ideas, to demonstrate status, tell a story or glorify the beauty of the natural world.
The fashion for various types of embroidery appears and disappears, but the main types remain unchanged. Different types embroidery from simple crosses to exquisite gold embroidery accumulated over time.
In this section we will post materials about hand and machine embroidery, useful tips, types of stitches and embroidery patterns. We hope that our section will be a great help in the work of embroidery masters.
Thanks to Tatyana Sobova for the materials provided for the historical review.
When it comes to embroidery, a kind of Russian beauty girl with a neatly braided scythe, whose head is bent over the hoops, appears in front of her eyes, and a needle flashes in her fingers. In our modern rapid age, a piece of fabric for embroidery complements or replaces leather, suede, felt and other materials, instead of a needle in the hands of skilled workers, a special embroidery machine is increasingly working, and in addition to the famous floss threads, beads, pearls, coins are used to decorate the next piece of art.
A tribute to the old deep ...
Embroidery has its roots in ancient times. Used in national costumes, embroidery in different nations was distinguished by its originality, uniqueness, style, unique plots and the most diverse range of colors. In Western Europe, embroidery originated in the 16th century, and its stories were biblical tales. In the East, embroidery was given a special role in decorating bathrobes, capes, carpets, bedding, pack bags and other household items. This embroidery was distinguished by the complexity of the pattern, the variety of colors.
Ancient Russia was famous for its needlewomen. From early childhood, girls were taught to work for the hoops, and for marriage, they easily and masterly owned a needle and thread, decorating their sundresses, scarves, napkins and ... men's shirts with embroidery.
According to ancient beliefs, a cross-stitched thing was supposed to protect its owner from the evil eye, damage, hex, serious illness. Therefore, in every hut in Russia, the hostess could boast of tablecloths, curtains, pillowcases, towels, headdresses, and shirts with amazing patterns embroidered with a cross. At that time, embroideries decorated wedding Dress brides and colorful scarves of her friends, and as a gift decorative miniatures with embroidered plots from fairy tales were presented. In those days, the patterns that adorn the fabric, had their own specific meaning. Thus, the rhombus and the circle symbolized the sun, and a curved cross suggested the wishes of good.
I go to the store for ... What is needed for embroidery?
If the soul reaches for the beautiful and the embroidery begins to dream at night, then it is necessary to visit the nearest supermarket. In the shop you can buy everything you need for needlework: thread-floss, special needles, hoops, scissors, thimble, hook and suitable fabric. All this beauty can be found in a special set for embroidery. From the variety of fabrics, choose flax, the very the best fabric for a novice artist! Floss threads are distinguished by their bright tones and magical variety. The more diverse the palette of acquired threads, the more beautiful the embroidery will turn out. Needles for needlework are different from all other needles: they have a blunt end and a long eyelet. For the hoop, a longer needle is selected than for hand work. For different fabrics need to pick up and different in width needles.
Special embroidery kits include canvas, thread and pattern design. The canvas is a guideline for embroidery, and the cross captures the same number of threads in height and width. To make the pattern smooth and beautiful, it is better to use the hoop, well pulling the fabric on them. The drawing should be centered, leaving even margins, 5 cm on each side.
When choosing a special set for embroidery, you should pay attention to the embroidery pattern, the quality of the thread, the manufacturer. All characters that come with the kit must be legible and understandable for future use.

How to embroider correctly.
In order not to get lost in the world of threads and needles, it is necessary to understand the crosses. There are two of them! There are Russian and Bulgarian cross. When the Russian single cross is embroidered, the needle goes diagonally, starting its way upwards to the right, and then moves down to the left. The next stitch, respectively, is at the top left and down to the right. The Bulgarian double cross is more complicated in execution. It is complemented by two threads interlacing in the center. Also in cross stitching, it is necessary to study various stitches, such as: a “forward needle” seam and a “back needle” seam, as well as a “semi-cross” seam and stitching stitches.
When the work is completed, the fabric with a pattern is washed in a soft powder and after it dries, it is stripped with an iron on the wrong side.
If you walk through the book supermarkets, look at the kiosks with an abundance of all kinds of press, you can easily find magazines on needlework with detailed guidance for embroidery.
There are special sites on applied art on the Internet where you can find embroidery patterns for a wide variety of subjects.
Modern embroidery is more and more confidently winning its fans. Hand embroidery is especially appreciated. Unique masterpieces come from the hands of real creators of the beautiful. Embroidered tablecloths, murals, curtains, carpets, decorative napkins, handbags, children's and women's outfits decorated with embroidery can be seen on the windows of specialty gift shops. And admiring embroidered paintings with epic tales and ancient legends!
From the depths of the centuries, the remarkable work of embroidery with the cross reached our contemporaries in order to truly occupy our high position and recognition of people.
Hand embroidery is one of the most common types of needlework. Modern embroidery has embraced the best traditions of folk embroidery of the past. Embroidery decorates a variety of products: tablecloths, walkways, towels, napkins, sofa cushions, curtains, bedspreads, valances, blouses, children's and women's dresses, men's shirts, underwear.
Embroidery can be done either by counting the threads of the fabric, or freely along the previously applied contour of the pattern.
Counting embroidery is more convenient to do on the canvas and other fabrics of plain weave, on which it is easy to count the threads. It is even easier to do countable embroideries on a special embroidery fabric, similar to the canvas, where the entire surface is divided into even squares. Counting embroidery (these include most of the old folk seams) are divided into cross-cutting, or scribal, performed on a fabric sparse by pulling out threads, and embroidery on a whole fabric, also called deaf. Stitch seams and embroidery there are a large number. These include all merezhki, line-translate, color translate, guipures, banners. Deaf seams include a cross, painting (often called a semi-cross). Various types of a counting surface: set, twig, pigtail, slanting stitch and others.
Counting seams are usually embroidered with geometric patterns (with straight lines).
Loose seams allow you to embroider patterns with curved contours on any fabric: silk, velvet, wool fabrics. Most often they are used to reproduce floral ornament. Free embroidery includes vestibule, richelieu, smooth surface.
Loose seams are sometimes performed in conjunction with counting seams. These include “Oryol list”, “Vladimir seam”, “Olonets seam by letter” and others.
For embroidery, except for threads and fabric, you need to have a few needles (short with a wide eyelet), thimble, scissors, bone pointed stick, hook, awl, hoop.
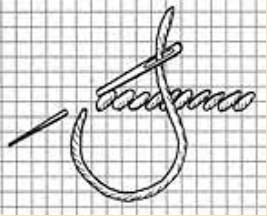
The hoop. Most of the handmade work is done in the hoop. They facilitate the work and improve its quality. The main purpose of the hoop is to keep the material taut in order to protect the embroidery from tightening. The hoops are round and square. The first are usually used for small works and for embroidery on the machine, the second for large ones. The round hoop is two wooden hoops, one inside the other (Fig. 1). To pull the material on the round hoop is simple. Embroidery material is put on the smaller ring. Then a larger ring is placed on top, pressed, and the fabric is stretched. When stitching the fabric in a circular hoop, you should make sure that the material is taut tight, for this smaller ring is recommended to wrap a narrow strip of gauze or soft fabric. If you need to sew small pieces of fabric in size smaller than the hoop, then 4 pieces of any other fabric are sewn along the edges of the material, which makes it possible to stretch the material on the hoop. To work faster, you need to learn to insert and withdraw the needle with both hands, that is, the right hand injects the needle into the work from top to bottom, and the left hand - from bottom to top. Thus, the right hand all the time on top, and the left - below.
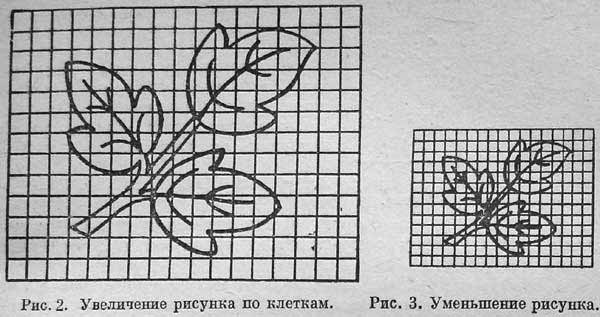
If the size of the embroidered product does not coincide with the size of the pattern, the latter must be increased (Fig. 2) or reduced (Fig. 3). You can do this as follows. Suppose you need to double the pattern. The desired area is lined into equal squares. The smaller the squares, the more accurate the increase will be. Then on clean sheet papers draw the same number of squares, but already enlarged by the necessary number of times, in this case 2 times. Transfer to these cells the lines of the corresponding cells of the original. With neat work, you get an exactly enlarged copy of the picture. When reducing the picture, the original cells are reduced by the required number of times. This technique is called increasing or decreasing the pattern of cells. It is very important with this technique to draw the exact square cells, otherwise the shape of the pattern will change.
There are several techniques for transferring patterns to fabric.
1. Translation of the pattern on the fabric through carbon paper - The most common, fast and easy way. The fabric is spread on a table or on a smooth board, with carbon paper laid on top. A picture is laid on it and fastened with buttons or pins. Sharply sharpened soft pencil encircle the lines of the drawing. On the fabric of dark colors, the drawing is transferred in the same way as through copy paper, with the only difference being that instead of copy paper, paper is rubbed with soap.
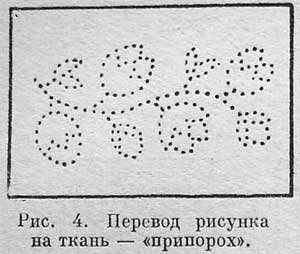
2. Translation of the pattern on the fabric "priporohe". The drawing is first transferred to a thin transparent paper - tracing paper, then put it on a table covered with a thick cloth or soft material. A thin needle pierce tracing paper along the lines of the contour of the picture, trying to make holes at an equal distance from each other. Then the tracing paper with a punctured contour of the pattern is laid on the material to be embroidered and reinforced with buttons or pins. After that, take a piece of cotton wool, moisten in a solution of kerosene with blue, soot or white. Strongly wring out so that there are no blots, and they begin to rub lines with holes along the contour of the drawing. Passing through the punctures, the solution forms a “priory” on the fabric - traces but the lines of the outline of the pattern (Fig. 4).
3. Translation of the pattern on the fabric with thin paper. Thin paper with a pattern is tipped over a thick colored fabric or velvet. Then, using small, fine stitches, flush through all the lines of the pattern. After that, the paper is cut off and the outlines of the pattern remain on the material.
When embroidering never make knots. The thread is fixed on the whole fabric mainly in three ways.
1. The thread is fixed with several small stitches in the place that will be closed with embroidery in the future. 2. Make the first stitch with a stitch “forwards a needle”, without pulling the thread out of the fabric to the end, sew the remaining small tip of the thread with one stitch and cut off the end of the thread, and then this place is closed with embroidery. 3. The easiest way: fold the thread in half, put the ends together, thread the needles into the eyelet and make the first stitch; without pulling the thread out of the fabric to the end, pass the working thread into the resulting loop and tighten it, sticking a needle into the fabric. The place of fixing the thread remains completely unnoticeable.
Finishing embroidery, it is necessary to skip the working thread with small stitches for the pattern.
In hemstones, the thread is fixed as follows: for the first stitch, the needle is passed into the stretched strip of fabric between the threads of the future post and inserted into the material 2-3 threads from the edge of the hemlock, the working thread is put in a loop from right to left, picking up 4 needles on the needle and tightening the loop. For strength, a second loop is made at the same place.
In the line work to fix the thread without a knot, stitch it with a “forward needle” seam along the non-sewn grid columns; these columns will be further edged and closed with embroidery.
Embroidery is seldom done by any one seam; Usually in the same pattern used different types of seams. This makes embroidery elegant and diverse.
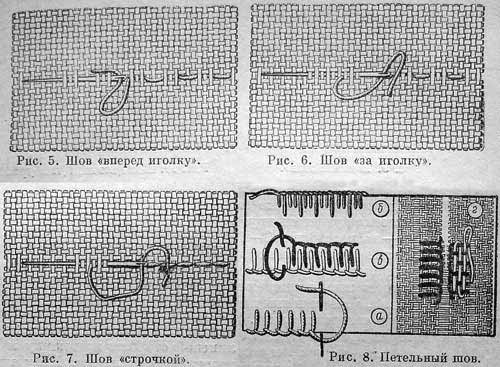
Seam "forward needle" (Fig. 5) - the simplest type of seam. The stitches of this seam go one by one. One line of these stitches is rather monotonous, but if you change the size of the stitches, give them in a different rhythm, enter threads of different colors, use a thick strand of threads, then a thin one, you can achieve diversity and create simple, but beautiful embroidery. This seam is also used when drawing around the outline of the pattern (in the smooth surface).
Needle needle seam (Fig. 6). The needle-stitch is easy. The name itself suggests that the stitch is made back from the puncture needle and is displayed under the fabric in front of the made stitch. This seam is embossed and embellished with embroidery. It is carried out in the following way: a needle is punctured by a needle, 4 cloth threads are supposed to be put on it, and a needle with a thread is pulled through it. Then they pierce the fabric at the back of the second needle puncture, at half past the first stitch, i.e., the needle is punched into the second thread, and six threads are picked up: two after the needle and four in front. The next stitch will again consist of two threads behind the needle and four threads in front. The size of stitches depends on the thickness of the fabric.
Stitch "line" (Fig. 7) is designed to tightly connect the fabric. This stitch is performed like this: 2-3 needles are gathered with a needle, a thread is pulled through and the fabric is pierced again, inserting the needle into the first puncture site. Now the needle is picked up not 2-3, but 4-6 threads, that is, the same number of threads behind the needle and in front of it. From the front side of the fabric, this seam gives continuous stitches, as when sewing on a machine, from the inside out resembles a seam “for a needle”.
Loop stitch (Fig. 8), as can be judged by the name, is used for overcasting heels, they can cut the edges of the fabric, as well as embroider (usually used in “cutwork”). The front and back stitches here are perpendicular to the edge of the fabric. Sew left to right, with the edge of the fabric is at the bottom. At the beginning of the work, a puncture is made in the lower left corner of the embroidery from the seamy side to the front one, that is, “to yourself”, and all other punctures will already go from the front side to the wrong side. After the first puncture, send the thread down, holding it thumb the left hand, make a puncture from the front side inside out and direct the tip of the needle into the resulting loop. The needle is pulled through the loop and the string is pulled down and “on itself”. The loop is tightened at the edge of the material. When stitching loops and seams, all stitches are made of the same size, they should fit tightly to each other. In embroidery, stitches are rarely made - at a distance of 3-4 threads (Fig. 8, a). Stitches can be alternated by making two stitches short, one long (Fig. 8, b). If stitches are made at a distance of 3-4 threads, then the gaps (on the other side of the seam) are embroidered with a looped seam with a thread of a different color (Fig. 8, c). The loop stitch can be decorated with a darning stitch or a “forward needle” stitch. You will get a thick colored strip, which is used to seal the cut on an embroidered blouse, children's dress or men's shirt (Fig. 8, d).
Seam "goat" (Fig. 9) is often found in Russian embroidery. In appearance, it is a cross-stitch on the front side of the product and two parallel rows on the wrong side. They begin to embroider from the bottom up or away from themselves, stitches are done from themselves, and the needle is sent all the time “to itself”. The seam "goat" is also used when embedding edges in outerwear (hem, pockets, seams, etc.).
Seam "chain" (Fig. 10) is a series of loops, leaving one of the other. This seam is also called "chain". It is executed as follows. Sew "on itself", the needle is removed with a thread on the front side. Putting the thread in a loop and holding it with the thumb of the left hand, they insert the needle from the face into the inside of the previous puncture and send it along the inside out 3-4 threads. New puncture on the front side make the tip of the needle fell in the middle of the loop. It turns out a loop with a thread in the middle. The tambour stitch is very uniform, therefore it is recommended that it be added with other types of seams.

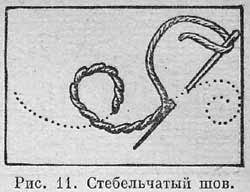
Stalk seam (Fig. 11) got its name because they usually embroider stems of flowers. Stalked seam is used, for example, by embroidering the transition from the thin part of the stem to the thickened one. Very often stalked seam is used when performing contour patterns. Sew them back with a needle, that is, each stitch is made, stepping back. Puncing the needle into the fabric, dial from 2 to 4 threads per needle, pulling the thread, and, stepping back, re-insert the needle and pick up on it the number of threads equal to the first stitch. The needle with the second stitch should come out of the fabric in the middle of the previous stitch, the front stitches go in one direction, coming in one after the other to the right or left, depending on the purpose of the seam. Observance of equal size of stitches and the obligatory removal of the needle in the second, third and subsequent stitches in the middle of the previous stitch make the seam beautiful.
A strap is made of threads pulled out only in one direction. A keb is often included in various types of embroidery, but is also used as an independent type of fabric decoration.
Merezhka "column" (Fig. 12). According to the technique of the most simple.
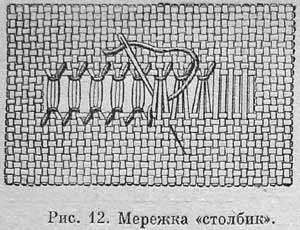
It is carried out as follows: 3-4 threads are pulled out from the fabric; they fix the thread at the lower left edge of the hairstyle, the working thread is led straight up into the pulled-through strip of fabric, pick up a bundle of vertical threads from left to right (3-4, depending on the density of the fabric), twist them once from right to left and insert a needle into the fabric from the inside on the front side for 2 threads of fabric from the edge of a merezhka for the next stitch. A diagonal stitch is formed on the bottom of each strapped “bundle”.
Merezhka "X" (Fig. 13). First, it is done merezh "column". Then thread in the middle hemstitch collect two columns in a knot. The knot is done in the following way: the thread picks up two columns, passes under it, returning, it twists around them in order to go out into the formed loop, and tightens it. So that the knot does not move, the second loop is immediately made.
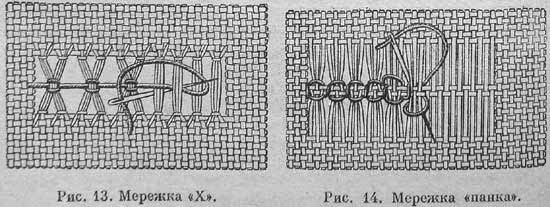
Punk stitching (Fig. 14). In the middle of a wide merezhka, the edges of which are hemmed with a brush, leave from two to three undoing threads. On them from two sides at the same time make brushes.
They are carried out as follows: with the first stitch the thread covers the left threads of the fabric from the bottom up and passes diagonally downwards under them; coming to the front side at a distance of three threads from the first stitch, the thread runs horizontally from right to left, that is, it returns to the place of work start; then, going upwards diagonally, it tightens the lower tassel; the upper brush is tightened by moving the thread from right to left and diagonally down.
This merezh serves as the edge of other demarches, in such cases it is made close to the edge and is called the "undercut".
Pointer "linen" (Fig. 15). Having made the first (upper) row of punks, they proceed to perform the second (lower) row, at the same time making the air loops of the linen. For this, the working thread is fixed down on the underbar, two punk bars are made and two bars are twisted up and left by two loops, then the thread goes up and loops on the punk, then two bars to the right and finally down again to the beginning of the air loop . To go to the execution of the second air loop, make four punk column. Between the fourth and fifth columns make the second air loop.
Merezhka flooring. The appearance of such a measure can be very diverse (Fig. 16).
First, they do the usual "stitch" merezhka, then, fixing the thread, four lines are drawn onto the needle from right to left: the first is under the needle, the second is onto the needle, the third is under the needle, the fourth is again onto the needle. After the fourth column, by pulling the thread, the left fourth column is pulled back under the needle, the third one on the needle and so on until the first one (so that the thread covers those columns that were above the needle during the first move). Dragging the thread, do not need to tighten it. Again they direct the needle from right to left, and so on until the middle of the merezhka, then from the middle of the merezhka they dial the next four columns, etc. But if the previous group of columns were filled from bottom to top, then the next one should be filled from top to bottom.
Solenozhka. The new henchmen can be in 3, 5, 7 slants, that is, in 3, 5, 7 working threads, depending on the width of the hemstitch. 5 Merezhka skovok (fig. 17). 20 - 30 threads are pulled out of the fabric and columns are made. Then the first working thread is fixed on the fabric in the middle of the merezhka and it is tied into a bundle, then 4 columns, then 6 columns (thus alternating to the end of the merezhka). The second working thread is fixed on the material at the point “a” (left) and passes by a wavy line from one end of the merezhka to the other. First, it goes over the first button (four columns), connecting two columns in a knot, then passes in the center of the second button (6 columns), without being fixed under the third button (4 columns), also connecting two columns each node (see . The course of the thread "a" in the figure). The third working thread “b” repeats the movement of the thread “a”; The fourth working thread is fixed at the point “b”, waving over the string “a” in the first button, then in the center of the second button and under the thread “a” in the third button. The thread "in" is first fixed by a knot on the first column, then it knots the second and third columns, forming a split, and is fixed by a node on the fourth column. The fifth working thread, the “g”, repeats the movement of the thread “c”.
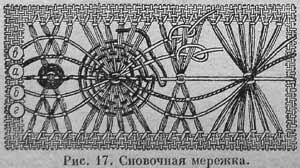
In this merezhka at the intersection of wavy lines on the snopike in 6 columns, a large "spider" is embroidered, and on the stitch in four columns - a small "spider". "Spiders" make a working thread, which runs along the middle thread of the merezhka. She holds the place where the wave lines cross on the snip and binds the spider.
"Spider" (Fig. 18). If they are done in two directions - horizontal and vertical, then when crossing its rows empty squares are formed. These squares can be filled with a simple or complex pattern, depending on the complexity of the hemstitch pattern.
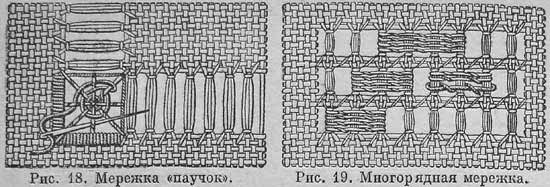
The easiest drawing pattern is the “spider”. First, the working string is tensioned from a corner to a corner of a square diagonally, and then horizontally and vertically. Stretching the thread, twine it, with the last thread twisted only half. Having reached the center of reticulation of the strained threads, a knot is made in the center with a working thread.
In order to form a "spider", the working thread must move in a circle, interlacing the threads. Going round the circle, the thread hooks on the last stretched thread and turns back, weaving the threads in reverse order. Having made the last circle, the thread is fastened near the unfinished (uninitiated) thread and twists it to the end.
In finished form, the drawing resembles a spider.
The edges of the squares are sealed with a stitch seam or an iron roller.
The old line is a multi-row hemming (fig. 19). The threads are pulled out only in one direction on the base or on the weft, therefore the merezhka is often called “one-way hold”. It is performed like this: four threads of a fabric are gathered on a needle, trimmed and pulled out, and 2-3 threads remain uncut, then again four threads of a fabric are trimmed and pulled, etc. Non-trimmed threads are sheathed like a hem punk, and the outermost ends are closed shuffle "column". The sides with the undercut of the threads are looped over by a stitch seam. The cells formed between the rows of columns and the strips of fabric separating them are filled with horizontal tightly lying rows of threads. The working thread is stretched over the posts. Having covered 3-4 columns, the thread comes back, twisting the working thread in each cell once.
"Derzhku" embroidered on men's shirts, women's blouses, towels, valances. Sometimes, it is combined with other types of embroidery - cross, satin stitch, etc.
The basis of this type of embroidery is the grid on which the pattern is applied.
Preparing mesh for white stitching. The grids are held on the base and on the weft (Fig. 20). On the fabric the needle puncture marks the boundaries of the embroidery motif. At the top of one of the corners, the weft thread and the warp are cut, they are gently pulled and cut at other marked points, then the thread is pulled out on all four sides.
On the pulled out threads they gather on the needle with the colored thread the warp threads and the weft. In each row of the grid, such a number of threads are taken along the base and weft so that the grid cells turn out to be strictly square in shape. The threads collected on the working thread are carefully trimmed and pulled out. The first thread in each strip pulls out the middle thread; when she is pulled out, her neighbors are pulled out without difficulty, in pairs. It speeds up the work. At the edge of the net, one or two strands are pulled out less, so that when the edge is tipped with a looped seam, the outermost cell does not increase. The prepared mesh is hooped into the hoop and twisted around.
Mesh Wrapping. For a white line, the net is wound diagonally around a thin white thread (coil No. 40-50). If the grid is small, then each column is wrapped around one stitch, and if large, two or three stitches are wrapped around the inside, making a diagonal stitch inside (Fig. 21). Begin to draw the grid from the bottom left corner, which is the transition from the vertical to the horizontal bar. Having reached the edge of the line motive, in the same movement interweave the grid bars, going down diagonally downward, making the second diagonal stitch parallel to the first. So interweave the whole grid, then overcast the edge with the threads cropped by looped or satin stitch.
The net rewrapped and swept along the edges is filled with various line cuttings: single darning, cobweb, flooring.
Drawing pattern is applied to the grid on the account of the cells. Sometimes a pattern with a free contour is embroidered on the grid, not on the count of cells. The contour of such a pattern is first applied to tracing paper with ink, then pinned or swept under the netting grid and with a working thread the contour is applied onto the mesh with a “forward needle” seam. You can also draw a tracing paper with a pattern on top of the line grid and sew the contour through it with a “forward needle” seam. When the contour is sheathed, the tracing paper is torn down, the contour is wide (4-5 millimeters) and the ornament figures are filled with cuts, according to the grid cell count.
Single darn (Fig. 22) is the filling of the grid cells with one vertical and one horizontal stitch, with a straight cross in each cell. Single darning perform white thread number 40-50 (coil) on the intertwined grid.
Having fastened the thread on the grid column at point 2, lay a working thread at once over several cells, in this case over 3 grid columns; thread hooked for the fourth column of the grid at point 2; during the return stroke, the thread twists its intersections with the grid and returns to point 1. From point 1, go to point 3, lay the thread horizontally over the grid to point 4, twine the working thread with two stitches and return to point 3, then to make a long stitch from points 5 to point 6 on top of two cells, and so on. The sequential course of single darning is shown in the figure.
Double darn it is performed in the same way as a single, with the only difference that in each cell it stretches not one thread, but two - along and across.
Gossamer or the air loop, is carried out on the twisted and on the non-inverted grid in parallel rows or on a diagonal. The worker thread is fixed at the bottom — on the grid column, first winding the column to the left with an air loop, then the working thread goes upwards into the loop too, then to the right behind the column and, finally, down again to the place where the air loop begins (see Fig. 15, “hemming ").
Flooring - this is the filling of the cells of the grid with a very dense seam (darning) with floss or silk. They pick up one table-bic cells on a needle, the other under a needle; when returning the working thread, the columns are recruited in the reverse order, making several rows of threads in each cell until the entire cell is filled.
Color twist (fig. 23) is a special type of color line embroidery, in which at first a pattern is made by dabbing (stitching) on an untransformed grid, and then the grid is intertwined with a colored thread. The grid for color inversion is made more dense than for white stitching. To do this, when preparing the mesh, they pull out half as much as they leave, for example, 3 threads are pulled out, and 6 are left.
After the grid has been calculated and the threads have been pulled out, they proceed to the execution of the motifs by “stanchion”, i.e., they embroider them with a single darning on an untranslated mesh. "String" is usually done with light colored threads - white or yellow. The motifs embroidered by the stlane are very dense, without any gaps. The mesh that remains around the patterns is interwoven with a thick colored thread (usually red or blue). Each column is twisted several times, moving from vertical to horizontal ledges diagonally. So that at the intersection of the cells, the fabric does not shine through, when moving from a vertical grid to a horizontal column, a diagonal stitch is made from the front side. It turns out colored, tightly entwined mesh.
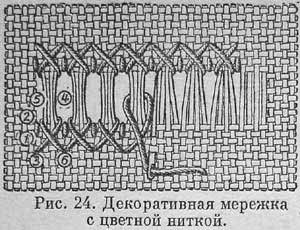
To perform a merezhka (fig. 24), several threads are pulled out of the fabric. With a colored thread, the columns are stitched with a seam in the form of a cross according to the following scheme: from point 1, a needle and thread are inserted through point 2 down 4 threads from the edge of a Metahka to point 3. An oblique 3-4 stitch is put on the needle 4 hem thread and make a second oblique stitch 5 -6, and from the wrong side they insert a needle with 2 threads of fabric from the edge of a merezhka, after which they make a stitch over the edge of a merezhka, sticking the needle from the wrong side again to point 6, etc. The second side of the hemming is sewn with the same stitch. It turns out openwork hemstitch, bordered on both sides by a colored strip. This hemstitch is applied in combination with the color wrap, cross, semi-cross.
The peculiarity of this type of white line embroidery (see color table) is that the mesh in it is prepared only for the background, and the fabric under the main pattern remains intact (the threads in this place are not pulled out).
When making a seam, first apply the pattern to the fabric through the transfer paper, then the outline of the pattern is sheathed with a simple or double tambour (two rows of the tambour). The background around the pattern is pulled out - three threads are pulled out, three are left and twisted diagonally.
The fabric of the main pattern is decorated with various cuts, round holes.
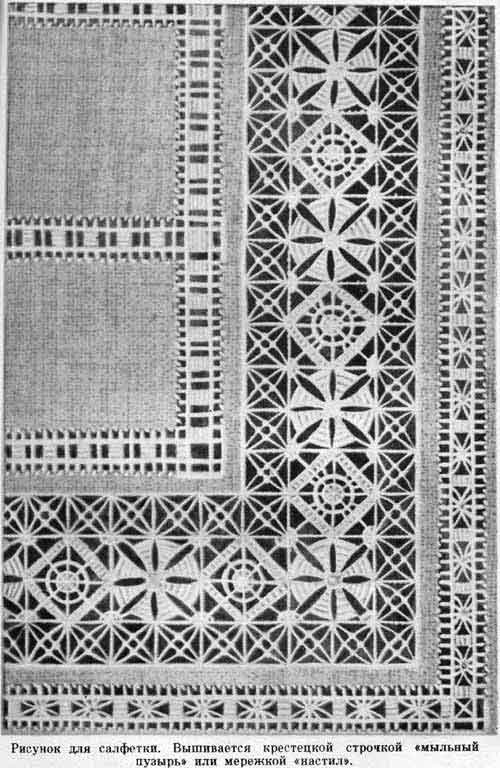
This type of embroidery was created by masters of the Krestetsky district of the Novgorod region (see color table). It is used for the design of white linen with white through patterns. All products are decorated with patterns of exclusively geometric nature, performed by various types of cross-stitch lines. In the Krestetsky district, several types of line techniques are known, each of which performs specific types of patterns: “bubble”, “antique guipure”, “loose guipure”.
"Soap bubble" - this type of embroidery got its name because of the airy outlines and roundness of the pattern. To make a “bubble”, first outline the border of the motive, pull one thread around the square, then pull 15 millimeters to create a coarse mesh, and leave 5 millimeters; it is desirable to leave an even number of threads (Fig. 25, a). After that, cut stitches of fabric at the edges of the motif are overlaid with rare stitches, and the left threads of the net are divided in half (b) and sheathed like stitch posts. Then put on two parallel diagonal threads in each cell separately, sticking a needle into a small square of fabric.

At the intersection of the diagonals, twisting the working thread, immediately make small spiders (c). When all the diagonals are tightened, they start to develop small dense squares of fabric, that is, sheathe them with a Metah, making on each side two columns, sticking a needle all the time at the center point of the squares (g), then around the dense square the working thread goes in a circle, securing the thread with two knots at the intersection of the threads. When the circle is completed, it is tightly wrapped around it, for elasticity and at a distance of 3 millimeters make a second large circle. Light translucent circles on a fine grid are obtained.
Vintage guipure (Fig. 26). It is performed in the same way as a “soap bubble”, but instead of openwork circles on the strained diagonals, tightly decorated figures are made. Thus, very dense rosettes in the form of eight-petal daisies are formed around the small squares of the fabric.
Loose guipure with a pattern made up of mesh squares, circles and dense jumpers, shown in Figure 27. For loose guipure, a large mesh is pulled out: 8-10 millimeters are trimmed and pulled, and 3 millimeters are left. The mesh is wrapped in sparse stitches, each column three or four times. The central cell of the motif is filled with a “spider”. From the central cell, in all directions, a working thread is inserted in several rows and is interlaced with a flooring, dense parts of the pattern are formed against a translucent background. The cropped threads weave overlaid with stitched seam.
This type of embroidery differs from the sacral more ease, softness.
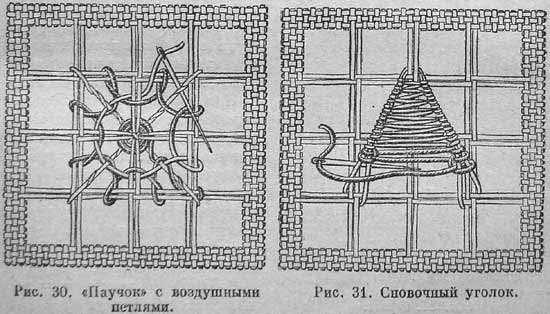
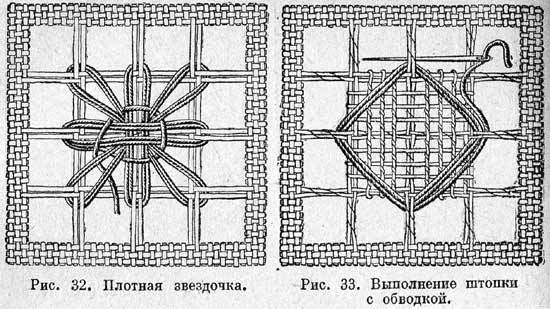
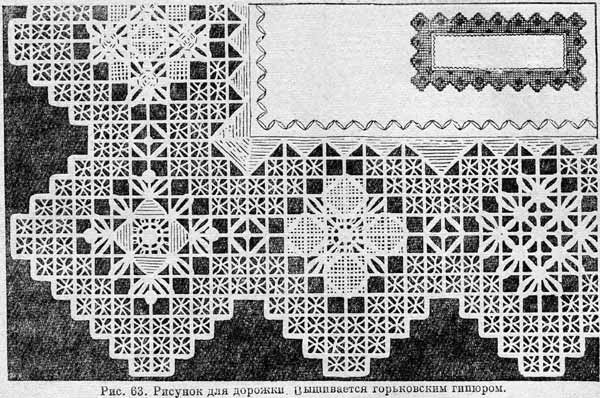
Gorky guipures are made on a large, rarely intertwined grid (with a grid of 10 millimeters, 8 millimeters are cut, and 2 millimeters are left). Guipures are embroidered on the canvas with floss threads and coil No. 40 or No. 50. Very often the drawing ends with festoons. First, the net is pulled out in a straight line, then the shape of scallops is marked with a thick thread, the needle is “sewed forward” along the net, and then they begin to twist the net to the laid thread. When the entire net is wrapped around, the edge and the scallops are tiled over with a stitch seam (fig. 28). The background of the guipure is sewn up with a thin reel of thread along the diagonal with a special “shadow” seam (Fig. 29). A rhombic “flowers” form is placed against the background: “spider” with air loops (fig. 30), “knitting corner” (fig. 31), “dense asterisk” (fig. 32), as well as large stitches going through several cells (Fig. 33). "Flowers" perform floss floss. Around the "flower" cells remain free, so that the "flowers" do not merge with the background. Gorky guipure embroidered tablecloths, curtains, curtains, capes, valances.
These include: cross, painting, double cross, set, slanting stitch.
It can be embroidered with a cross according to a special fabric (canvas). A canvas is sewn on the material and, counting the small squares, embroider a pattern. When the embroidery is finished, the threads of the canvas are carefully pulled out.
You can also embroider on a fabric with a large flat thread that makes up the correct squares, for example, on the canvas.
Cross (Fig. 34) is performed with two intersecting diagonal stitches. All upper stitches should be in the same direction. With the correct implementation of the cross on the wrong side, straight, straight stripes should pass in one direction - vertically or horizontally.
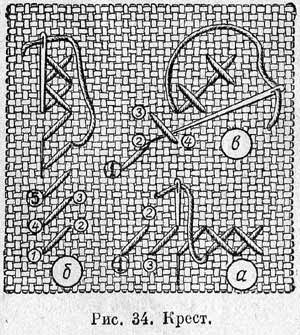
Compliance with these rules is achieved by the following methods. When the cross goes on one flat line, horizontally, then all stitches are executed first in one direction, and then they are overlapped with stitches in the opposite direction (a).
When the cross is sewn vertically, then, having made one stitch from bottom to top, it is necessary to go straight up inside and, piercing the needle on the front side, make a slanting stitch down to the left. Having on the wrong side of the straight stitch up, go to the formation of the third cross, etc. (b).
The most difficult job is diagonally, since in some cases it is necessary to bring the second diagonal stitch under the first one already done, so that all the upper stitches on the front side of the fabric lie in one direction and the inside out goes straight lines (c).
The cross can be embroidered and on points. For this purpose, the desired pattern is drawn on the graph paper. It is superimposed on tracing paper. Tracing and graph paper split off. A thin needle makes punctures at the ends of the crosses throughout the entire pattern. Next, do the same as when transferring the pattern on the fabric "pryporokhom".
Small dots imprinted on the fabric indicate the location of the crosses (Fig. 35).

Double cross (Fig. 36) consists of four intersecting stitches - two diagonally and two on the base and duck. Make every cross completely. First, an ordinary cross, then after the second stitch, the needle is inserted in the middle between the two upper punctures, a fractional stitch is made from top to bottom, as well as transverse from left to right.
The sequential progress of the double cross is shown in numbers.
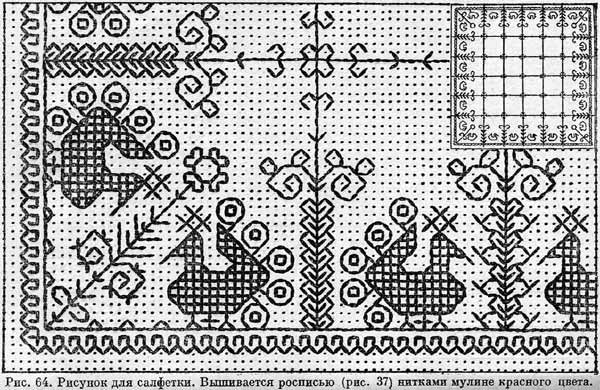
"Polukrest", or "painting" (pic.37) is a double-sided stitch, in which the front and back stitches are connected in a continuous line. It is executed in two moves.
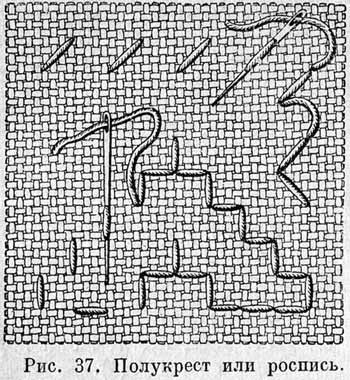
The first move: from left to right, diagonal facial stitches are laid on the thread count. Inside out the same stitches, but inclined in the other direction.
Second move: working in the opposite direction, fill the gaps between the facial stitches, making punctures in the puncture spots of the first row of stitches. Polukrest widely distributed in embroidery of various nationalities of the USSR.
Braid or twig (Fig. 38), embroidered with a flat strip, filled with cross-stitches. Puncturing the fabric from the reverse side to the front side, making a stitch diagonally up to the right, sticking it into the fabric from right to left, and coming to the surface, doing an elongated stitch to the right down. Grabbing the fabric from right to left, the next short diagonal stitch is made. On the wrong side, two parallel linips are made of stitches along the edges of the strip.
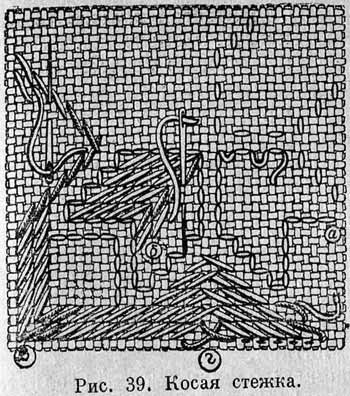
Oblique stitch (fig. 39) is the most common seam of Mari, Mordovian and Chuvash folk embroidery. It is embroidered with silk, wool, floss, gold tinsel (see color figure VI). The main color of embroidery is red (terracotta) and a small amount of dark blue, green and golden yellow. An oblique stitch is performed on the thread count of the fabric with stitches going in an oblique direction. First, the outline of the pattern is sheathed with a mural (or semi-cross) (a), and then the pattern is filled with an oblique stitch (b). It is done this way: fixing the thread, make a puncture from the inside on the front side. To make the first oblique stitch, four threads are counted to the right and two up, make a horizontal stitch inside out from right to left. The size of the stitch is half the slanting stitch (c). The second oblique stitch is made on two threads of fabric above the first (b), the third one - on two threads of fabric above the second, and so on. The movement of stitches goes all the way up to the right. It turns out one stitch in each row. In order to embroider on the second stitch, the last stitch is made on the naznayik by moving from left to right, and a slanting stitch is directed down from right to left, making punctures into the puncture spots of the previous row of stitches. On the wrong side, continuous horizontal lines resemble the seam of a machine stitch, and on the front side there is a tightly wired surface with the direction of stitches in one direction. Depending on the pattern, the direction of the stitches can be changed by making a crosswise turn (d).
Sealing the edges in Mari embroidery. Sometimes in the national Mari embroidery the edge of the product ends with an embroidered color strip. After several rows sewn with a slanting stitch, the edge is made with a special stitch. From point 1 (fig. 40), make a stitch with an inclination right down to point 2 and remove the needle through 2-3 threads to point 3. From here they make a stitch with an inclination to the left to point 4. Inside the diagonal stitch is laid to the right and at a distance of two or three The threads from point 1 pierce the needle into point 5. Subsequent stitches do the same. It is recommended to make the seam tight. At the bottom of the seam flagellum in the form of a rope. According to this flagella, the fabric is bent and hemmed from the inside. 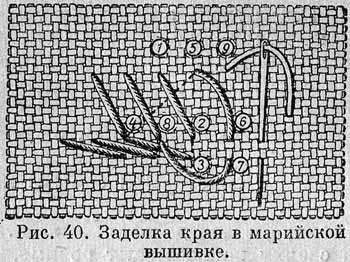
The set is performed by counting the threads of the fabric. This embroidery covers the fabric in rows consisting of stitches “forward needle”. The movement of the working thread goes in one direction from one end of the work to the other and back. On the wrong side of the pattern is obtained the opposite of that which is formed on the front side.
There are several types of surfaces: thick white with flooring, light without flooring, slit, Russian smooth surface, shadow and satin sewing.
The floral pattern of flowers and leaves according to the translated pattern is usually performed with a smooth eye.
White smooth surface with flooring (linen). A linen satin is embroidered on thin fabrics - cambric, awnings, crepe de chine. The threads for this smooth surface should be taken soft and preferably shiny (floss, silk). Smooth embroideries are decorated with various types of additional sewing: knots, loose, backed seam, or “figure eight”, openwork nets, openwork.
To learn how to embroider a linen satin, you need to familiarize yourself with some of the most necessary techniques of this embroidery.
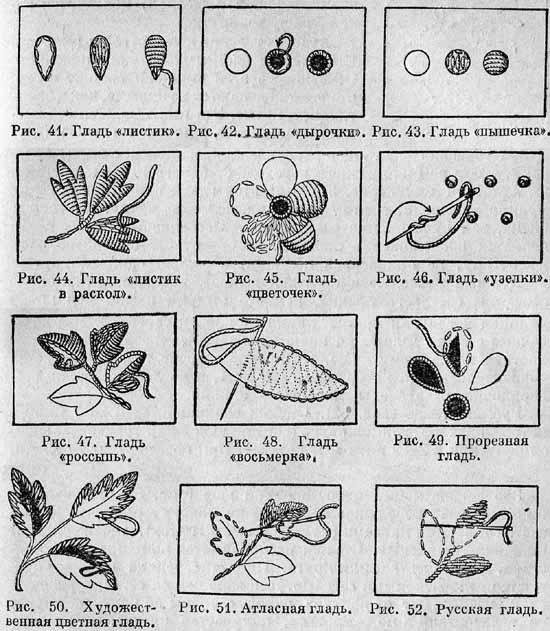
"Leaf" (Fig. 41). The outline of the design is sheathed with a “forward needle” seam, then the flooring is made. The flooring is placed along the leaf, and on top of it they put even, very tightly adjacent stitches in the opposite direction.
"Holes" (fig. 42) pierce with a thick darning needle and overcast with a thin bobbin thread.
"Pyshechka" (Fig. 43). The contour is sheathed with a “forward needle” seam, the flooring is made, then the surface is embroidered.
"Leaf in the split" (Fig. 44). Split - this means that the leaf is divided into two parts. They start the leaf as usual: they mark the edge, lay the flooring, but at the place where there should be a split, make two parallel stitches. First, fill the whole part of the leaf, and reaching the point of splitting, first fill one side, sticking a needle between parallel stitches. After one side is embroidered, they go to the second.
"Flower" (Fig. 45). At first a hole is made, then the contour of the flower is sheathed, the flooring is done and each petal is sheathed with transverse stitches tightly adjacent to each other.
"Knots" (Fig. 46). Sheathed smooth smooth surface stalked seam the form is filled in the following way: the working thread, appearing on the surface, is wound onto the needle once or twice and returns to the place from which it came out. When inserting a needle, the knot should be held with a finger until the working thread pulls it towards the matter.
"Placer" (Fig. 47) is done with small stitches "back pgolku." Both the nodules and the placer fill the form, starting from the edges, parallel to the outlines.
Underlay seam, or "eight" (Fig. 48), is performed with small stitches “back needle”, running along the edge of the form. The working thread, having made a small stitch here, is thrown inside out to the other edge, so that, having formed the same stitch there, to go back to perform next to the first stitch of the second. Inside out is formed frequent binding in the form of "eight". Places of embroidery, decorated with underlay seam, stand out well on light fabrics and to the light.
"Pruned surface" (fig. 49). First, the contour is contoured with a “forward needle” seam, then an incision is made along the leaf and sheathed like this: the needle comes out from the inside of the incision, and from the front side it is inserted into the material, a narrow seam is obtained.
Artistic color surface (fig. 50). Embroidered with colored threads and silk. The peculiarity of this embroidery is that the stitches are made not straight, as in the white surface, but slanting. This surface is sewn without the flooring is not high, but a flat surface (two-sided).
If the sheet or flower is rather large, then you should not make long stitches, but embroider with shorter stitches, first with one color and then with another, darker or lighter. It is better not to stitch a needle into a previously made stitch, but between stitches so that there is no abrupt transition from one color to another.
Satin surface (Fig. 51). For this smooth surface, you need to take floss or silk threads. It is better to thread one thread into the needle: the thinner the thread, the better the drawing lies. The peculiarity of this smooth surface is the arrangement of stitches, which lie tightly one to another, without touching the ends, but entering one after the other. Each subsequent stitch is made by sticking a needle around the middle of a neighboring stitch, stepping back a little, under the thread of the stitch just made. The direction of the stitches must go along the veins of the leaf, petal. When a rounded part begins on a leaf or a petal, the number of stitches should be increased along the curve in order to avoid a long oblique or straight line from the edge to the middle. These additional stitches are made along the edge, going back from the middle of the leaf to the outer edge. On the right side of the fabric, a smooth, shiny surface of the pattern is obtained, and small stitches are randomly scattered on the left side.
Russian smooth surface (fig. 52). Stitches of 5 to 7 millimeters in size go in a straight line (vertical or horizontal) with a pass of 2-3 threads between them. During the reverse course of the stitches, fitting tightly to the previously performed, cover the missing 2-3 threads with a working thread.
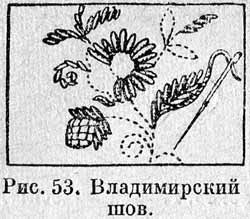
This is a decorative one-sided seam (Fig. 53). On the wrong side there are only small transitions along the contour of the picture. It is embroidered with thick threads (floss in six threads). The main color of embroidery is red. The stitches are arranged in the direction of the leaf, or petal, or circle. Sometimes the middle of the flower is decorated with decorative grids. To fill the mesh with a working thread, they stretch from the contour of one side to the contour of the other horizontally and vertically. On crossings, threads are fastened with different stitches.
This embroidery is a later time. The contour of the pattern transferred to the fabric is sewn with a “forward needle” seam once or twice (Fig. 54). At the same time make the binding parts of the pattern - lintels (brides). Then the entire pattern and edges are looped over with a stitch seam. The edge of the stitch seam should be directed toward the cut. The material between the lines of the pattern and the edges of the cut out at the end of all embroidery.
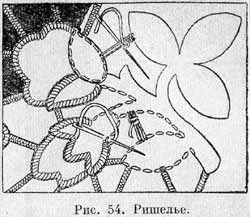
Breeds can be done in three ways: simply by wrapping them in a stitch seam, flooring.
Banners are made on thin rare fabrics (marquette, batiste, redina). Tracery pattern is obtained by tightening the threads of the fabric. Banners are most often used in combination with ironing technique.
Banner "punk" (fig. 55) is carried out in rows from left to right, between the rows there is a free, unstretched, thread of material. The sequence of work is shown in figures.
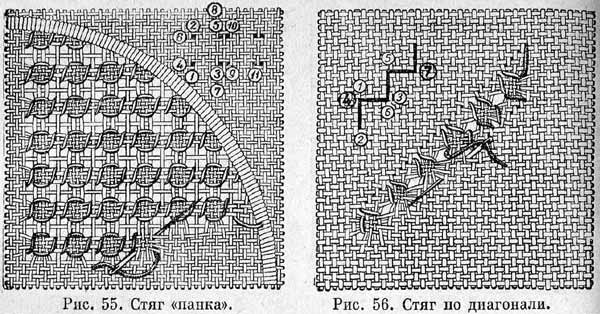
Dip and executed diagonally. The sequence of work is shown in Figure 56.
The fringe of thread (Fig. 57) is made of thick floss threads. To make a fringe, take a strip of cardboard of the desired length. A small stitch is made from top to bottom from point 1 to point 2, and then from the inside out at a distance of two to three threads they are pierced to point 3. Twisting a cardboard, thread a needle at a distance of two threads from point 3, make a stitch inside out and insert a needle at a distance of two threads from point 2, and then make a stitch to point 1. Go to the next stitch inside out, a horizontal stitch at a distance of four threads from point 1. The order of subsequent stitches is the same.
When the working thread covers the entire strip of cardboard, the cardboard is carefully pulled out, it turns out the fringe of colored thread (it is not cut). This fringe finish napkins, tablecloths, towels. The color of the thread is taken in accordance with the embroidery tone on the product.
This fringe (Fig. 58) ends with small embroidered products. Fringe can be white, harsh or colored, depending on the pattern. To sew a fringe, 2-3 threads are pulled out from the fabric of the product on each side, then a strip of colored fabric is taken (in embroidery tone), folded in half and swept up to the bottom row of the pulled-out threads, and then a hemlock is made. Sheathing the lower edge of the hemstitch, simultaneously sew colored fabric. About a hem of a color stripe, a camouflage stitch is sewn with a light thread to the tone of the main fabric - a semi-cross, satin stitch or a cross, after which the fabric is cut to the color stripe and the colored and basic fabrics are pulled out to the masking stitch. It turns out a thick fringe in 3 layers. At the corners of the fringe is not done.
Sometimes you have to embroider large items of narrow material. To hide the junction of various fabrics and decorate the product, apply camouflage seams. Camouflage seams combine both one-color cloth and white cloth with a colored one, for example when decorating items with a border of different color cloth.
Camouflage seams can be dense, deaf or openwork, transparent.
Suppose that in a thin curtain it is necessary to connect the edge with the edge. On a gleam dense threads of an edge a dark strip will be allocated. This disadvantage can be eliminated by applying openwork camouflage seams. At first the cloths of the fabric are joined along the edges, swept with large stitches with a “forward needle” seam, then sewn with a narrow seam “over the edge”, grabbing edges along one thread, and pulling the remaining thick threads along the edges as in a hem. The stitched scar is smoothed. The material was sealed in a hoop and embroidered along the seam with various types of stitches, a cross, a pigtail, a figure eight, a punk.
Masking of a connecting seam of a small attachment "small lamp" (fig. 59). This stitch is made on dense fabrics (chescha, linen). 5 filaments are pulled out of the edges, leaving one extreme. These two extreme threads are sewn over the edge with a thin thread (coil No. 60-80) and then sheathed with a “punk” stitch, seizing two half-woven threads in a bundle. For the formation of columns of a merezhka on its edge embroidered "pigtail" colored floss floss. It turns out two rows of columns. Then a flashlight is made on the posts of a merezhka with a thick white thread of floss. The flashlight is performed in two steps: first, the working thread is fixed on the middle of the lower row of columns, fastening two knots of 3 hemlock poles, goes up to the “punk”, makes an air loop and comes back down, locking the next 3 hemlock bars together. So it turns out one half of the flashlights. Then the second half of the lanterns in the top row of the merezhka is made. On the two sides of the half-open hem, a semi-cross is embroidered with colored floss threads (to match the "pigtails").
Masking cross stitch (Fig. 60).
This suture is best done on thin transparent fabrics, especially on things that look at the light. 5 threads are pulled out from the edges, 3 threads are left from each edge in the middle. On the remaining six threads, closing the connecting seam, a large cross (6x6 threads) is embroidered with thick white threads of floss. The edges of the hemstitch are sewn with a seam, which tightens 12 hemlock threads, forming oblique diagonal stitches converging at an angle from the front side, and on the front side there are two parallel horizontal rows. Wide columns of a merezhka correspond to two crosses. On two sides of the hemstitch, you can add two more strips of embroidery painted, which will make this stitch even more elegant.
Masking the connecting seam "eight" (fig. 61). From the edges, 4 threads are pulled out, 5 extreme threads are left. On the remaining 10 threads, closing the connecting seam, they embroider a figure-eight with thick colored threads, seizing 3 threads in a column, and at the same time making the upper row of columns, then the lower one. A cross of 6x6 threads is embroidered on both sides of a wide merezhka, which tightens two columns of the merezhka. To move from one cross to another, a small vertical stitch is made on 3 threads.
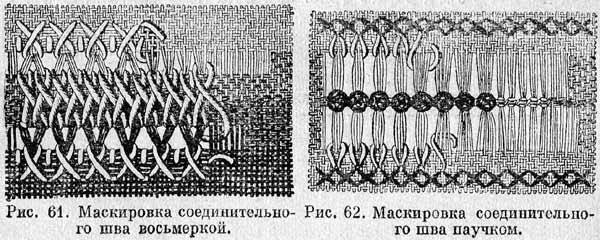
Masking the joint seam "spiders" (Fig. 62). 8 filaments are pulled out from the edges, and one edge thread is left on one. The remaining two threads (connecting seam) are sheathed with a “nankey”, seizing two threads in a column. For the formation of hemstitch posts along the hemline edge, it is embroidered with a seam that pulls together four hemstitch threads, forming stitches with a slight inclination on the front side, and on the wrong side there are two parallel horizontal rows. To disguise the connecting seam, a cross and spiders are embroidered on the “punk”, combining two columns together; a cross is embroidered on both sides of the hemstitch.
The biggest embroidery
"Battle of Grunwald".
It was completed and presented in Poland. 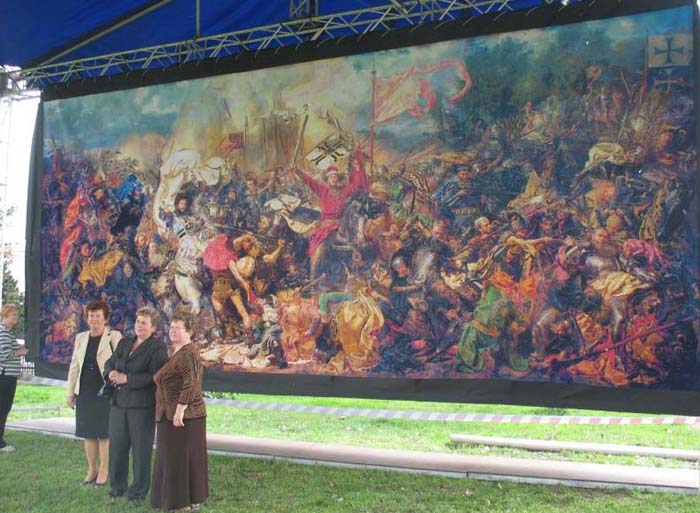
The battle of Grunwald 600 years ago, July 15, 1410, was one of the biggest battles in Europe and glorious victories in the whole history of Poland. After defeating this battle, the knights of the Teutonic Order lost their former greatness and stopped their advance to the east. The decisive moment of the battle was captured by the artist Jan Matejko.
And in 2008, Adam Panek and Grzegorz Zoczowski, (the creator of the HaftiX program for translating images into embroidery schemes) began a long project - the embroidered painting “The Battle of Grunwald”.
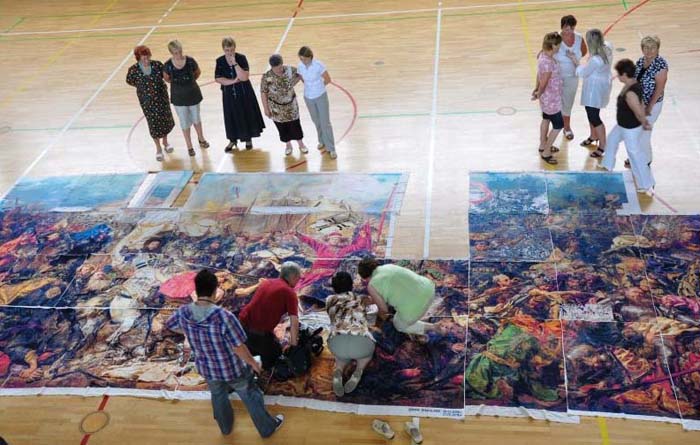
A few days the program translated the picture into the scheme, then the designers “cleaned” the scheme manually. The result is a pattern for embroidery, the size of 4304 by 1835 crosses (7 897 840 crosses), which consists of 50 parts: 40 full-size and 10 short.
In total, 220 colors are used in embroidery, but each part contains about 100 colors. The printed scheme consists of 50 books with 20-77 pages (total 3270 pages),
The size of the finished embroidery - 9.87 by 4.26 meters.
Embroidery is made by joint efforts of Polish craftswomen.
The volume of the picture is certainly impressive. Of course, this huge embroidered canvas will be an interesting exhibit of the exhibition (or at least the Guinness Book of Records). This is also a brilliant PR - move, a wonderful reception to draw attention to the developers of the program and their product.
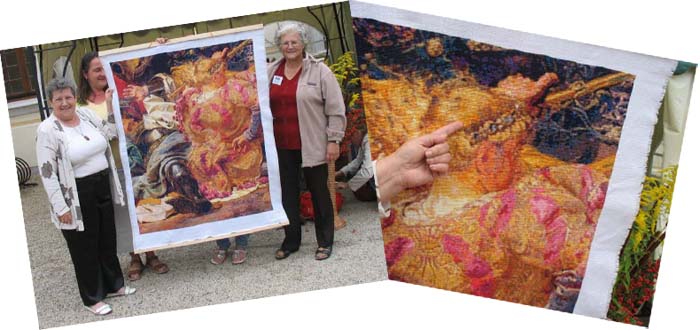
However, looking at large fragments of otshivov, comes the idea that the number (crosses) does not always turn into quality (scheme). Well, the embroidered pieces of embroidery also do not add impressions.
Source of material: read in detail !
 Smallest embroidery
The smallest is dot, micro embroidery
The famous petit point technique is a traditional art of embroidery, which dates back to the times of Empress Maria Theresa in Austria.
Embroidery looks like a small semi-cross, but the stitches are also embroidered with a long diagonal on the reverse side. As a result, the surface is dense and solid.
Embroidery is carried out on a silk mesh (fabric), which is available in different sizes.
11er gauze: 11-12 threads / cm -\u003e number of stitches 121-144 / cm² 900 stitches per square inch
15er gauze: 15-16 threads / cm -\u003e number of stitches 225-256 / cm² 1600 stitches per square inch
19er gauze: 19-20 threads / cm -\u003e number of stitches 361-400 / cm² 2500 stitches per square inch
21er gauze: 21-22 threads / cm -\u003e number of stitches 441-484 / cm² 3500 stitches per square inch
The larger the count number of the fabric, the thinner, smaller and more beautiful the embroidered motif looks. 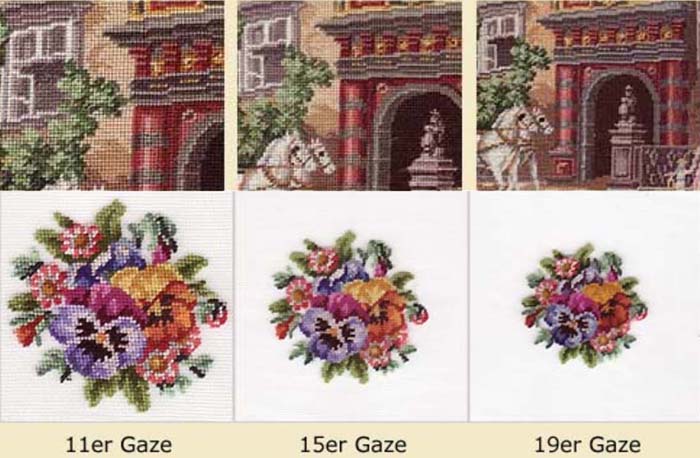
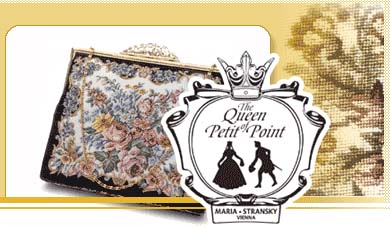
Maria shtranski
Maria stransky
and dot embroidery
We look at the site masters !
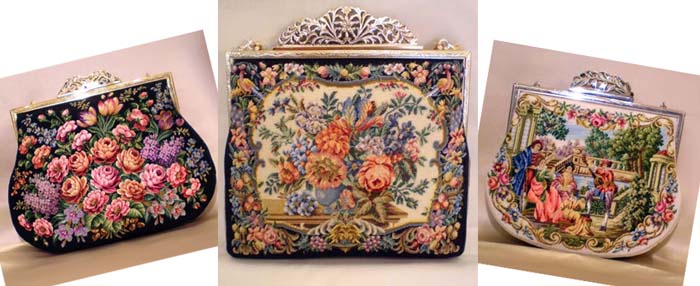
In Vienna, a souvenir shop next to the palace-museum sells such handbags, caskets, brooches, etc. Amazingly small stitches and very beautiful drawings.
In Vienna, in addition to Maria Shtranski, in other workshops perform Viennese petit point, all the plots are similar. Is there some more:
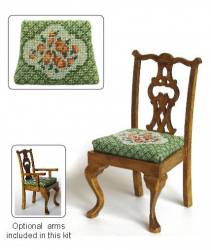
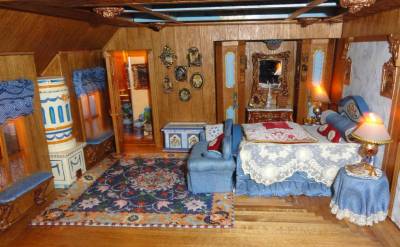
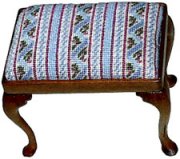 Sets are sold, which are mats, seating for chairs, banquettes, pads, fireplace screens, belts for bells - all this is for doll houses, for toy furniture.
It is also possible to buy this furniture in the set in order to insert the embroidery into a chair, a banquette, etc. To embroider on such a thing is probably not a LCA, but silk. Well, be sure to use a magnifying glass.
The designs, of course, are very simple, there are few colors, it is almost impossible to embroider something complicated on such a count. But there are very nice designs.
There even micro slippers are embroidered!
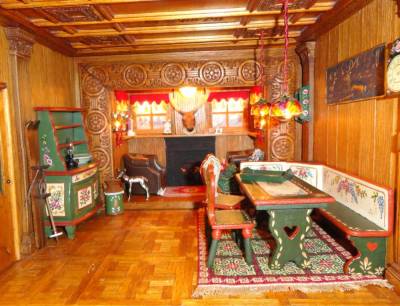
For those who collect such doll houses and furniture, this is a dream and a find.
Only this is a very expensive hobby. The houses and furniture themselves can be very expensive, there are such collectible vintage models! Well, these very naborchiki very expensive.
Vintage Doll Houses
read and watch !
Photos from the regional exhibition of doll houses in Barcelona.
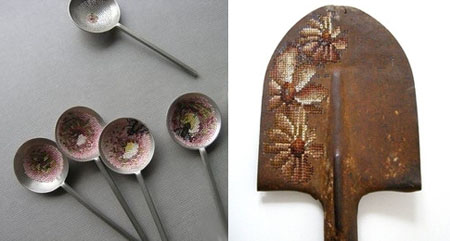
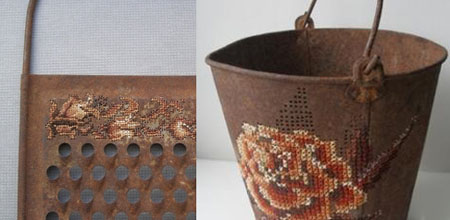
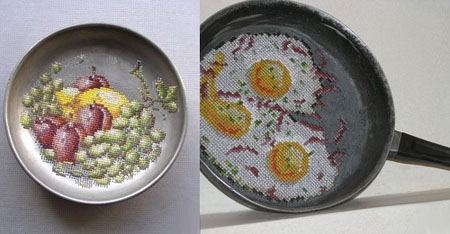
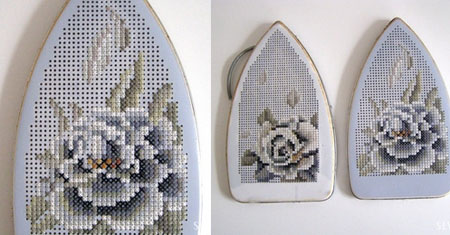
Unusual materials and equipment
Among the many unusual embroidery techniques, this is one of the most unusual and interesting.
Master from Lithuania, Severija Incirauskaite - Kriauneviciene,
enthusiastically creates amazing masterpieces, doing car tuning, decorating familiar household items, decorating a house, street, office.
Working as a needle on metal, the craftswoman uses the traditional cross-stitch technique, thus she wants to increase interest and restore the popularity of the art of embroidery.
At first, she took on the development of several items of kitchen utensils: spoons, graters, saucepans, plates, ladles and tried to work on them.
| Related articles: | |
|
Cabbage salad with carrots "Maximum of vitamins
The problem of proper nutrition today is most acute. If before ... Modern embroidery in the interior becomes a fashionable design trend. Modern embroidery in the interior becomes a fashionable design trend.
When it comes to embroidery, a sort of Russian appears before your eyes ... The best snack for weight loss
Eating right means not only watching you eat on ... | |


