Reader's Choice


Popular articles
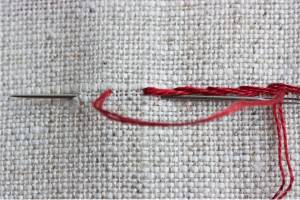
The stalked seam is one of the main seams in satin stitching. It is made in the form of an elegant contour line, which can be straight, curved, creating a circle, etc. It looks impressive in embroidery of plant motifs. With the help of only one stalked seam, you can embroider stalks, streaks of leaflets, leaves and petals, and it will look in the technique of artistic surface.
One of the most ancient seams. Most often used for embroidery stalks of flowers and twigs, which is why it got its name. Consists of oblique stitches, tightly pressed to each other. All stitches should be the same size and lay flat. It is sewn in different directions - from left to right or from right to left, and from top to bottom and vice versa, as well as at any angle, depending on the motive or detail. It may also be a straight line or curved stitch. Despite the fact that it is a contour stitch, it is very widely used in the artistic surface due to its plasticity. With the help of a stalked stitch, irregularly shaped parts and complex motifs are filled.
To begin with, we apply a marking on the fabric.
From point 1 to point 2, while skipping point 3, we make the first stitch (Fig. 16).
fig.16
Then we remove the needle from point 3 directly above the first stitch. The working thread should always be on the one side on the left or on the right, otherwise the structure of the seam will be broken. It turns out that the stitch starts from the middle of the previous one, tightly adjoining it. The second stitch is located between points 3 and 4. From point 4, we withdraw the needle to point 2 - the middle of the second stitch (Fig. 17). 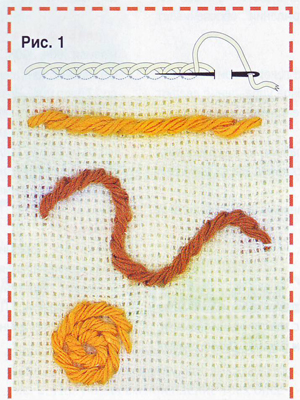
fig.17
Stitches should fit snugly together. In the same way continue the seam further. Here is what our stalked seam should look like: ![]()
On the seamy side should be a series of lowercase stitches (Fig. 19).
fig.19
Ideally, the stalked seam should have an even cord. The beginning and end of each stitch should be barely noticeable.
Art is the need for a person to eat and drink.
The task:
Using stalked seam, make 2 straight lines. In one working thread
The stalked (“back needle”) seam is one of the basic seams in embroidery. It consists of several horizontal stitches adjacent to each other. The stalked suture is considered the oldest and at the same time the easiest to perform. It is no coincidence that it is advised to begin acquaintance with this type of needlework.
In the old days, stitches of flowers were embroidered with the help of this suture, for which he received its name. But in this area of its application is not limited. “Back needle” can be used as an additional one, combining together with other types (for example, with a countable cross), but also simple contour paintings will look very impressive. The stalked seam is plastic: they can fill in the outlines of the drawing, make floral patterns and even complex motifs - examples of the work can be seen in the photo.
Embroidery needs special tools and materials.
It is better to use cotton fabric, it is better to wash it before starting work, to prevent tightening and deformation. finished product. To use a border for cross-stitching is not worth it - it is not suitable for this purpose.
It is better to use hoops - so the thread will not work, and embroidery will look good.
Threads - you can pick up any that seem most appropriate. Most often in embroidery they use floss threads.
Pencil - he will need to apply the outline of the pattern on the fabric.
For the first time, when embarking on embroidery with stalked seam, marking points can be applied. They must be on the same line, at the same distance from each other. In order for the seam to be beautiful and even, it is very important to correctly calculate the stitch length. It depends primarily on the width of the selected thread. It is best to make a stitch, the length of which exceeds the width of the thread 4 times.
In order not to get lost in the work, you can mark all the points with letters. For stalked seam letters will not go in order, but as follows: A-C-B-D and so on. This markup will allow better orientation during the first execution.
 Fastening thread on the seamy side
Next, go directly to the embroidery. To begin with, we thread a needle. If the eye of the needle is too small, you can thread the thread with a special device - a needle threader. Then you need to fix the thread on the wrong side - how to do it, you can look at the photo or video of master classes.
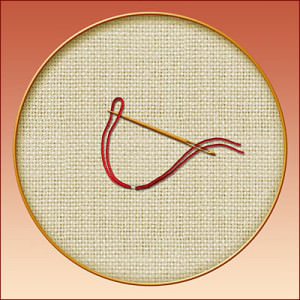
"Back needle" is easiest to sew from right to left. First you need to insert the needle to the point A from seamy side. Passing point WITH, pull the needle to the wrong side through the point B. Then we return to the front side at the point C, it should be in the middle of the stitch. Removing the needle on the front side, you should try not to separate the strand.
Pull the thread to remove its excess. But this must be done carefully so as not to tighten the pattern. Make the next stitch. To do this, pull the needle to the wrong side through the point D and back to the front through the previous hole - in our case, the point B. Again, we tighten the thread a little, avoiding sagging.
Thus, it turned out 2 stalked stitches, identical in size. By the same principle, you can continue to embroider a straight line with stalked seam. That is, we make a stitch, draw the needle to the front side approximately in the middle of the previous one, make the second stalked stitch, again draw the needle to the front side through the previous hole. If you can not figure out the scheme, you can see our training video or photo.
Smooth line - the easiest option stitch stitch embroidery, and not the only one. In this way, you can make a curved line, fill the area of the picture. The directions of embroidery are also different: it is possible from left to right, but it is possible - on the contrary, from top to bottom or from bottom to top, it is possible - at an angle. That is, stitched stitches can sew the outline of any pattern, which only requires the implementation of the scheme.
If the line has to be curved, the stitches are executed exactly according to the same principle as for the straight. But there are a few nuances. To make the seam look neat, stitches can be made a little smaller. And to get a smooth line, bending is best done in such a way that the stitches “look” at the outside.
Some schemes require the filling of a whole stitch with a stalked seam. In this case, the contour of the square sew embroidery is not worth it. Embroidery is filled with several rows of stalked seam. At the same time, each of them should start from one side so that all stitches are made in one direction, and each row fits tightly to the previous one.
Ideally, the stitches should fit snugly together, the stalked seam should resemble a solid cord, in which neither the beginning nor the end of the stitches should be visible. To achieve the perfect result, it will take some time for training, and, of course, compliance with some rules.
The working thread must be constantly kept on one side, on which one is more convenient - to the right or left of the main line. It is impossible to change its location, otherwise the entire structure of the seam will collapse, and a good result will not work.
Needle need to withdraw only in the previous hole - so the seam will look neater and tight.
The stitches should be made the same length. If it is not possible to determine the distance "by eye", you can do the marking of the picture for the first time, marking the points of the needle inlet and outlet points.
Simple seams (part 3)
Hello, novice masters, in the previous article we told you about a simple seam. Today in the third part of the article you will learn how to perform the "stalked seam."
Stalked seam. This is another one of the simplest seams often used in various types. embroidery . They, as a rule, embroider branches and stems in floral ornaments, so he was named "stalked". Even with this stitch, you can completely fill individual embroidery elements or sheathe the outline of the pattern. In the face of sewing it is used as the main.
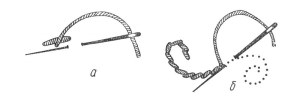
The stalked suture is performed both in and without the hoop, from left to right or from bottom to top. First, make a stitch of about 3-4 mm, then remove the stitch from the wrong side to the front side in the middle of the first stitch, without piercing it. To perform the next stitch, the needle is inserted into the fabric, retreating along the pattern 1.5-2 mm from the end of the first stitch (i.e., at a distance equal to its half), and the needle is pulled out on the front side at the point of its end (Figure .one).In the same way, perform all other stitches until the end of the row. At the same time it is necessary to ensure that the working thread was always on the same side of the seam. This rule must be followed in any bend of the pattern line - only then a straight line is obtained. With proper sewing on the seamy side, a back needle stitch is formed. Strongly curved lines, such as circles and spirals, need to be embroidered with a traditional stitch as small as possible stitches.
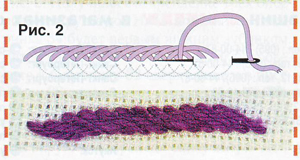
Embroidery often alters the traditional stalked seam.
To get a thickened line, stitches are gradually shifted to the left, increasingly overlapping previous stitches with subsequent
(Fig.2).

And if you need
Get a thinner line,
then they move the needle withdrawal point
Front right
(pic.3).
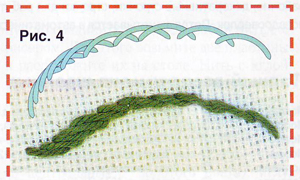
With these trickscan embroider sprig with thickeningthe grounds and very thin attops
(Fig.4).
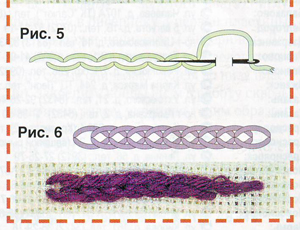
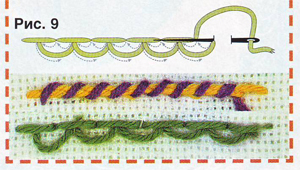
If, when performing a stalked seam, to withdraw the needle on the face from the top, then from the bottom of the previous stitch, you will get a two-row seam "Bricks" (pic.5).
The seam "Pigtail" it turns out, if you perform two rows of a seam, placing the stitches symmetrically to each other, one under the other (Fig. 6).
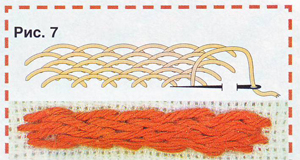
Tightly stacked rows of stalked seam can fill in whole fragments of the pattern. In this case, the seam gives a more convex filling. If during the filling of the pattern with a thin stalked seam, the stitches of the adjacent rows are arranged in a checkerboard pattern, the smoothing filling turns out to be flatter (Figure 7).
![]() The seam "To split"
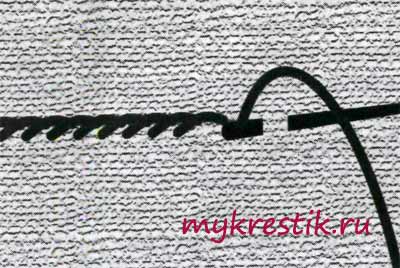
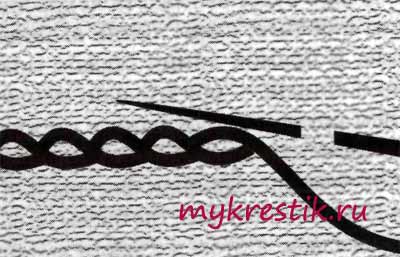
perform in the same way as traditional stalked seam, but pulling the needle on the front side, they pierce the thread of the stitch being executed. The puncture point is shifted slightly to the right (approx. 1/3 or 1/4 of the stitch size). The thinner the thread, the smoother the seam is (fig.8). This suture is performed especially thin smoothembroidery
"Facial sewing", which embroidered on the icons of the saints.
The seam "To split"
perform in the same way as traditional stalked seam, but pulling the needle on the front side, they pierce the thread of the stitch being executed. The puncture point is shifted slightly to the right (approx. 1/3 or 1/4 of the stitch size). The thinner the thread, the smoother the seam is (fig.8). This suture is performed especially thin smoothembroidery
"Facial sewing", which embroidered on the icons of the saints.
The stalked suture is also used as a finishing, twisting a thread of a different color or performing festoons.
The seam received such a name because most of the time they were embroidered with stalks of flowers. This is the most popular and lightweight seam. If you only master the basics of embroidery or teach your children, start by mastering this particular seam.
When embroidering with stitched seam, take a thread that is not too long, otherwise in the process of work it will be shaggy and the embroidered design will look untidy.
Pattern for embroidery stitched seam copy on the front side of the material. According to the method of execution, there are two types of stalked seam.
It is sewn from left to right as follows. After securing the thread with two consecutive stitches, inject a needle of 2-2.5 mm to the right along the contour, pull it out from the front side at the point at which the thread first entered the fabric, and pull the thread. After 2-2.5 mm, inject the needle again, pull out the thread with the thread at the point of entry and continue further in the same way. When the needle comes to the front side of the fabric, the thread is only removed, but not tightened.
Thus, with each needle stitch you grab the fabric from the front side, i.e. the needle enters the material, comes out of it, and the thread is pulled out. The thread remaining on the front side is twice the thread from the inside. In an ordinary stalked seam, do not try to sew several stitches at the same time, as when embroidering with a splicing stitch or a “forward needle” stitch. Here each stitch is sewn separately. Stitches come in one by one; at the same time make sure that when you pull the needle the thread is always on top.
A stalked seam is only beautiful if its stitches are the same in size. This value depends on the thickness of the thread that is embroidered. The thicker the thread, the larger the stitch, but it should not exceed 5 mm, otherwise the seam will look ugly. The size of stitches depends on which lines are embroidered - straight or winding. In a straight line, a stitch can be 5 mm in size, but in a curve it is necessarily smaller, and at the same time, the smaller the steeper the bend. Large stitches for embroidery winding lines make its contour inaccurate.
After the embroidery is finished, or if the thread has run out, inject the needle where you would inject it, if the work continued, in the same place pull out from the wrong side, skip under 3-4 stitches, pull and cut the thread. Start a new thread by pulling it through 3-4 purl stitches, pull it out from the front side, from where you would pull it out, if you continued to embroider with the same thread, and then repeat the process.
From the inside, the stalked seam resembles a hand stitch. How well you can get his stitches can be best judged by the wrong side.
It is performed almost the same as the first type, with the only difference being that with successive stitches, pulling the thread, it is left on top of the needle, and then - under it. In this case, the seam looks as shown in Fig.
This type of stalked seam is most often used when making a binder, instead of embroidery hemming. It, as a rule, is sewn with thick threads - iris or floss in 4-6 layers.
| Related articles: | |
|
Long french Color French gel varnish
With all the variety of new technologies of nail art, the jacket continues ... Why is a sharp increase in blood pressure?
The most visible signs of high blood pressure are headaches, ... Weight stands still - what to do to lose weight, how to make it fall
During prolonged weight loss, almost everyone faces a problem ... | |


