
Reader's Choice


Popular articles
2)

This hat is not only very beautiful, but also very practical. Everything is closed everywhere and mommy can not worry that the baby will blow it.
For the cap you need:
100 g of wool yarn (100g / 250m), needles No. 3 and No. 4, circular needles No. 3, hook No. 3.
Basic patterns:
stocking knit (in the front rows to knit purl loops),
garter stitch,
“Spit” - knits from 6 face loops.
1 row: facial loops
2 row: purl loops
3rd row: leave three loops on the auxiliary spoke, knit the next three loops with the front ones, and then knit the loops with the auxiliary needles, i.e. knit crossed loops
4 row: purl loops
5 row: facial loops
6 row: purl loops
7 row = 1 row

4) Slam Hat 

Another such hat 

And now for the boys 
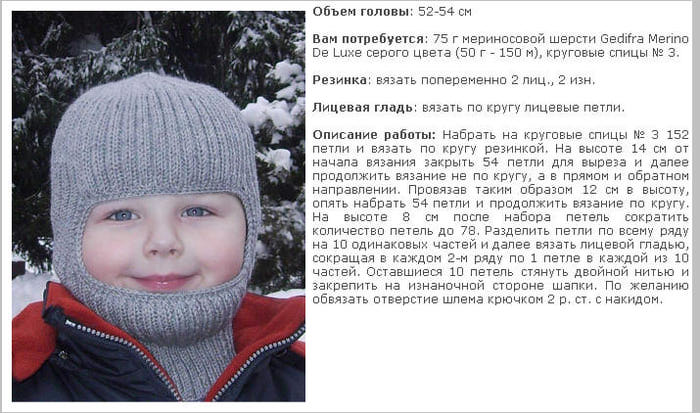
DESCRIPTION: On the exhaust of 45-48 cm, the needles number 3, 100 grams (50 yarn wool, 50 acrylic, 120 m / 50 g).
Cross the dial set of 50 loops and knit an elastic band 2 by 2 30 rows (in front), the loops are postponed. Then also fasten the second part on 50 loops, but already a little longer than 40 rows (back), then close the two details into a circle and knit 30 rows in a circle. We close the middle 18 loops on the front half and continue knitting, closing 2 loops on each side in 2 rows 5 times, 62 loops should be left in work and knit the height of our hat (about 15 cm) and then divide it into three parts 20, 22, 20 loops and knit like a toe heel, there should be 22 loops on the knitting needle, then knit a rubber band on the face oval of 10 rows. Make pompons and sew on buttons
In general, I made a hat for my Children (in the photo a favorite doll of eu). Simply and, as it seems to me, with taste.
Here I decided to post a detailed photowatch on how to connect it, in short a master class (although which one of me is a master!).
Time is required from someone like, I have 4 pm so, but still it quickly matches.
So it started ...

9) Description from the newspaper “Home atelier”, November 2007.
Type 84 loops in red yarn. Knit 37 rows in a circle on four knitting needles "elastic" 1 * 1 in one thread. Then two rows of pink yarn in two threads of the same knitting. Close the 10 loops anywhere - this is the beginning of the hole for the face. Next, knit 3 more rows of pink yarn in two threads of the same knitting. The following 12 rows knit with red yarn in two threads also with an "elastic band" 1 * 1. Then 5 more rows of pink and 5 rows of red. Close 24 loops on each side. Leave the middle loops on the knitting needle and knit 26 more rows with the same stitch. To perform a rounding on the forehead, close along the edges, first by 2, then by 3, then by 4 loops, and then all remaining (.
If you do not need ears, then "sew" the sides and top.
If needed. Then dial 18 loops from under the closed 24 from either side (pink yarn in one thread). This is the bottom of the ear: knit 9 rows, then add 1 on each side in 10, 14, and 18 rows, then knit again without knitting to 27 rows. In the 27th, 28th, 29th and 30th rows close 1 loop each, in 31 and 32 –– 2 each, in 33-34 –– 4 each. And in the 36th row close the part completely.
Now type 18 loops of red yarn into one thread.
18 loops from the side edge of the top of the cap - the top of the ear. Knit in the same way. Repeat both operations on the other side of the cap. Unscrew the cap and sew the pink and red details of the ears on each side. Sew the top of the cap to the sides. Dial around 82 loops (in one thread with red yarn) from under the closed and side (for the elastic band, which will be around the face). Tie a viscous "elastic" 1 * 1 18 rows. Stick gum to the inside of the cap.
http://www.nashevse.tv/forum/viewtopic.php?t=4800&sid=8d7f963b5caa20eaa5b01f218acfd486
10)
|
HELMET You will need:lang VARNS yarn (100% wool, 55 m / 50 g), 100 g - burgundy, 50 g melange in red-brown tones interspersed with blue, needles No. b, hook No. 5. Knitting density: 15 p. X 30 p. = 10 x 10 cm (front surface). On the needles number 6 dial 3 p. And knit, adding in each person. a row, 1 p. on each side, until there is 15 p. on the spoke. Postpone the work and tie another similar part. On the left side, dial 26 points and knit 15 points from the set knitting needles so that there are 56 points on one needle. Tie 4 rows of faces together. stitch work to postpone. Next, knit visor. Score 9 points and knit 10 rows, adding in every 2 persons. a row on both sides of 1 p. = 19 p. To knit openwork row: 1 krom., * 2 p. together, 1 nakid. *, from * to * repeat to the end of the row, 1 chrome. The next row is wrong. The resulting visor knit with the already existing "ears" and connect the work in the ring. Next, knit 8 rows of faces. p. in a circle. Then alternate 3 rows of burgundy, 3 color. In the next burgundy row, make the downs as follows: divide the work into 4 parts and subtract 2 sec. In each row until 2 sections remain on the spoke. At the same time, after the burgundy row, knit 2 color rows and then another in burgundy. The remaining 8 p. To tighten the working thread. Crochet the edge of the cap (visor, ears and the back of the head) with a colored thread “ step by step". Visor unscrew up openwork row weave 6 strings with a length of 15 cm and sew to the ears. "Rachy step":crochet crochet stitches in the direction from right to left. Tips wizard.When for one reason or another in the last row there are more loops than necessary, it is impossible to tighten them so that an ugly hole does not form in the center. The same result can be obtained even with a small number of loops, if the cap is knitted of very thick yarn. To avoid this defect, we recommend doing so. In the front row, tie all the loops, alternating 2 together with the front (purl) and nakid. Thread break off. Thread the end into the needle and sew only the loops, and drop the nakida with a knitting needle. Hinge tightly. As a result, elongated loops folded into a beautiful flower. Newspaper "Knitting Hats". Scheme |
http://www.uzelok.ru/shapki_item3647.html
11) knitting a hat-helmet on the "Osinka" http://club.osinka.ru/topic-34164?p=4652970
I hope the material is enough and the beautiful hat will be contacted! Waiting for boasts!
The helmet has long ceased to be the prerogative of skiing exclusively. Today it is actively used as a hat for everyday wear, because in terms of warmth and comfort it has no equal. Modern mothers are increasingly buying helmets for their babies for a reason. In such a headdress, the ears and forehead, cheeks and neck will always be closed.
Unfortunately, the price of children's helmets is higher than regular hats. This is often explained by the fact that a greater amount of wool is always used for tying a helmet than for other hats. Often, manufacturers sin a high price because of the exclusive models of their hats. But all this does not play a big role, if you know how to tie a hat-helmet. There are many schemes and descriptions of such products. They are a combination of a cap and a dummy, and may differ in a wide variety of designs.
It is a model with no frills or decor. Begin to knit the product should be measuring the girth of the head, selection of wool and knitting needles. For winter, you need to knit a headdress of warm threads, and wool is considered the warmest. Sheep wool can be pricked, so it is best to take merino wool or mix wool with acrylic. The size of the needles depends on the size of the knit, for the classic helmet fit circular needles at number 3.
If you need to knit a hat for a boy, the scheme will not be necessary, as knitting this headdress is quite simple. Such a helmet matches the type of "elastic", that is, every 2 loops the direction changes from front to back, and vice versa. The number of loops is dialed according to the circumference of the child’s head. So, for example, if the measurements showed 52 cm, you will need 100 more loops, that is 152. After gathering the right amount, you can start to knit the elastic in a circle. When the mating length reaches 14 cm, the first 54 loops should be closed, and a cutout will be formed there. Further mating does not go round, it needs to be sent forward and then back.
In this way, it is necessary to knit another 12 cm, after which replenish the loops in the same quantity in which they were collected. Then knitting again moves in a circle. When after the set will pass 8 cm, you need to reset the loop, leaving them only 78.
From the remaining amount, 10 equal parts should be formed, after which you can begin to knit the facial surface. In this process, each 2nd row must be reduced in the form of a single loop. When ten loops remain, they will have to be pulled off with a pair of threads and hidden on the wrong side of the product. For beauty, the neckline of the helmet can be crocheted.
See also:

All parents know that in winter, not only the head should be covered, but also the ears and neck. An ordinary hat and scarf create a cumbersome design, which during active games and strives to slide somewhere to the side. The cap now and then flies off from the head, the scarf is untied ... So it's not a long time to catch a cold! But to hurt, especially in new Year's holidaysI do not want at all. To make outdoor activities more comfortable, it is better to choose a hat, which is a kind of hybrid between a hat and a scarf - this is a hat-helmet. It will surely be warm and cozy even on the windiest days. In this article we will tell you how to knit a hat-cap for a girl who is not only warm, but also beautiful.
The following is a detailed step by step description for the manufacture of hats for girls.
1) We start our master class by picking up ten loops on straight knitting needles.
3) Crochet one level from the column without single crochet. Again we take knitting needles.
4) The following 46 levels are performed according to the scheme: edge loop, six front loops, then three blocks of the pattern “eight loops need to be removed from the spokes and swapped, making a cross, then twelve face loops”. At the end of the level edge loop.
5) We divide the blank into three parts - we buoy each of them separately.
6) Starting from the 52nd level, we perform a decrease: every two levels, two loops in the center. Loops need to be knit together.
7) We close the edge of the workpiece when we have twenty loops on the needles.
8) After that go to knitting sidewalls. From the seamy side of the knit crochet.
1) Now we will make the most interesting part of the helmet-cap - the collar. In order to take the circular needles and dial them loops around the edge.
2) At each second level we make additions of two loops (center). After that, we continue to knit with the stockings using knitting using only the front loops.

3) To determine how long you need to knit the shirtfront, it is better to try it directly on the child.
4) The headpiece is almost ready. It remains only to decorate it to your liking: sew beads, ribbons or knitted flowers. Still interesting option - Perform knitted "shuttlecock" and sew it around the perimeter of the neckline. Helmet caps with a pompon sewn on top of the head still look very bright and perky.

In fact, it is enough just to knit a hat-cap once to master the process of making this headgear. Further, the process will go easier and in the same way it will be possible to knit hats for any child's age.
For a girl, even such a practical accessory as a hat-hat is better to be knitted from bright and attractive yarn. It is not necessary to dwell exclusively on the pink color, but in any case, bright colors for children's hats will look much more attractive than dull gray tones. Below the photo shows a few original options.
Some babies refuse to wear hats, explaining that the hat "prickles" and "bites." This may occur if the yarn for the product is selected incorrectly. To make the cap gentle to the touch, you should choose a yarn with the addition of mohair or angora. Natural wool, despite all its positive insulating properties, mercilessly pricked, therefore it is not the best choice. In addition, remember that children's headgear will have to be washed frequently, so the material should also be practical.
A helmet hat is an indispensable accessory not only for winter walks, but also for practicing winter sports. When skiing or snowboarding, a hat-helmet can serve as a cap comforter and, accordingly, wear a helmet for warmth and protection from snow and wind. When riding on ordinary cross-country skiing, a hat-helmet is worn under a thin sports hat. Please note that if you plan to wear a hat-cap as a cap comforter, then the yarn for it should be chosen thinner. If the child will wear it alone - then the threads may be thicker and friable.
For more details on how children's helmets are knitted, see the following videos. WITH step by step instructions From experienced craftswomen it is easy to deal with complex elements and easily cope with the manufacture of this unusual hat.
Often in stores sell the most ordinary children's hats, not affecting the soul of either moms or kids. That is why it will be good to learn to knit them yourself, because as a result you will get a unique and high-quality designer thing. Cap knitting needles for a boy can tie everyone. To make such a little thing for your child or as a gift is not only interesting and exciting. This will allow you to opt for a higher quality material, choose color range and style. In addition, the son will be overwhelmed with a sense of pride in the fact that the hat is tied with the hands of the mother.
You can decorate the finished hat in different ways. For example, to sew on her a picture with your favorite hero or to embroider some bright element. For very young children, you can associate a hat with ears or in the form of a helmet.
At first glance, there are not so many ideas, but all you have to do is look into the special selections, and the fatazia will immediately be played out, and knitting will only be fun!
An example of the calculation of the cap associated with the rook on the exhaust gas = 50cm. Knitting density 2,6n = 1cm. Calculate how many loops you need: 50 * 2.6 = 130p. Divide the total number of loops into 5 parts: 130/5 = 26p. Distribute the loops as follows: 26 loops each for knitting ears, 26 loops for knitting the back of the head, and 26 * 2 for the front part.
If the exhaust gas is greater than 50 cm, or the knitting density is different from the density given in the example, the calculation should be made using the specified formula, simply substituting your data.
How to tie such a nice new clothes? Knitting start with ears, tying two at the same time from two balls. Dial 4 loops for each ear.

Make an increase in each second row of 2 loops (on the edges after the edge). In each ear, add 22 loops. Plus 4 dialed initially, a total of 26 loops.

Then dial 26 loops between the ears for the back of the cap. The set is carried out with one thread, that is, after knitting the front row of one ear, dial loops, continue to knit the front row of the second ear. With the same thread to knit a cap to the end. The second thread can be cut.


Knit about 2 cm in height, making gains in front of the ears in every second row. The ears after this should be 30 loops each.
Dial the remaining loops for front and close in a circle. On before you need to dial 26 * 2 = 52 loops; 8 loops to add, tying the back of the head, 52-8 = 44 loops remains to dial.

After you start doing a downgrade in order to form the top. Divide all the loops into five parts and reduce in each second row two loops along the edges. When the loop becomes smaller, go to the stocking needles. Close the top of the head, at the end (when in each sector there are approximately 6 loops left) to lower the loops in each row, and not through the row.


Even a beginning knitter will be able to tie such a hat. It uses the front and purl surface, as well as crochet half columns.
For her performance will need orange, white and black yarn. Perfectly 100% acrylic, but fans of natural materials, you can take wool. In addition, we need knitting needles No. 3.5, hook No. 2.5-3 and a long needle for stitching parts.

Thread orange loop dial 38 loops (on the girth of the head somewhere 46-48 cm). Next, knit the front satin stitch, alternating the front and purl (even) rows. 1st row
In the 7th (front) row, make the first gains. Divide the number of loops in half - 19 loops. Knit as follows - 18 loops face, 1 increase - knit a loop from the previous row, 1 front. And then symmetrically - 1 face, 1 increase, 18 loops front.
Increase vyvyazat so: between the 18th and 19th loop, use the right knitting needle to pry the thread of the previous row.

Transfer it to the left knitting needle and tie it over the front wall.

Thus, the loop will turn out to be as if crossed and no holes will be visible at the place of the increase.

Such increases are exactly in the middle of the canvas caps. Gradually knit hood.
After a row with increments, the next row is knitted with purl loops, then a row with facial loops, then a row again with purl. And again in the front row to make an increase - to knit already 19 face loops, 1 gain, 1 face loop, 1 face loop, 1 gain, 19 face loops. I.e increase to do in every 4th row. All you need to do 9 increments. And the number of loops in the end is 56. Close the loops of the first part after 44 rows are knitted.
Loop closure is performed by purl loops. After that, you should cut off the working thread, leaving a longer tail, fold the part in half along the line of additions and sew the top row.

Cap conceived double. Therefore, the second part must be knitted the same as the first, with the only difference that the loops dial 36, and the part will have 42 rows in height. The number of increments is the same as in the first case.
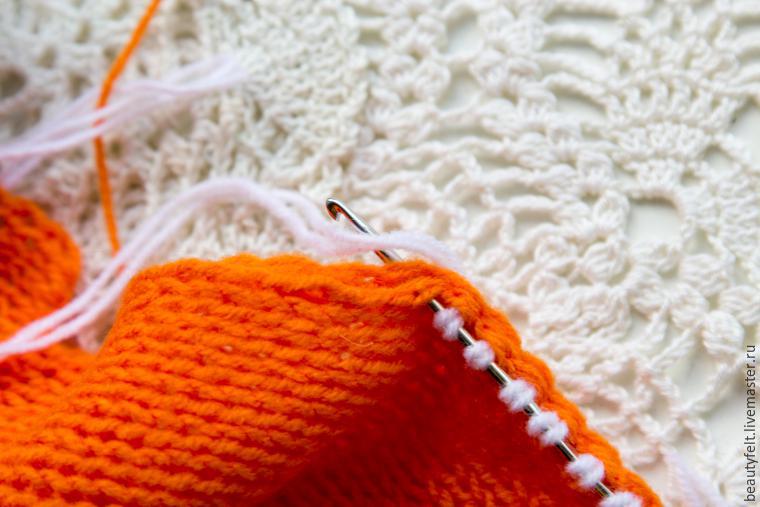
Internal and external parts to connect, inserting each other inside out to inside out, and stitch with a needle on the top of the head.

Now you need to knit the bezel-gum. To do this, take a white thread, folded in two times to obtain a more textured elastic. Crochet loops along the edge of the cap and transfer them to the knitting needle. Knit 2 × 2 rubber band, that is, 2 leoped loops and 2 purl loops.
In the 3rd row do the same.
Row 4 - do not tie up another 6 loops (that is, just do not tie up 10 loops until the end of the row) and rotate.
5 row - the same.
6 row - knit all the loops to the end.
AND connect to the black thread. She knit 2 rows of gum and close the loop on the picture.

The main part of the cap is ready. Now you need to tie fox ears. Again make a set in one thread. Orange dial 13 loops. This is the 1st row. Then knit like this (all the even rows are knitted with purl loops):
3 row: 4 persons. P., Do a decrease (tie 2 loops together with the front one), 1 person. P., 2 loops together, 4 person. P.
5 row: facial.
7 row: 3 person. P., Two loops together, 1 person. P., Two together, 3 person. P.
9 row: 2 faces. P., Two loops together, 1 face. P., Two together, 2 faces. P.
11 row: 1 person. P., Two loops together, 1 person. P., Two together, 1 person. P.
13 row: knit 3 sang together and finish knitting.
The second part of the abalone is knitted in the same way with a white thread.

Now you need to connect the two ears together. This can be done with the help of a hook and a black thread. Fold the two parts of the wrong side to the wrong side and tie up with columns without nakida. At the top of the ear, double crochets can be tied to the ear to make it more elongated and sharp. Also on the top knit three columns in one loop.

You can sew the ears with the help of tails of thread left over from knitting.

It remains the case for small - hide all the protruding tails and make strings. Cap ready!
This cap will require Peter Pan Wendy yarn composition: 55 nylon (polyamide) 45 acrylic. 50 grams - 170 meters. Recommended knitting needles number 3 ¼ - 4. The helmet takes exactly 100 grams (2 skeins). It is better to knit in 2 stitches, but not tightly, then the hat-cap will turn out to be rather dense, but at the same time comfortable to wear.


You need to start knitting from the top wedge. Calculate the width of the wedge: measure the distance from the eyebrows of the child, multiply by the number of loops in 1 cm plus 2 edge. The number of loops must be odd.
Edging in this model is obtained one on 2 rows: at the beginning of the row, remove the unbound, at the end, knit it in the wrong direction.


If the back of the head of a child is not very pronounced, it is possible to make less reductions. The lower wedge fits exactly from the lip line, as it will pull on the chin, compensate for the missing length and ensure a tight fit on the ears and on the neck.
Explanation of the photo number 15:for the lower wedge of the last striped helmet, gain 25 loops, plus 2 edge walks go here, it turns out 27 loops for the lower wedge.

In case of reductions on the elastic band, it is necessary to take into account the girth of the head in order for the child to climb through the head.

Choosing a headdress for a girl is not an easy task. It should be warm, comfortable, beautiful, in harmony with the rest of the clothes. We suggest you to tie it with your own hands. The hat for the girl, the various variants of which are presented in this article will appeal to the most fastidious young fashionista.
A hat - a helmet is calculated on the age of a girl of 2 years.
We need:
Patterns:
We collect 82p. plus 2 edging. We tie a gum on 4cm.

Turn on the faces. Smooth and knit 8cm.

We distribute the loops into three parts: in the central - 26p. the rest of the loop - 29 pieces each - at the extreme parts. At the boundaries of the sites set markers.

Further scheme of knitting is performed on the principle of knitting heel toe. We knit loops to the second marker.

Turn over the job.

We remove the first loop, the rest of the paragraphs to the marker are knitted with purses.


We reach the 2nd marker. We remove the 1st section of the central part, and knit the loop of the side part.


The removed item is pulled through the knitted one.


Turn the work.

1st p. We remove, the rest to the marker knit persons. satin stitch.


We knit the loop of the central part together with the loop of the side part in 1n.


Turn the canvas over again and continue to work on this principle until the end of the section on the side parts.


Cap - helmet has already acquired the form:

Along the edge edge raise the loop.
![]()

Correctly do it for the bow of the two loops.

The resulting picture - see photo. All you need to dial 19p. The edges of the threads fasten.

For button strap type 8p. Turn over the job. We knit the bar with a shawl pattern, the rest of the items with a purl.

On this side of the edge crochet 19p.


Recruiting 8p. for the second bar and knit it with a scarf pattern. Having knitted three rows, we set markers on raglan lines. Do not forget in the 2nd p. to make holes for buttons. Method - see photo.

Lower 2n. close the hook. Above them we collect new 2p.
We are determined with raglan lines. On the back they will extend a number of loops, resulting in a decrease - in the photo they are marked with yellow markers. Two more lines will be located in 7p. closer to the front. They are marked with blue markers. In the first row of tying up the shirtfront you can (optionally) on the back evenly reduce 2n.


![]()
Adding to do in the front rows on both sides of the raglan lines. For the openwork version, we make ordinary nakida. If you make nakida from crossed loops, then there will be no holes. On the wrong side, we knit knit backs with purlins. In principle, you can draw a raglan line in any way you are used to. Our site describes several ways of tying raglan.


![]()

Do not forget to do in 6 p. holes for buttons. We knit the shirtfront to a height of 8cm. We sew buttons.

For a rose, we crochet 31 air points (VP).

Knit 6VP. In the 6th VP knit crochet column (CCH).

Then 1VP, in the 3rd loop knit two CCH. Between them -2VP. So we repeat on all the p. Series.


2p .: we collect 3VP, in the arch we knit CCH, 2VP, 2CCH, 1VP, etc., on all the loops of the row.


We include in the work a white thread. For a smooth transition last loop SSN knit white.


3p .: we collect 3VP, then into the arch 3CCN, an anchoring column between the arches, into the next three arches along 6CCH. Do not forget about the bar posts between the arches. In the next 2 arches 8 CCH. In all other arches on 10SSN.


We fold flower and sew.


Decorate the flower with beads and glass. Sew on the cap.


Girl's girth 46-48cm.
We need:
Patterns:
Recruit 90p. We knit 10cm gum. We turn to the facial ch. We knit approximately 14cm (clarify fitting). We divide the entire amount of the item into 3 parts by 30p. in each. We continue on the principle of tying the heel toe. Details of the process described in the previous model. We tie the shirtfront of the desired length. Do not forget to dial the buttonhole stitches for three buttons. Tying the shirtfront, button panels and raglan lines - see the previous workshop.
We make a flower ornament as shown in the photo.

Sew flowers to the cap.

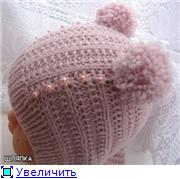
This warm hat for the winter is calculated on the girth of 45-48cm.
We need:
Pattern:
We recruit 44p. (including two - edging). Perform 28p. gum and lay the loop without closing. This will be the front of the cap. We recruit 44p. and knit 38p. gum - this will be the back. We connect two parts and vyvyazyvaem round 20r.
14p. Center the front of the transplant to the holder and leave for now. On each side in each even row (i.e., on the wrong side), we make reductions. The needles should remain 60p. + 2kr. We continue to exactly knit the desired height of the cap.
This is about 15cm. Top of the head knotted on the principle of the toe heel. Divide 60p. into three parts of 20 pieces. Edging sections remain in place.
Having tied the crown, proceed to the execution of rubber around the oval. Raise the hinges on the sides, turn on the previously delayed 14p. center. Round knit knit 8p. gum. Close n. Make 2 pom-poms and sew them - see photo.


Head circumference: 44-46cm.
We need:
Patterns:

The diagrams show individuals. rows, on the wrong side knit on the picture.
Density: on faces. smoothing 25p. on 30r. equal to 10 cm by 10 cm.
We collect 112p., We distribute in equal parts on 4-so nosochny sp. and knit 20p. gum. Next, postpone 24p. on auxiliary c. The rest of the paragraphs are distributed as follows: 1cr., Spit 1 - repeat 6 times, 16p. - diamond, braid 2 - repeat 6 times, 1kr. According to this scheme, knit straight / reverse knitting 13cm. Then knit by analogy heel toe: 1kr., 57p. according to the figure, with the 57th paragraph and the 58th paragraph knitting in 1l. We expand the work, knit 24p. according to the drawing, with the 24th paragraph and the 25th paragraph we knit in 1sc.
We expand the work, knit again 24p. middle by completing at the end of the decrease. We continue this until the loops of the side parts run out. Then we lift along the edges of the section from the braids, distribute them to 4-foot solenoids. and vyvyazyvaem vkrugovuyu 20r. gum. Loops close. Hem gum inside.
Go to work on the bottom of the helmet. On the edge of the gum dial 112p. We distribute them on 4-re spokes in equal amounts. Knit the sides of the faces. satin stitch, but before and behind we knit it like this: - Spit 1, 16p. - diamond, 4p. - braid 1, 1i., 1l. For expansion we add on 1p. from the broach after the 1st and before the outer loops in every 3rd row. Knit the loops on the back and front parts. satin stitch.
So we knit 10cm. Then on the side we knit 4p. with a blanket pattern, close the section. We continue to knit the loops of the back and front parts in direct / inverse rows. In every even r. we make reductions: 7 times 2p., 2 times 3p. The remaining sections are closed. Crochet the edges with a striking step.

Sizes: models are calculated on the age of the child 3 (6/12) 18/24 months.
For the red cap we will need:
For white cap we will need:
For both caps:
Patterns:


Density:
Recruiting 13p. needles No4. Knit fantasy pattern - see diagrams. We tie the first eyelet, adding on each side after the 4th p. 1 times 1 p., Through two rows 1 time 1 p., Then in every 4 r. 3 times 1 p.
Lay the loops and tie the second ear.
We collect 6 (8) 10p., We take loops of the first ear, we dial 14 (18) 22p., We take loops of the second ear, we collect 6 (8) 10p.
We get 72 (80) 8p. We continue according to the schemes. Knit 60r. (66 p.) 72 p. according to the schemes, we get 16 (17) 20p.
For the first size, we knit the loops 2 through 2. For the second, we knit the size 1p., Then 2 through 2. For the third size, we knit the loops 2 through 2.
We cut the thread, skip to the remaining loops and tighten.
Visor for the red model: dial 31 (35) 39p. knit gum 1l.h1i., Beginning and ending 1st p. and all odd p. with 2l. Linking 4,5cm, close the item.
Headphones for the white model: dial the spokes No4 10p. polyester. We knit people. 8.5 cm satin stitch, close p. Second headphone knit similarly.
We sew the cap with an invisible stitch. Around the ears fold 2p. or 2p. inward, fix the secret seam thread for sewing.
For the red model: we sew a visor between the two ears - see the photo - with a flat seam.
For the white model: skip the thread around the headphones to give an oval shape. Sew headphones to the cap on the 2nd diamond - see photo.


The sizes for different age of the child; 1/3; 6/9; 12/18 months; 2; 3-4 years.
Head circumference child 40/42; 42/44; 44/46; 48/50; 50/52.
We will need:
Patterns:
Density: stocking knitting needles No4,5 yarn in two additions 18p. on 23 p. equal to 10 cm by 10 cm.
Cap - a helmet is knitted round the bottom up.
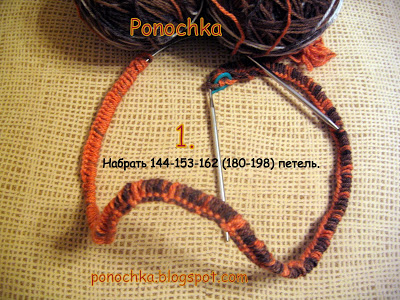
We type 144; 153; 162; 180; 198p. yarn in two threads with needles No4,5. We knit people. p. 8 p. handkerchief pattern. Further pattern: * 7i., 2n. * - from * to * repeat to the whole row. Knitting 3; four; four; five; 5cm in the areas of izn. loops we reduce by 1p., knitting the first 2i. in 1i. We have 128; 136; 144; 160; 176p. We repeat the reductions after 1 row of all four. 64 left; 68; 72: 80; 88p. At this point, the drawing turns into an elastic band 2i.h2l. We knitted in height 7; eight; eight; 9; 9cm. We continue to height 11; 12; 13; 14; 15cm and note the middle thread of the front and back parts with a contrast thread. Measuring knitting from here. We continue stocking viscous. Knitting from marks 1; 2; 2; 3; 4cm translate 10; ten; 12; 12; 14p. in the middle of the front of the thread.
We knit straight / reverse knitting, at the same time diminishing 1p. on each side through 1 row of all 2; 2; 2; 3; 4 times. At the same time add 1p. on both sides of the marking thread in the middle of the back through 1 row, a total of 4; four; four; five; 5 times. After all the reductions and increases we have 58; 62; 64; 72; 76p. Knitting 11; 12; 13; 14; 15cm, add on each side towards the middle of the front part after 1 row of 1p. four; four; four; five; 5 times.
Now dial 6; 6; eight; eight; 12p. towards the middle of the front of the delayed p. Received 72; 76; 80; 90; 98p. We continue to knit round. At 19; 21; 22; 24; 26cm from the thread mark close the paragraph
Fold the cap in half and carefully sew the upper seam. Around the hole for the face we lift the item, we include loops from the thread into operation. Only 68-88p. Knit 1p. back purse n., then 1p. facial. Go to the gum 2l.h2i. Knitting 4; four; five; five; 6 cm, close the item on the figure. Fold the strap in half and sew to the wrong side.
We make 2 pompons with a diameter of about 4 cm and sew them on both sides of the top of the cap.


| Related articles: | |
|
Decoding of markings and informational signs
Federal Customs Service State Educational ... Tea with milk: more good or all the same harm?
What is the use of this "cocktail", and also about whether it can harm, ... Skin antiseptic for hands
On the shelves of shops and pharmacies you can find various means for hygiene: ... | |


