Reader's Choice


Popular articles
This material is dedicated to installing Windows operating systems from a USB flash drive. Many skeptics still claim that this is impossible, and if it is possible that is very difficult, but the very existence of this material proves the opposite. Installing Windows XP, Vista, 7.8 from a USB flash drive is much more convenient than from a disk, since a USB flash drive does not require a floppy disk drive, is better stored and much more portable than a floppy disk.
As you know, you can install Windows using a disk in two ways: through a working system, running the installer from a disk in My computer and through the BIOS. With USB flash drives you can install any Windows exactly as well.
So let's start with the simplest, installing Windows through a USB flash drive from the My Computer window. In order to install the operating system in this way, we need a working OS, a computer on which we will install Windows (In order to write on the USB flash drive the installation of the system), a USB flash drive and the Windows XP itself, Vista, 7, 8 which we will install, or rather her image.
Now we need to prepare a flash drive by writing an OS on it. It is necessary not just to copy the system files to a USB flash drive, but to write them in a special way using the UltraISO program. So let's get started:
1. Install the UltraISO program and open it.
2. Select the Boots tab \u003e\u003e Burn hard disk image.
3. In the window that appears, select the flash drive where we will record the installation, the image file and check that the recording method was USB-HDD +. When everything is checked, click Record and wait for the end of the recording.
After successfully writing the OS to the USB flash drive, let's start the actual installation of the system. Go to the flash drive and run the file setup.exe, which should be in the Windows files in the root of the flash drive. After launch, a window should appear in which we select the Windows installation. The usual installation of Windows will begin, which is described in detail, and there is no point in describing it again. Having rebooted, the computer will continue the installation until it is completed.
The minus of installation via My Computer is that you cannot format the disk on which the operating system is currently installed. If this does not suit you, go to the item below.
This is a more time consuming installation compared to the first, through My computer. First, prepare a flash drive by copying the Windows operating system there, as described in the previous installation type.
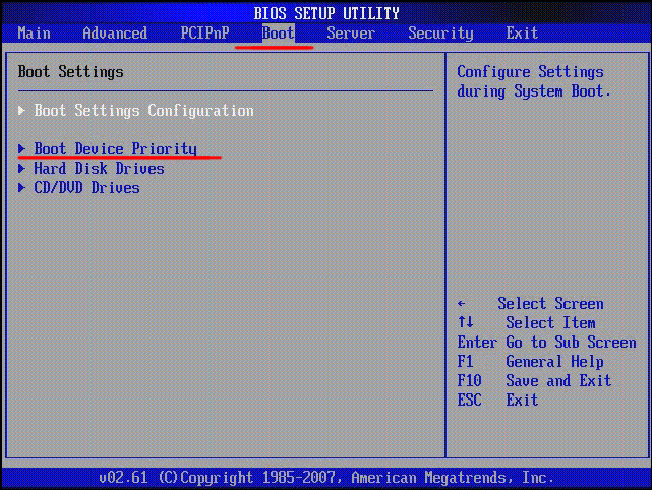
Having prepared a USB flash drive, we need to prepare a computer boot in BIOS to install Windows XP, Vista, 7, 8. Restart the computer. While the first graphic images will appear on the screen, this is usually the manufacturer's logo. motherboard, click the DEL button on your keyboard until the settings screen appears. This is the BIOS. Now find the Boot tab, and if your BIOS background is blue, look in the left column for Advanced BIOS Features and use the arrows to move the pointer and press ENTER on the keyboard. Now this window should appear with the settings of the computer boot.
If you have a gray BIOS, you may immediately see the boot order that we need, or you may have a choice where to find the Boot Device Priority and hover over press ENTER. If you did everything correctly, the order of loading devices in the computer should be displayed. Install it so that USB is first, CD / DVD Disk is second, Hard Disk is third.
The names of the values may be slightly changed compared to those written, but you must understand. When the boot order is as described, press F10 on the keyboard, then ENTER. We have just set the boot order in such a way that the flash drive is loaded first, then the drive, and only then the hard drive. This is a completely harmless option, which after installing Windows to return to the previous state is optional.
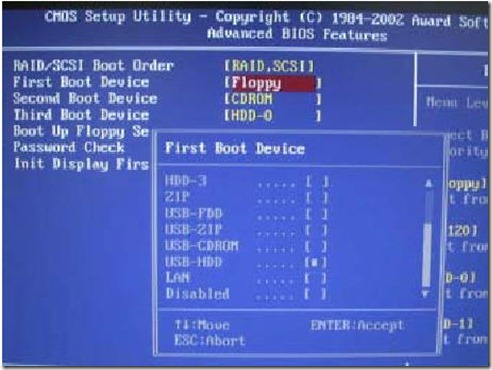
In the event that you have a blue BIOS, put the First Boot Device - USB-HDD, Second Boot Device - CDROM, Third Boot Device - Hard Disk or HDD-0, then press F10 and then ENTER.
After everything is done correctly, the computer should restart. We are waiting for the message to appear on the screen, something like "Press any key to boot from CD or DVD ...", then press any button to start the installation of Windows, which is described in detail.
If you want to install non-Windows using a flash drive, the essence of the action will be exactly the same. However, in case you want to install one of the Linux distributions, you can use programs that will make recording the installation of the OS on the USB flash drive even easier. These include Linux Live USB Creator and uNetBoot. These programs are also an excellent replacement for UltraISO, which was discussed above.
The next article will be about how to write and install Windows 7 from a flash drive. This is a really topical way to install today. Windows 7, since the flash drive is much more convenient than a disk. In order to install Windows 7 from a flash drive you need to first create a bootable flash drive, from which we will do the installation operating system.
To create a bootable flash drive, we need:
1. Windows 7 operating system image
2. USB flash drive at least 4GB
3. Program Windows 7 USB / DVD Download Tool, download.
Create a bootable USB flash drive:
1. Format the USB flash drive. Be careful, as when formatting all data from the flash drive will be deleted. Go to "My Computer" right click on our flash drive, take the "Format" and where the file system select NTFS and click "Start"
2. Run the program Windows 7 USB / DVD Download Tool.
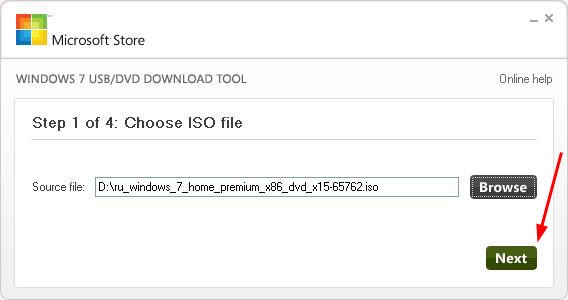
3. Click on “Browse” and select a disk image. I will say that it does not have to be Windows 7, you can, and XP.

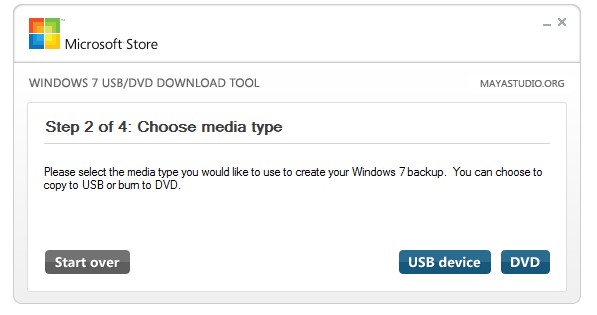
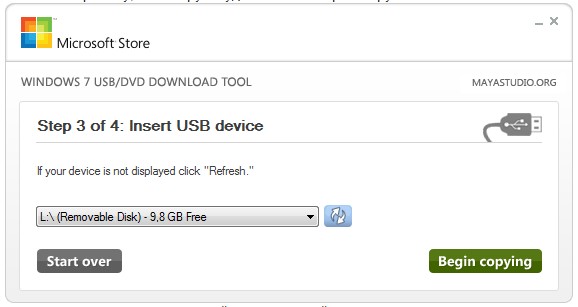
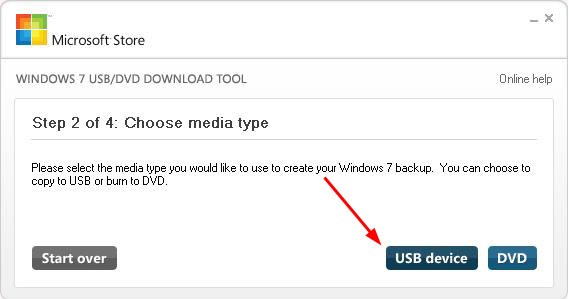
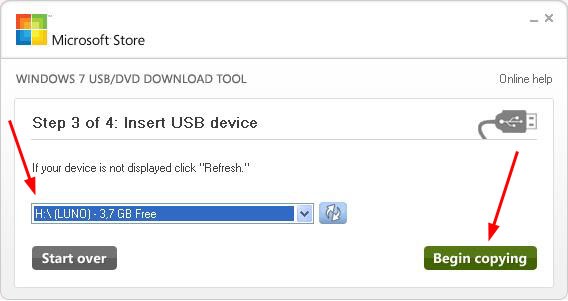
5. Select the USB flash drive to which you want to burn Windows 7 and click "Begin copying"
6. Everything, it remains only to wait for the completion of the creation of a flash drive for installing Windows 7.
Now you will always have on hand a flash drive with which you can install the operating system. All new computers support installation from flash drives, only you will need to select a special boot point in the BIOS. and go on. Good luck!
Step-by-step installation of Windows 7 from a flash drive!
Gathered to install windows 7, but the DVD-drive did not work for you? Or you do not have it at all, so how do you use a netbook? Indeed, the situation is not pleasant, but do not despair. Great way out of this situation - installing Windows 7 from a flash drive.
Note that for the installation process you will need:
For simplicity, the entire installation process of windows 7 will be divided into several stages:
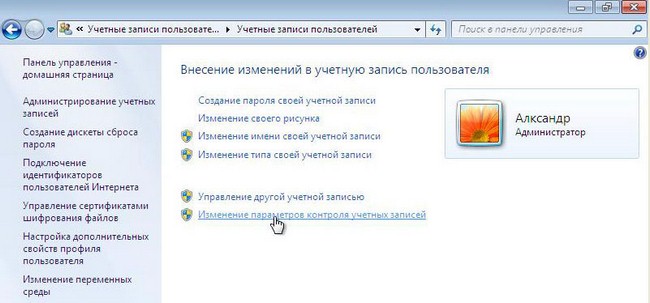
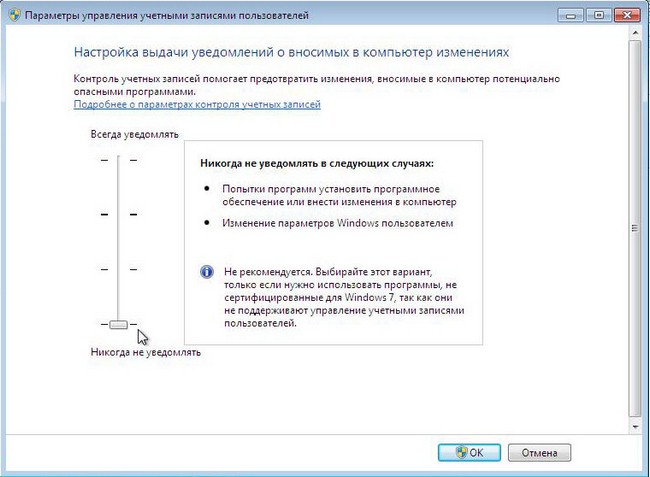
Go to the “Start” menu, select “Control Panel”, then click on the item “User Accounts and Family Safety”, and last, select “User Accounts”. Here we click “Change Account Control Settings”.
Move the slider to the bottom, then press ok.
We confirm our decision by clicking the Yes button.
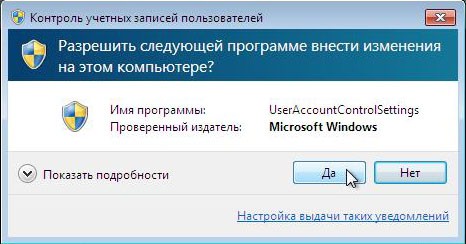
Congratulations, you have passed the first stage - disabled account control.
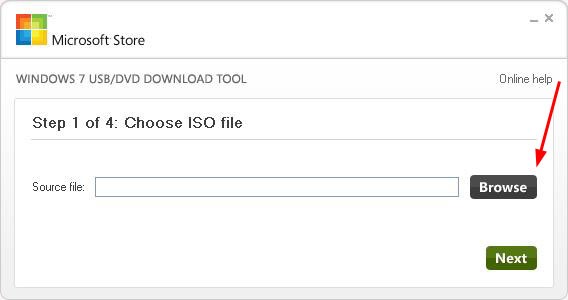
There are several ways to install the windows 7 operating system. Installing from a flash drive using Windows 7 USB / DVD Download Tool 1.0 is the easiest and fastest. Connect the USB flash drive to the computer, after copying from it all important information. Next, launch the USB / DVD Download Tool and click Browse.
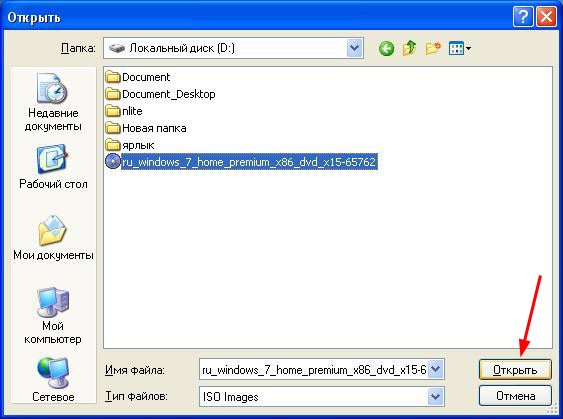
Select the ISO image of the operating system and click Open.
After you pointed out computer ISO image, click Next.
Click USB device.
In this window, select the connected USB flash drive and click Begin copying, which will start the copy process.
Click Erase USB Device to format the USB flash drive.
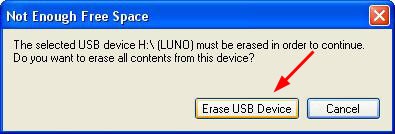
Click Yes, confirming your decision.
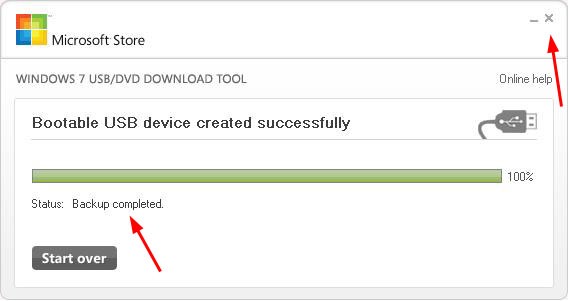
Began the process of recording the image on the USB flash drive.
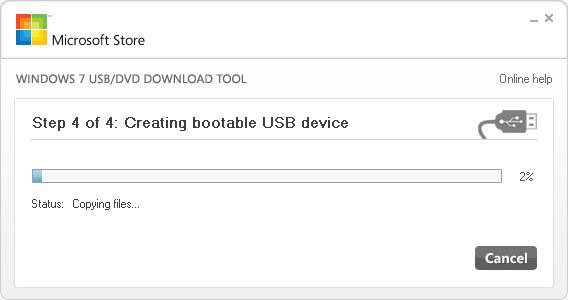
Once the entry is complete, Backup completed appears. Feel free to close the program.
That's all. You yourself have created a bootable flash drive. As you can see, installing windows 7 from a flash drive is not at all difficult if you follow these steps.
Before you start the installation of Windows 7, you in the BIOS put the flash drive in the first place in the boot priority. To get to the BIOS menu, you need to start a certain key when the computer starts up. It can be Del or F2. When loading at the bottom of the screen you can see the following hint:

In BIOS, look for the Boot tab. Here, in the boot order, you must put the boot drive in the first place. To do this, use the arrow keys, as well as F5 and F6. Use the arrow keys to select a USB flash drive, and use the F6 key to bring it to the first position. Then save the changes and exit this menu by pressing F10.
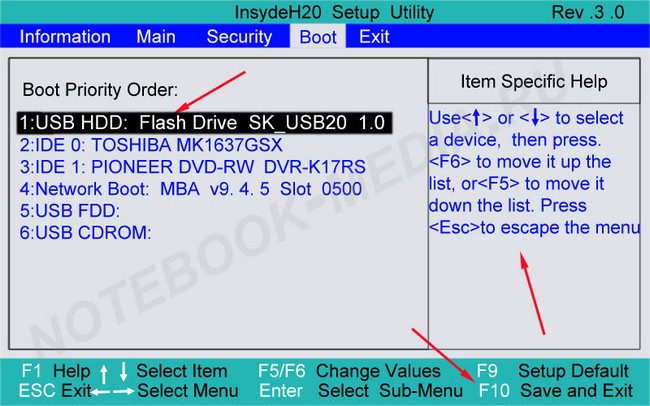
A window will appear where you need to click Yes, confirming your intention to put the flash drive in the first place in the boot sequence. If everything is done as described here, then after restarting the computer, installation of windows 7 will start from the USB flash drive.
Select the basic installation parameters and gain More.
Click Install.
![]()
We agree with the license agreement by ticking the appropriate place. Click Next.
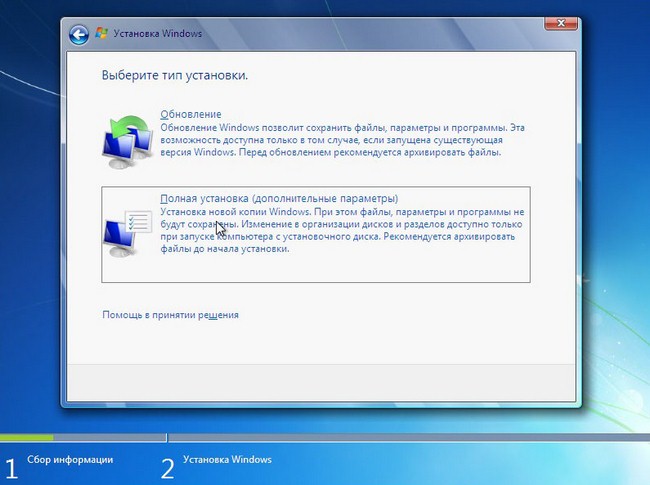
At this stage you will be offered several types of installation. We recommend choosing a full installation.
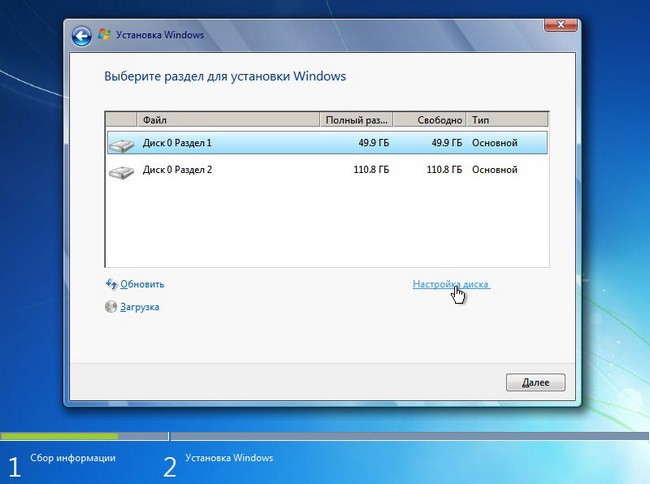
Here you need to specify the partition (disk) on which Windows 7 will be installed. Pay attention! Do not put the operating system on hidden partitions, if any.
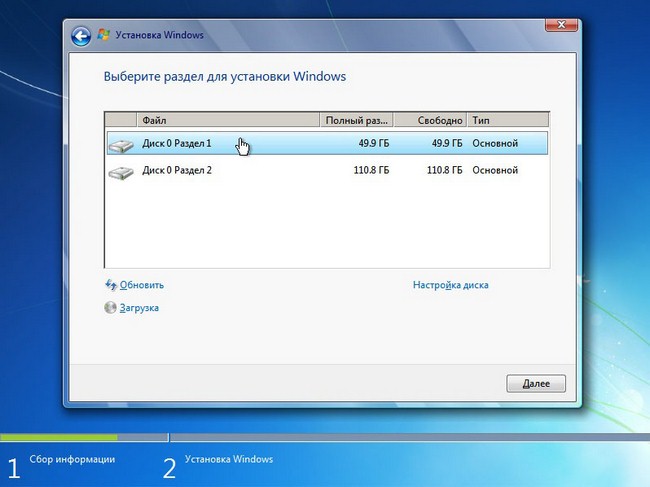
Select the partition where you plan to install the OS, click Disk Setup.
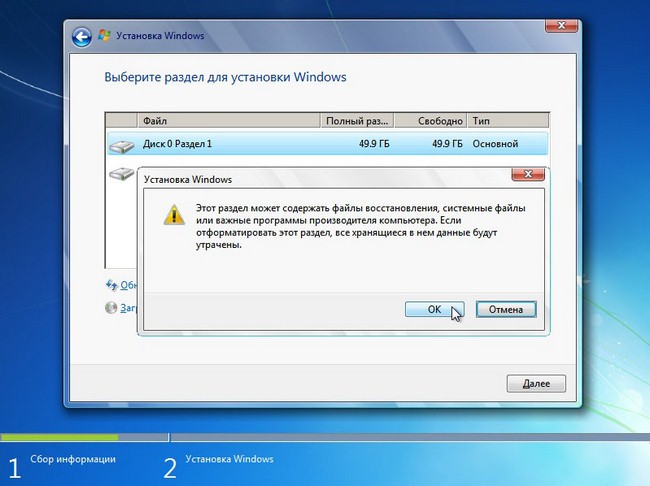
Click Format. Note! When formatting all data from this disk will be permanently deleted.

If in this section there is no important information, feel free to click ok.
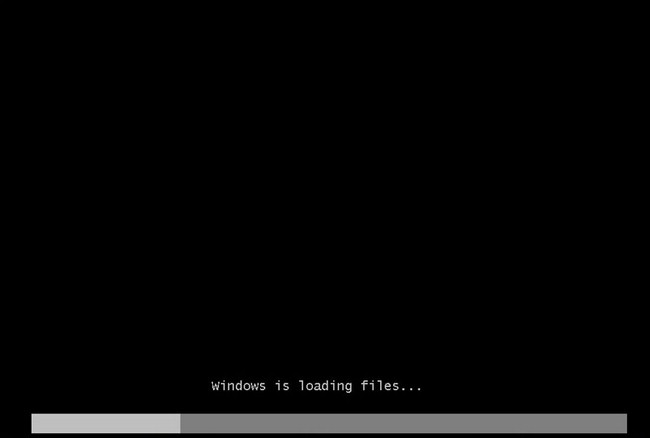
Installation of windows 7 starts from the USB flash drive.

If all files are copied, the computer will restart for the first time. If you do not want to wait until 10 seconds have passed and the computer restarts itself, click “Restart now”. During the reboot, be sure to return the hard drive to the first place in the boot priority, otherwise you will re-install the OS.

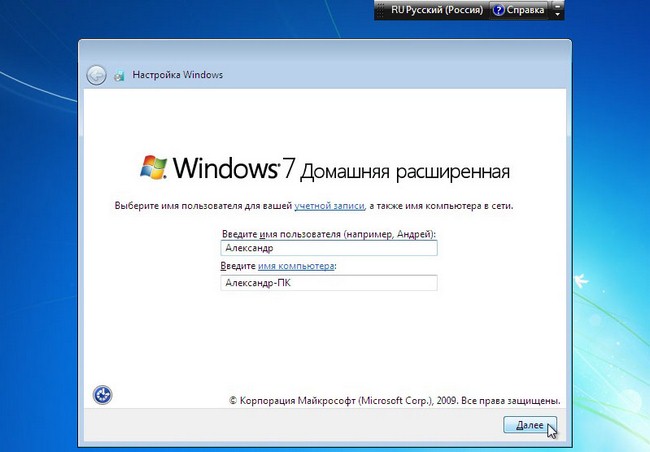
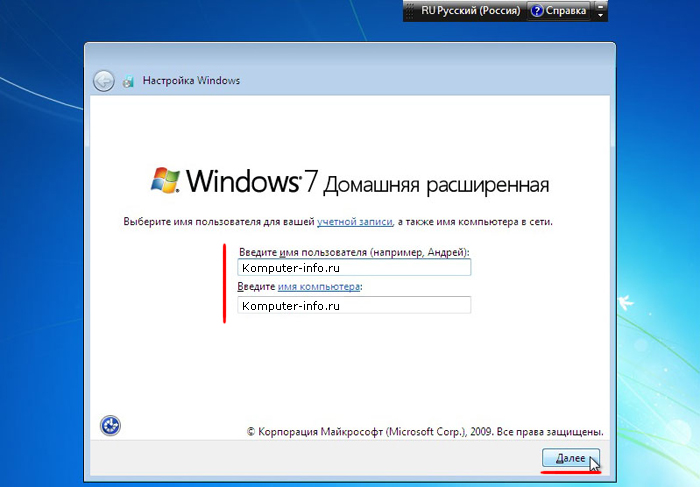
Here you need to enter your username and computer. Go ahead.
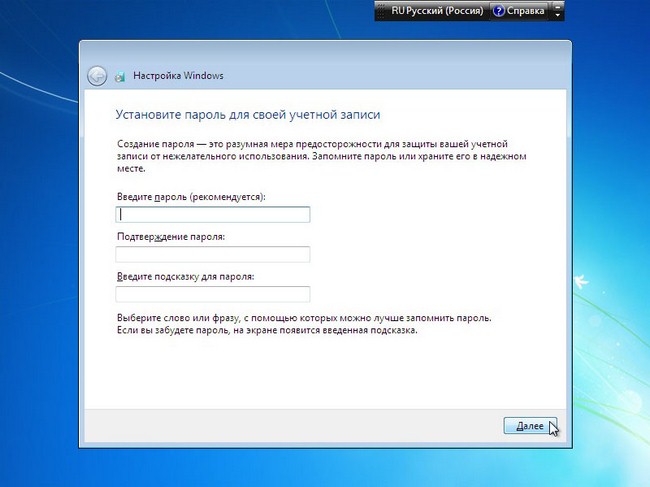
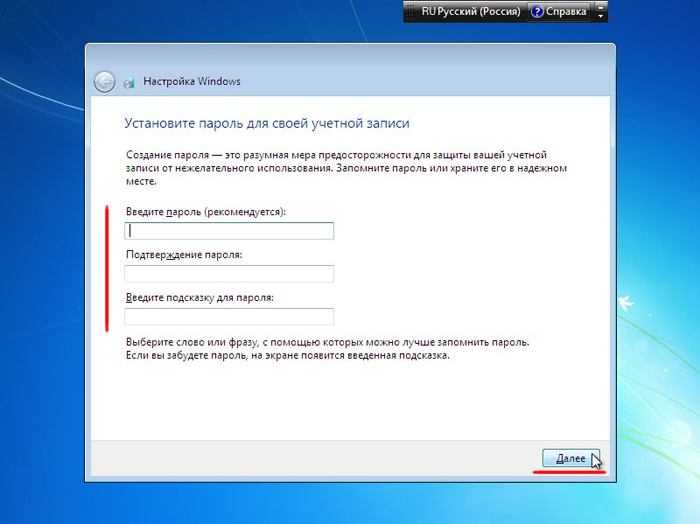
Optionally, you can set a password for your account.
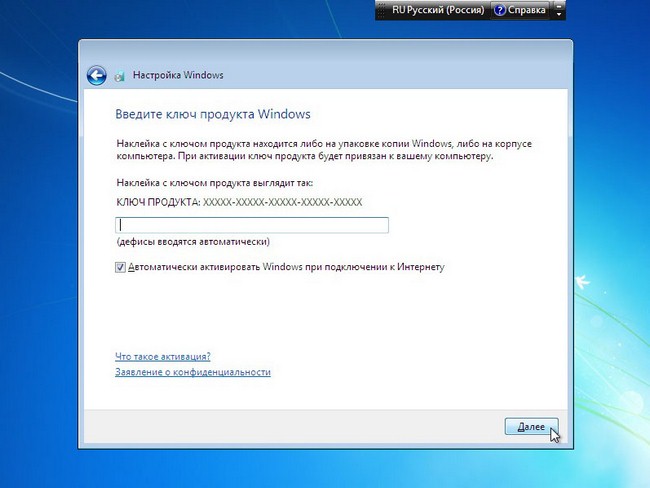
Enter the license key in the field. Note that you can enter the key after installing the system. Click Next.
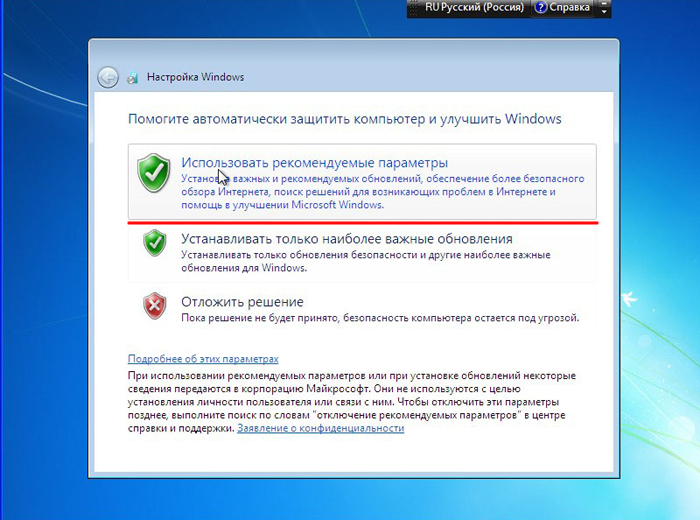
Here we specify the security settings.
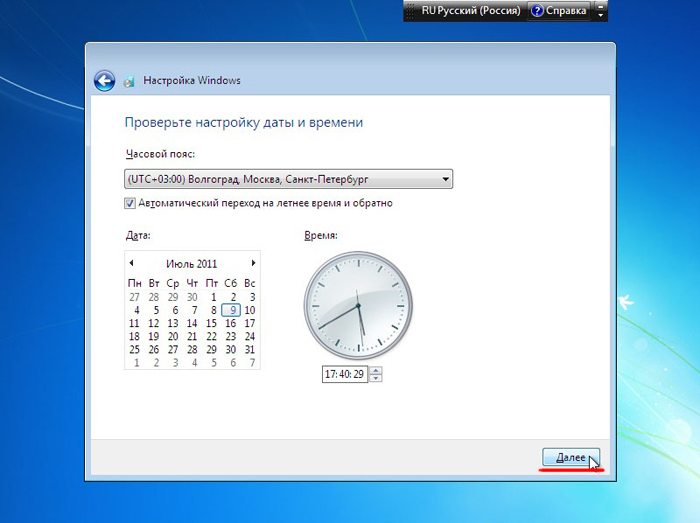
Indicate the date and time.

Specify network settings.
If you have followed these steps, then you will see an image that indicates that the installation of windows 7 is complete, with which we congratulate you!
Write in the comments below, if you do not get something or have difficulties - we will understand together!
This version of the operating system is considered outdated, but it is still popular if you need to reinstall the OS on old or weak netbooks, stationary computers. Very few people use disks, so you can install from a flash drive, which requires some preparation of removable media for recording Windows from it.
To a user who has not previously encountered this process, it may seem that installing Windows XP from a flash drive is more difficult than from a disk, but the procedure itself is not so difficult. There are many programs that simplify the creation of an installation USB drive. It is especially useful to know how to install Windu to netbook owners on a USB flash drive, in which there is simply no drive (CD drive). In the process of installing Windows XP, you need:
Most of these steps will be done by the necessary programs without your help, you just need to run them and specify the location of the necessary files. The preparation process is the same for all laptop brands: Asus, Lenovo, Acer, etc. In the absence of a flash drive, you can use a memory card. This method is also relevant for all subsequent versions of Microsoft operating systems (Win 7, Vista). Below painted more detailed guidehow to install Windows XP from a flash drive.
The first and necessary thing to install Windows XP from a USB flash drive is the Windows Installer. There are different builds of this version of the OS, but to prevent various errors, it is better to use a clean version, without additional programs, it is called Windows XP SP3 MSDN. The installer can be in the format of an archive or disk image, in the first case all files must be unzipped, in the second one nothing needs to be done.
In older computers, an interface was used to connect hard drive IDE format, and modern models are all already transferred to SATA. To properly install Windows XP, you need to additionally download drivers for the new connection format. Otherwise, the installer simply will not find your hard drive. Download files without any problems on the Internet. To integrate them into the distribution, do the following:
After adding the necessary drivers, it was the turn to write the image to removable media. To prepare for the installation of Windows XP, you need to download the WinToFLash utility, which will do all the necessary actions with minimal user participation. First you need to prepare removable media: copy all the important files from it to your computer, complete the full formatting. Next, you need to run the WinToFlash program and perform the following actions:
If your previous OS is working, then there is an option how to start the installation of Windows from a flash drive without using the settings in BIOS. After creating the bootable media, you just need to go in, find the file with the “exe” extension in the opened root folder and launch it with a double click of the mouse. A window will appear, it prompts you to upgrade, restore or reinstall the system, select the option you need and click "Next." All further actions the program will perform itself.
This installation of Windows XP from a flash drive is very easy to configure, but it has its drawbacks, for example, it is not possible to format the C drive and delete the old OS, which can lead to further conflicts. In addition, at boot time, the computer will always ask which version of the operating system to load (there will be two of them). For correct reinstallation, it is better to use the method with setting the boot priority in the BIOS.
To run the installation from removable media as a boot disk, you need to set it first in priority using BIOS settings. For this:
After that, the computer will reboot again and right before the OS should start, a suggestion will appear with actions to update, reinstall Windows. When you click on the desired item, a blue background will appear and the files will be copied. Following are a few steps to follow:
All further configuration occurs automatically, the computer will reboot several times - this is normal, and you don’t need to remove the USB flash drive from the connector. You will be asked to enter the product license key, but you can simply skip this step and perform it later. You will need to specify the time zone, give the name of the account, if necessary, come up with a password. At the end of the installation, the operating system opens. After that, do not forget to remove the USB flash drive and return to the boot priority of the BIOS again the PC hard drive.
If there is a number of second PC, then you can watch the video, how to install Windows from a USB flash drive to a laptop. They consider in detail the process of creating a bootable drive, probable problems and errors that occur during preparation or during the installation of the OS.
I had to reduce the number of ardent fans by an order of magnitude well-optimized and time-tested Seven, but this did not happen. New features of modern Windows operating systems were not needed by all users, so many people still prefer to use seven for work and study.
In this article we want to tell how to install Windows 7 from a flash drive. This installation option is now very popular among users, because it has a number of indisputable advantages compared to using a boot disk.
The advantages of installing Windows 7 from a flash drive:
In order to quickly and efficiently install the seven on the computer, we will need to follow a certain pattern. Each item of this scheme we will carefully analyze, so that during the installation process you will not have any difficulties, and you will quickly cope with this task on your own, without calling the wizard or contacting the service center.
In general, the scheme of installing the OS from a flash drive is as follows:
Do not be afraid of a large number of steps in our guide. Believe it. All these operations can be carried out very quickly, if you know what you are doing and why.
First of all, before creating a boot disk with a Windows 7 operating system on a flash drive base, you need to find a high-quality ISO image of the system. The network has a large number of various OS assemblies, in which many new programs, functions and applications have been added. In such assemblies, the standard themes and standard sounds are changed, but not everyone likes such changes. That is why we offer users to download the original images of Windows 7. Who needs exactly the assembly - you will easily find them on the network.
You can find a suitable image of the sevens in the article “”. There you can download both English and Russian versions of this popular OS.
List of Russians ISO imagesavailable for download:
After downloading the system image, you can proceed to the second step - creating a bootable USB flash drive on its base.
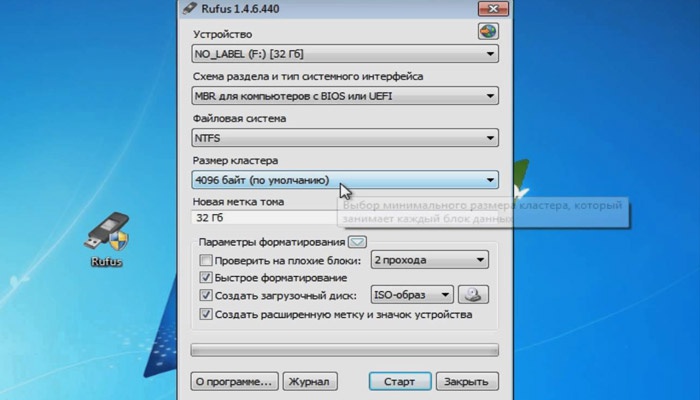
The next step of our guide will be to record the image you downloaded on a USB flash drive. This can be done with special programs: UltraISO, Windows 7 USB / DVD Download Tool or WinSetupFromUSB. Each of these programs has been repeatedly tested for performance by many users, and you can be sure of their effectiveness. Which of these products to use is up to you. We have already described in detail how to use the listed programs step by step in the article “”.
Read the article carefully and decide for yourself which method of recording is the easiest for you. Distributions of your chosen program can be downloaded in the article above. On this occasion, you can not worry.
After we have a bootable USB flash drive with an operating system written on it, we can start installing Windows 7 on the computer. To do this, turn off our computer and connect a USB flash drive to it. This step is very important. Do not connect the USB flash drive to the computer after it is turned on, as in this case it may not be readable.
We also draw your attention to the fact that some laptops and computers cannot be loaded from memory cards connected with the built-in card reader (this applies to you only if you use an SD memory card or some other instead of a flash drive). If you still use the card reader and the computer does not boot from the memory card, look for the USB flash drive and use it to install the seven.
Turn on the computer and go to the BIOS. on any computer we have already disassembled. Find your laptop model or a suitable BIOS manufacturer and look at the hotkeys for switching to BIOS (in the article there is a list of such keys for different models devices).
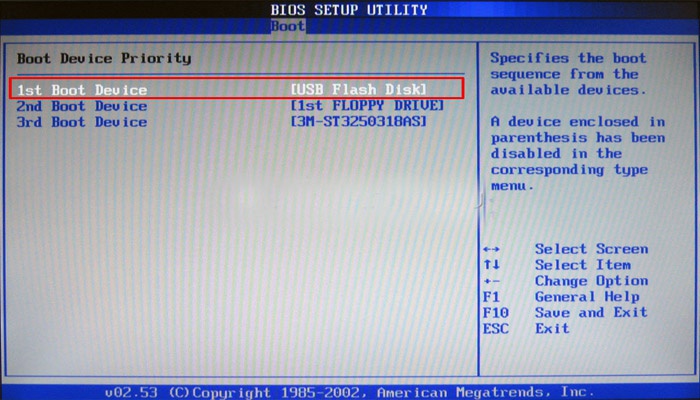
After you have successfully logged into BIOS, you need to go to the settings section of the boot parameters. Have different manufacturers such a section may differ slightly in name, but the general meaning remains unchanged. Go to the “Boot” -\u003e “Boot Device Priority” section.
As the first boot device, select USB media.
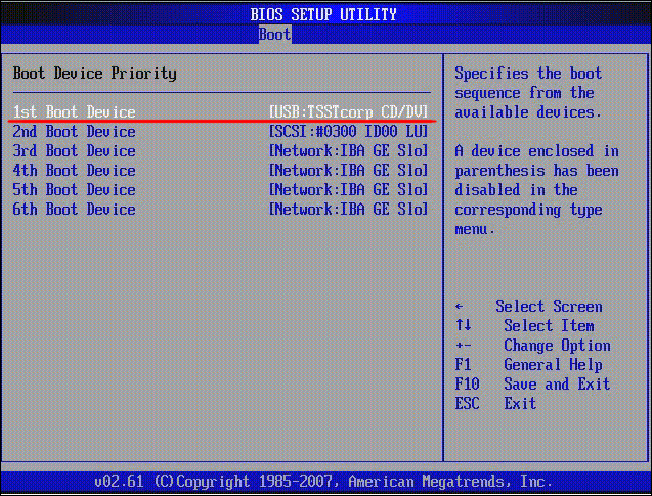
After that, press the “F10” key to exit BIOS and save the changes. In this case, the computer will restart and start from the flash drive, on which we have written the seven.
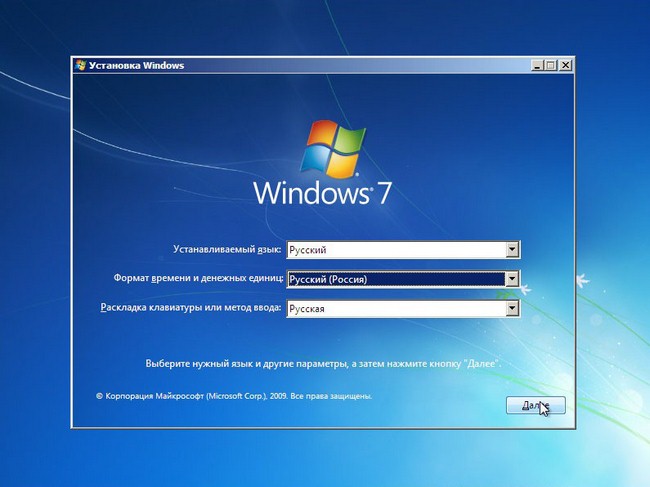
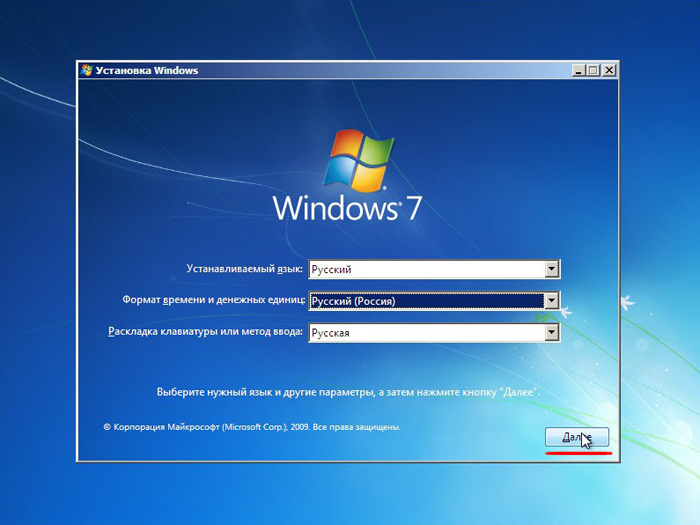
If you have successfully completed all the steps described earlier, then at this stage you should have running computer, on the screen of which the start window of the Windows installation is displayed. We select “Russian language” in all fields and click “Next”.
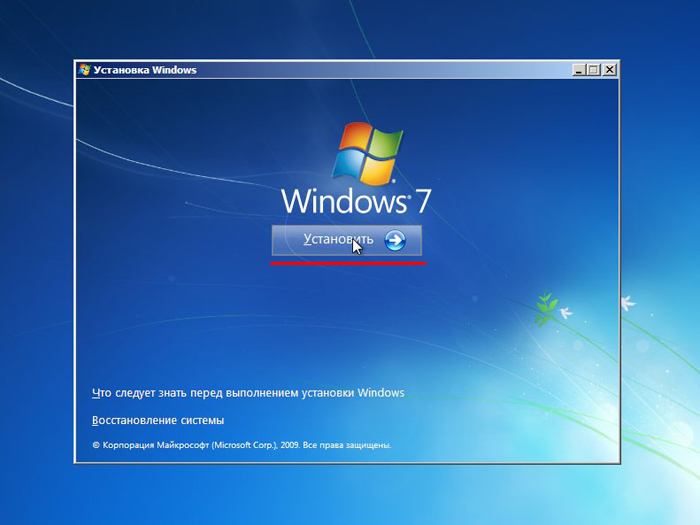
In the next window you need to click on the “Install” button.
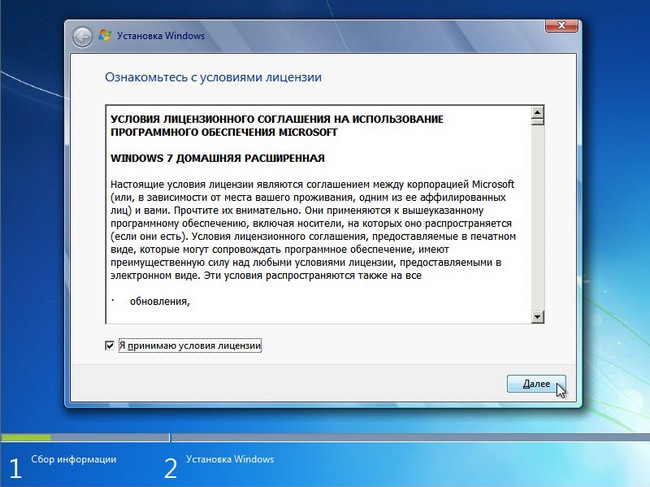
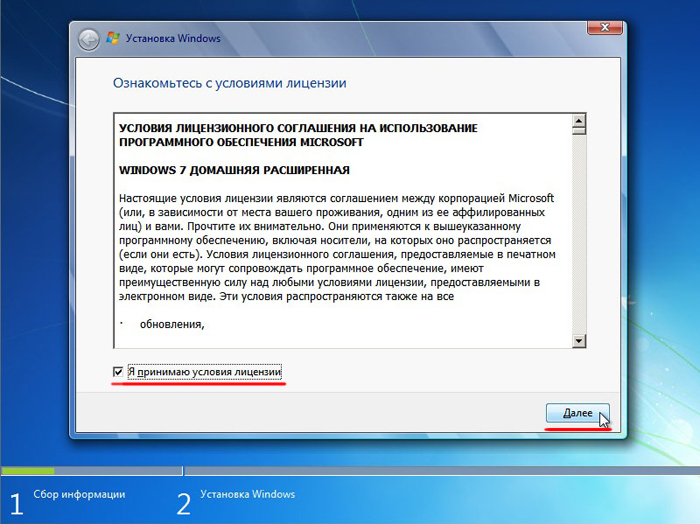
At this step, we agree to the terms of the license agreement, set the appropriate checkbox and click “Next”.


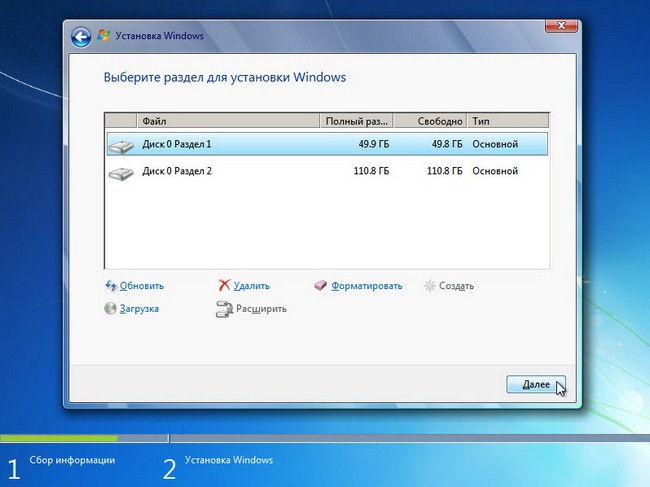
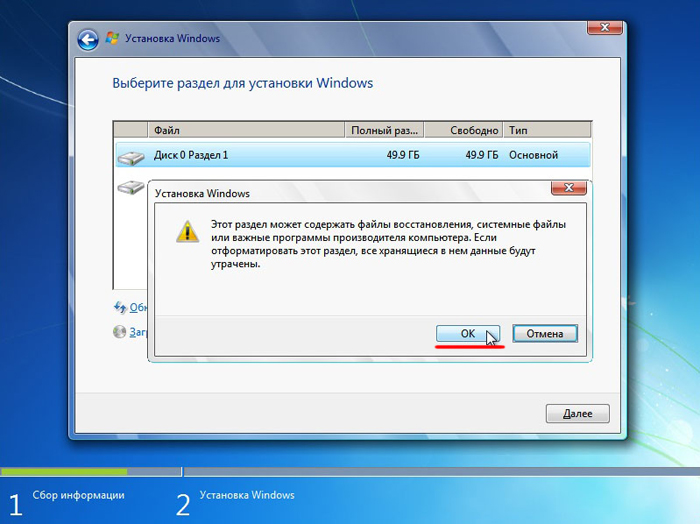
Before installing Windows 7 on a computer, it is recommended to format the disk. Please note that all recorded information from the disk will be deleted, so for example, if you install the OS on the C drive, it is better to copy important information from it to the D drive (the letter designations of the discs may not coincide). To format the disk, click “Format”.

Confirm the start of the formatting procedure in the warning window and click “OK”.

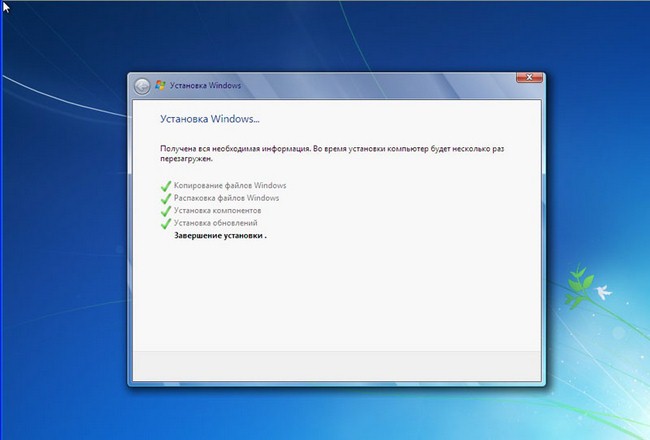
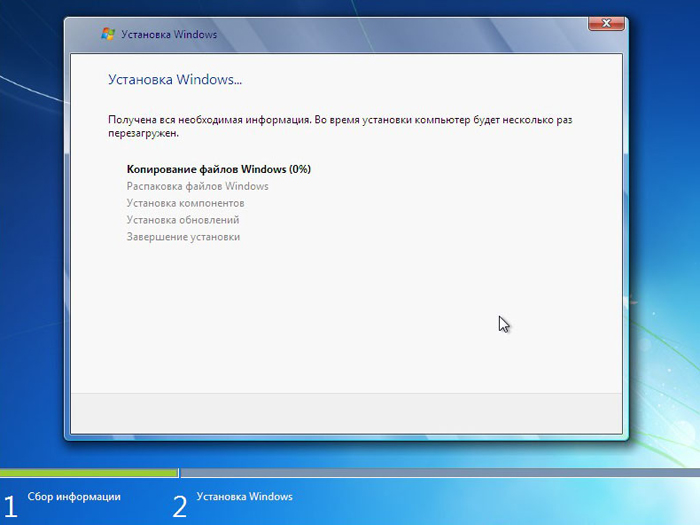
The system files will begin to copy.
After the first stage of the installation of Windows 7 is complete, a restart of the computer will be initiated. Do not forget to reboot into BIOS and set the priority boot device to the hard disk (we don’t need to start from a USB flash drive).
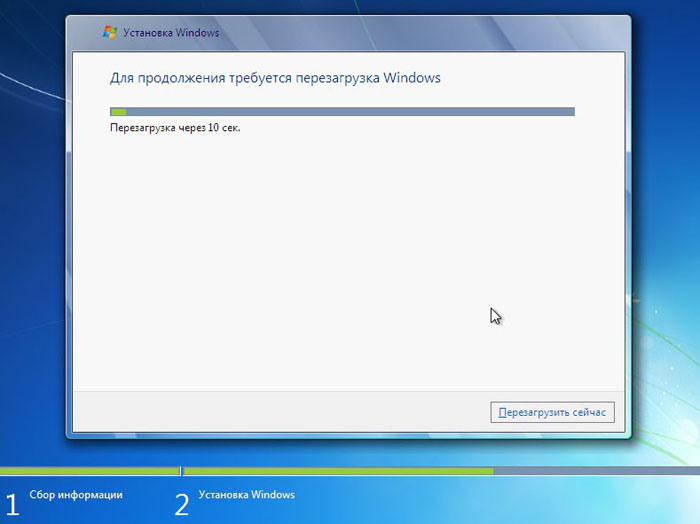
After the reboot, the installation will continue.
![]()
In the next window, you must enter the user name and computer. To continue, click “Next”.
If you wish, you can set a password to enter account. It is not necessary to do this. If you don’t need a password, just click “Next”.
In this window, you must enter the product key (in some cases, this step can be skipped by clicking on the “Activate Later” button or something similar). Click “Next”.

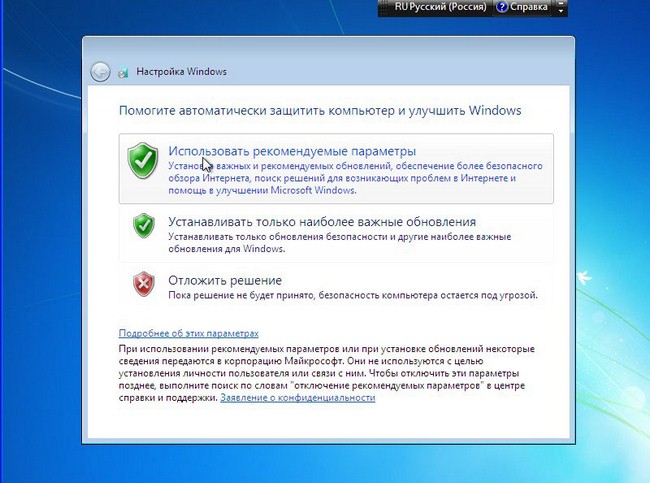
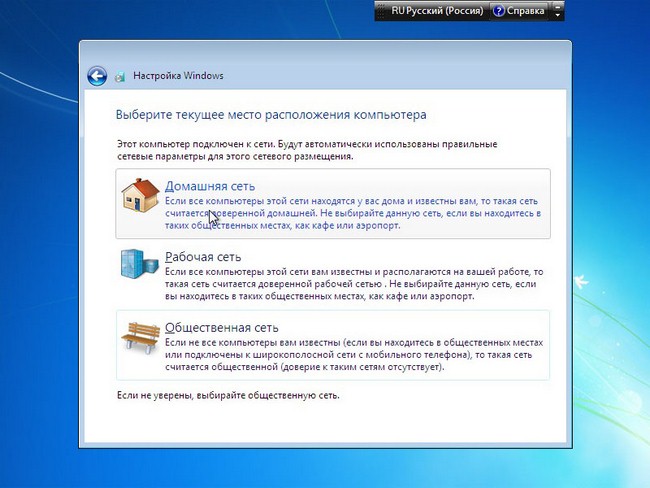
In the security settings, select the first option (in the future, these settings can be changed).
If your computer is connected to a network, you will be prompted to select a network. Choose the first option.

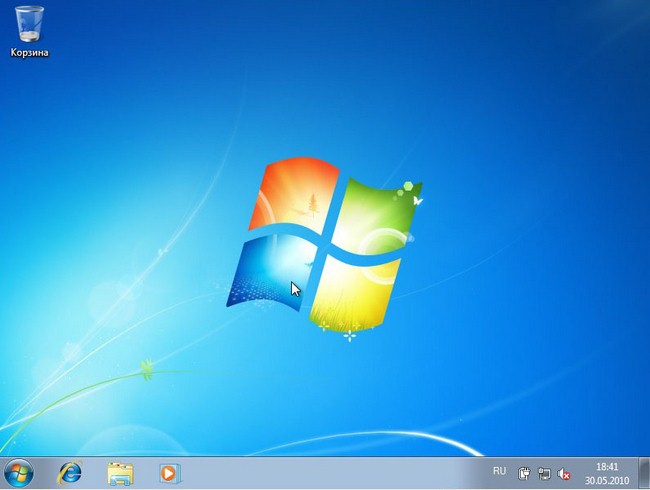
This completes the installation of Windows 7 from the USB flash drive and you should see the standard seven desktop.

We do not agitate you to use an activator, and the information provided is informational.
For normal operation of the operating system, it is recommended to install actual drivers for all devices of the system. It is very good if you have a disk from the computer where all the drivers are collected. In this case, you simply insert the disk into the drive and install all the drivers in order. If you do not have such a disk, then all the drivers can be found on the network. It will take more time, but the way is working.
Those users who do not want to manually search for all the drivers themselves can recommend programs for automatically finding and installing suitable drivers. For example, such programs apply. We described in detail all the features of its use, so if you wish, you can quickly master this utility.
Optimization of the operating system is often carried out after several months of its operation, when the speed of the computer noticeably decreases. Usually, immediately after installing the OS on a computer, there are no problems with the speed of work, therefore, optimization questions are not set by users and quietly enjoy fast PC operation. But for the future we recommend that you familiarize yourself with the questions, because sooner or later problems with the speed of the computer will overtake all seven users.
We have reviewed in detail the entire process of installing Windows 7 from a USB flash drive and simultaneously disassembled topics related to this procedure. We hope that this guide will help you install the OS on your computer without assistance. We will be happy to answer any questions about the installation of the seven.
| Related articles: | |
|
The use of protein cream
Regular readers know my love to cook and eat well with ... Symptoms of lactose deficiency in adults
Lactose intolerance is a clinically significant condition associated with ... How to mine Bitcoins - the essence of the process and where to start, types and profitability of earnings
Surely almost everyone who is just starting to get acquainted with Bitcoin, ... | |


