Reader's Choice


Popular articles
Without a doubt, the printer is a very convenient and useful device in the household. That's just this device is quite cumbersome, especially in comparison with a miniature netbook or tablet. And tying a mobile PC to a heavy stationary device using a “standard” cable connection is at least inefficient.
Therefore, in this article we will look at how to connect the printer to a laptop via wifi, and what to do if the printer does not see Wi-Fi.
And first of all we will focus on the “classics of the genre”: how to make wifi from a regular printer?
You must agree that in order to set up a wireless connection of the printer to the laptop, both devices must support this function.
Unfortunately, developers of low-cost models rarely supply devices with an integrated wifi transmitter, therefore, for ordinary printers, the following methods of remote connection to a computer are used:
1. Installation of additional network equipment - print server with which you can make the printer a wireless LAN node;
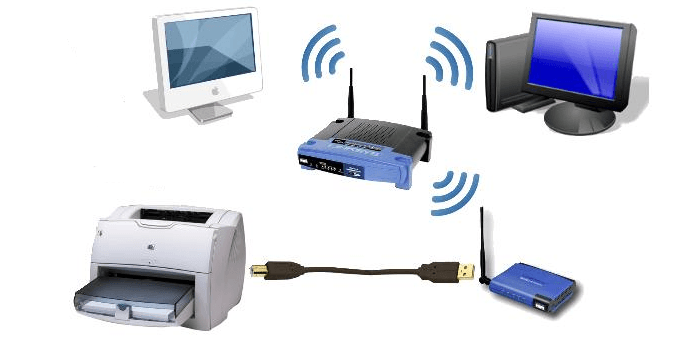
2. Cable connection of the printer to the computerwhich has access to a local wi-fi network: in this way, any wifi device can contact the printer through an "intermediary".
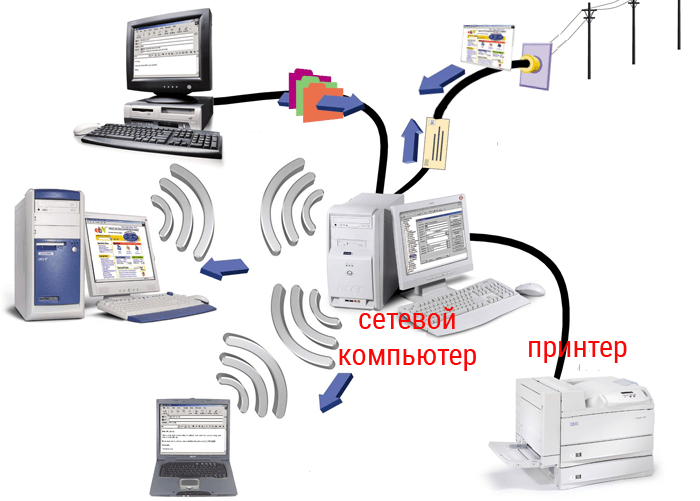
The advantage of this method lies in its efficiency: you do not have to spend money on additional expensive equipment. However, one cannot do without a second computer, which must constantly work throughout the entire “communication session”.
To set up a wifi printer connection in this way:
Connect the printer to the "intermediate" computer with a cable and install the necessary software (driver);
Go to “Start” -\u003e “Control Panel” -\u003e “Printers and Faxes” and open this printer for general access;
Connect the printer to the laptop via wifi. To do this, go to the "serving" printer computer via LAN (see the link at the end of the article) , find the shortcut of the printer that is open for sharing, right-click it once and select the menu item “Use by default”.
Now, using the “Print” command, your laptop will automatically print on a connected Wi-Fi file printer.
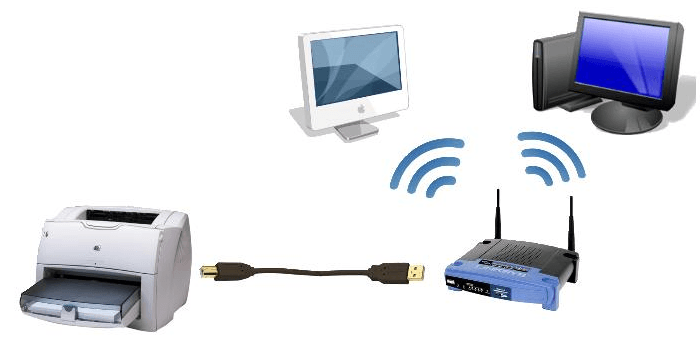
3. Using wifi router with built-in print server function and a USB connector for external network devices on the case. To configure such a connection, you should:
Connect the printer to the router with a cable;
Connect to printer from laptop via local wifi network (see the link at the end of the article).
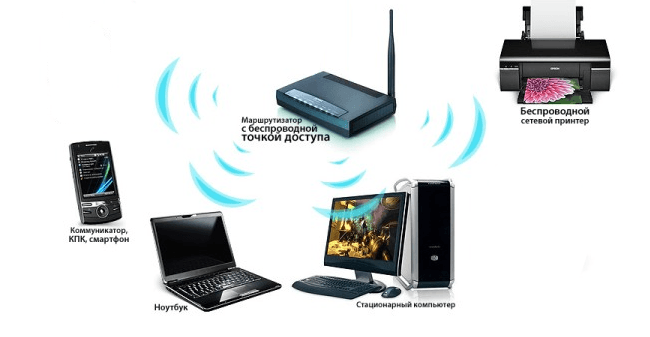
However, such difficulties are justified only when setting up Wi-Fi is required on a good old printer, long established and almost native. In other cases, it is more logical to immediately purchase a modern wifi printer with an integrated network module and not be bothered with setting up all kinds of additional equipment.
Among the most popular time-tested vendors here are HP, Canon, Epson, Konica, Panasonic, Samsung, Xerox, Brother and Minolta: you can easily connect such a printer to a laptop, router, tablet, etc.
At the same time, depending on the specific situation, you can create a wireless connection with a laptop in different ways: consider the main options for connecting a wifi printer in more detail.
From the "classic" ways to connect wifi printer can be noted:
This is possible when connected to wireless network The computer is able to independently distribute wifi.
Here to set up a wifi printer connection, you should:
Through the built-in printer interface to connect to the local network of your laptop (see the link at the end of the article) .
- in automatic mode (WPS technology).
To do this, first and then use the WPS (QSS) button to connect your printer to your home wifi network.
In order to print via Wi-Fi it is enough to connect from your laptop to the installed printer via LAN (see the link at the end of the article).
- in manual mode: through the “Setup Wizard” of your printer.
To do this, start the "Search for available networks" in the printer's control panel and select the network of your router by SSID. Here you will need to specify a password for wi-fi and confirm the connection to the network, after which the corresponding wifi indicator should light on the printer.
Run the driver installation and select the wifi connection with manual settings, after which the printer will be available for wireless LAN connection.
The ideas of wireless interfacing with devices are used everywhere. The trend has not bypassed equipment for information output. Therefore, it is necessary to solve the problem of how to connect a printer to a laptop via WiFi.
This method consists of using the Wireless Setup Wizard in Windows.
Before connecting the printer to the computer via WiFi in this way, you need to make sure that the printing equipment can be connected using the wizard.
If the MFP supports WEP and WPA encryption, the pairing will succeed. Connect the device in the following order:
How to connect a wireless printer to a computer if the previous methods did not help? There is one more way, but it differs in complexity in comparison with the previous options. In such methods there are always nuances that can play a certain role in connecting devices. Most often they concern the factory IP address and the subnet mask provided by the provider.
But this situation is unlikely, and therefore does not hurt to connect the multifunction device. This is due to the fact that most equipment does not use static addresses, but dynamic ones. For printing equipment of this kind, it is only necessary to add the IP address available on the device in the computer settings. How to connect the printer to a laptop without a wire in this case? The action should be as follows:
At the end of the connection procedure, a window will appear notifying you of the successful pairing with the output device. You can start working with printing equipment immediately after restarting the laptop.
Connection method using WPS Before you begin, you must fulfill some conditions to use the method with pressing the WPS button:
 does not blink 15 times, then release the button.
 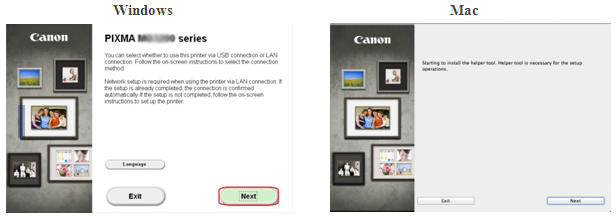 <Только для пользователей Mac>
When the following screen appears, enter your password to allow the installation of the auxiliary tool, then click [Installation Assistant]
<Только для пользователей Mac>
When the following screen appears, enter your password to allow the installation of the auxiliary tool, then click [Installation Assistant]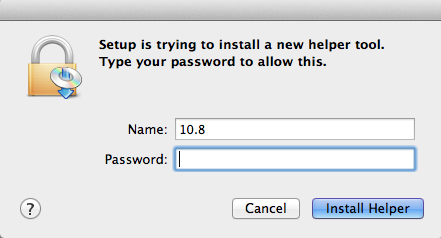 [Further].
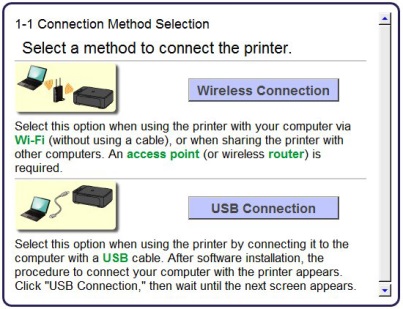
 note: When a screen appears asking you to choose between a USB connection and a wireless connection, select [Wireless connection]
.
note: When a screen appears asking you to choose between a USB connection and a wireless connection, select [Wireless connection]
.
Step 21. Click [Connect to network].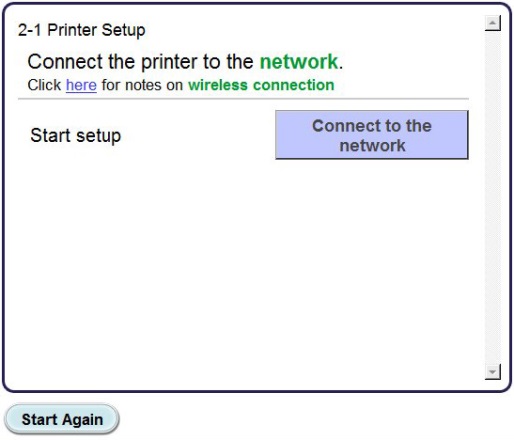
2. When the following screen appears, click [Wireless installation].Note: For Windows XP users, the wireless installation method is not supported. Select [Other installation]then go to. 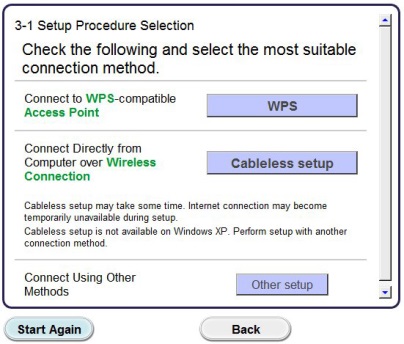
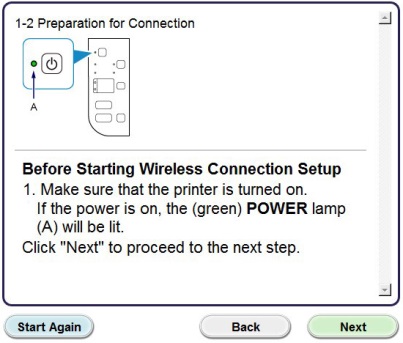
3. When the screen appears [Connecting via wireless installation] hold the button
(A) on the printer until the orange alarm indicator (B) blinks 2 times, then release after the second flash. 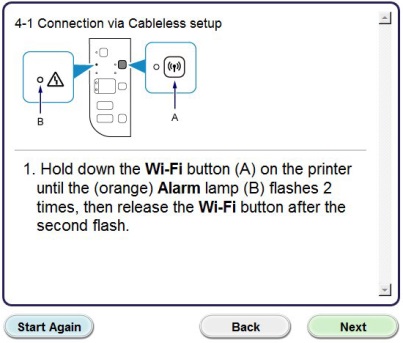
4. Make sure the Wi-Fi indicator (A, blue) flashes quickly, and the power indicator (green) is on. Click [Further].Note: Your network connection will be disconnected during installation. 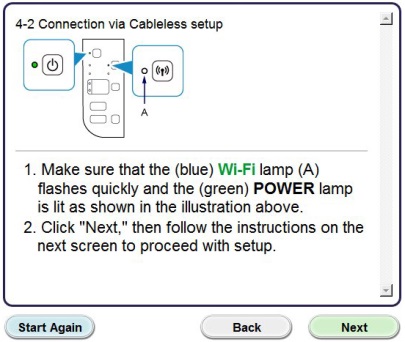 Click [Further].
5. Windows XP users only: select [Setting up a wireless connection using a USB cable] Step 31. After the following screen appears, select your region and press [Further].
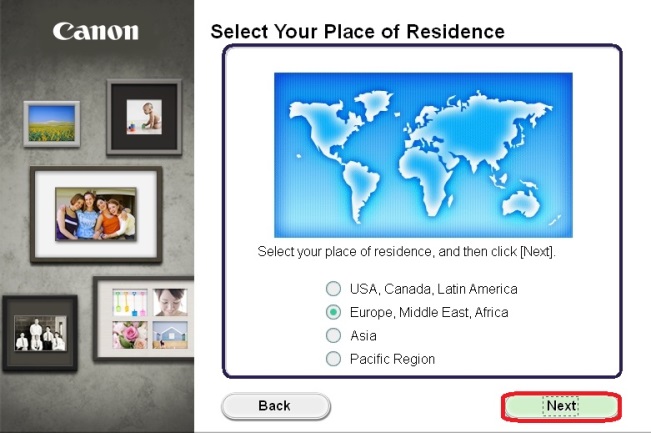
2. After the following screen appears, select your region of residence and click [Further].
3. After the following screen appears, select the software you want to install and click [Further]. If you are not sure what software you want to install at this stage, do not worry - it can always be removed at a later stage. 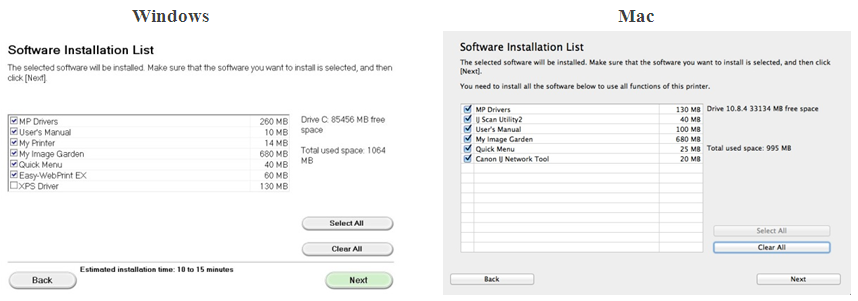
4. After the following screen appears, click [Yes]to accept the terms of the license agreement. 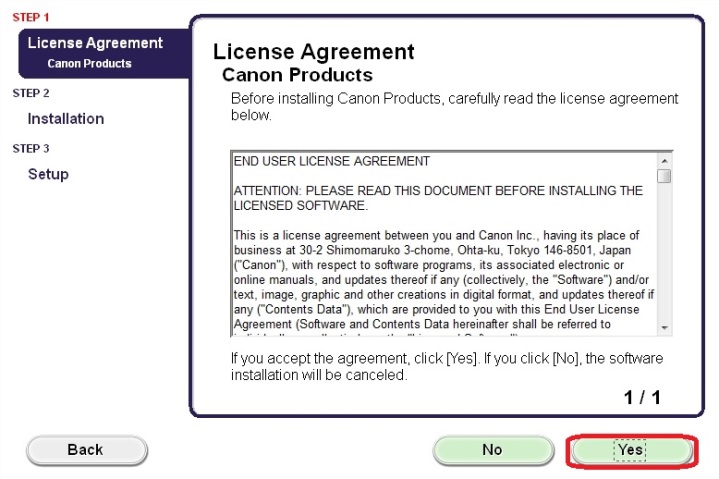 <Только для пользователей Windows>
After the following screen appears, click [Further].
<Только для пользователей Windows>
After the following screen appears, click [Further].
5. The next screen shows the printer model and the name (or SSID) of the wireless network.
Windows (except for Windows XP users)
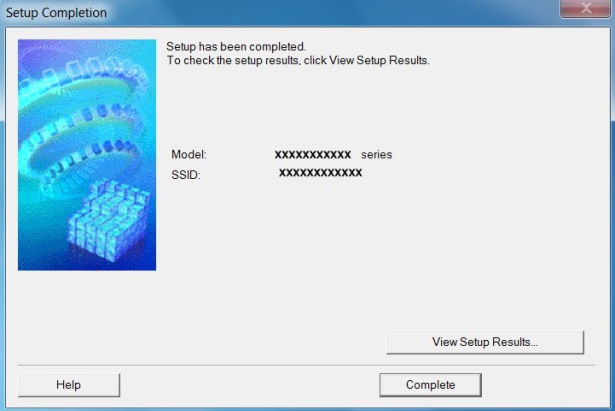
Click [To complete].
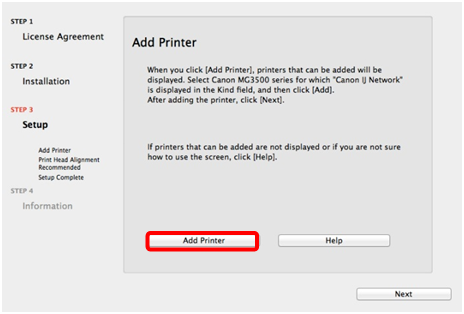 On the next screen, select the network driver version.
and press [Add].
On the next screen, select the network driver version.
and press [Add].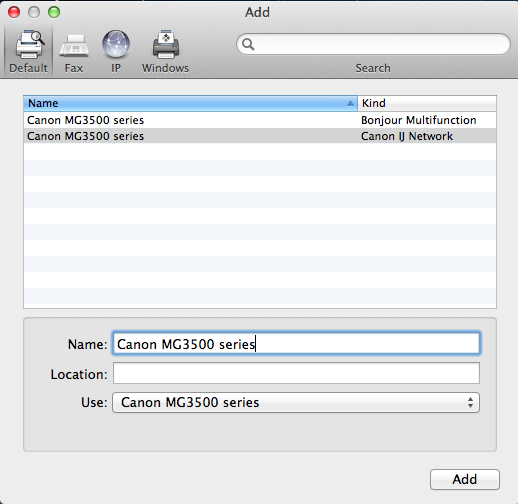 Click [Further] to complete the installation.
 Setup using a USB cable for Windows XP users and users of systems where no network connection is detected
6. Select [Establish network connection via USB cable]then click [Further].![]()
7. After the following screen appears, connect the printer to the computer using the supplied USB cable. This cable has a symbol on the connector. 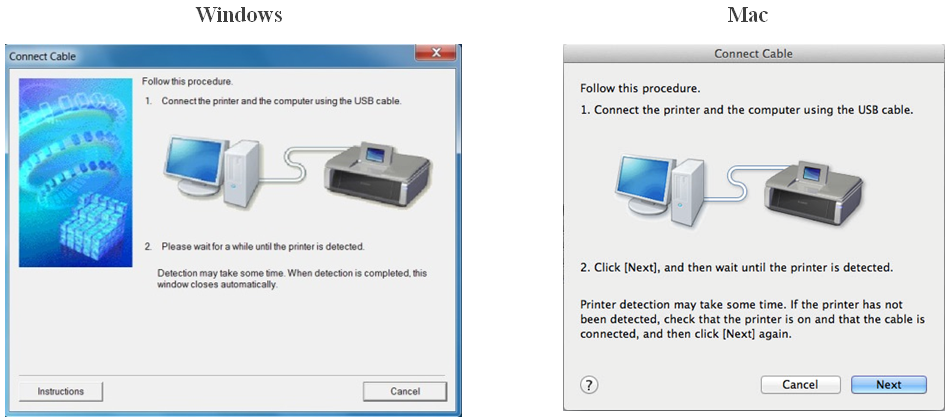
8. After the printer is detected, the following screen will appear.
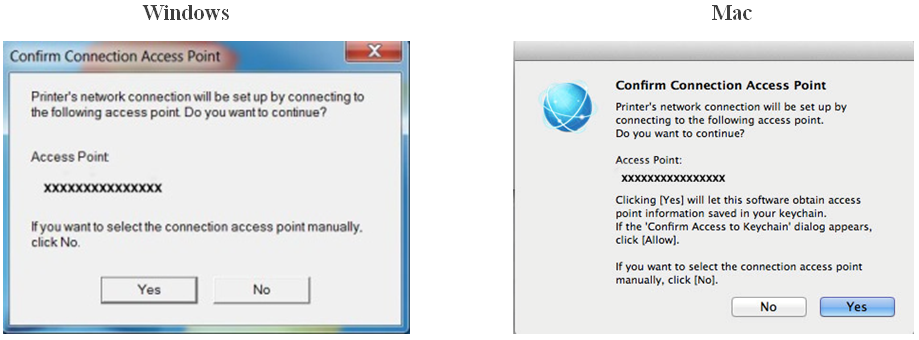 The name of the access point the computer is connected to is displayed (in place of "xxxxxxxxxxxxxxx"). If you want to connect the printer to a wireless network, click [Yes].<Mac users only> [Allow].
![]()
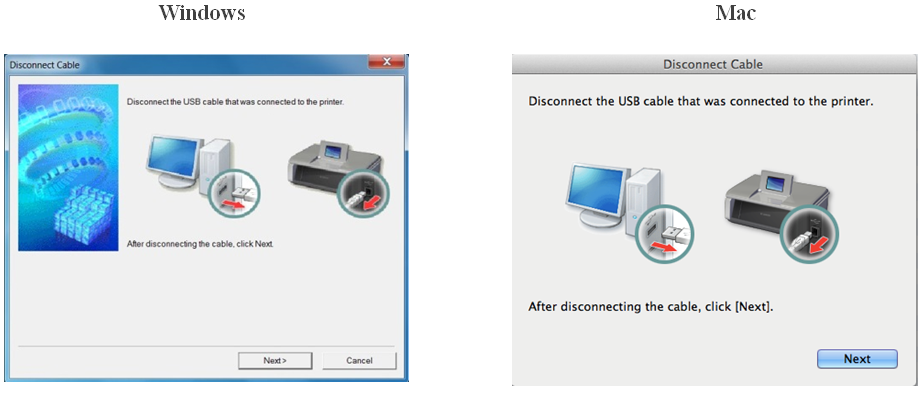
9. After the following screen appears, disconnect the printer from the computer and press [Further].
 <Windows only\u003e When the following screen appears, click [To complete].
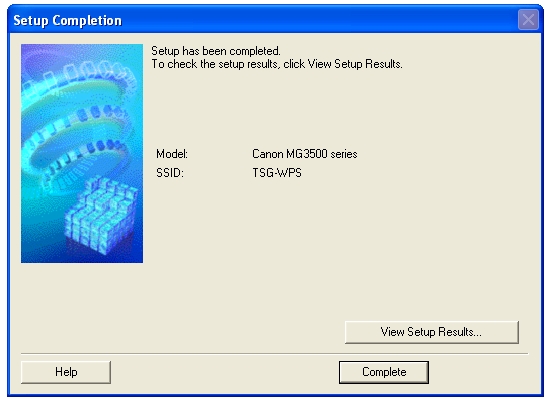
At this setting for Windows ends.
<Только для пользователей Mac> Once the printer is found, the following screen will appear, displaying the name of the access point the computer is connected to (in place of "xxxxxxxxxxxxx"). Click
17 times.2. Release the button [RESUME / CANCEL]The network settings have been reset to the factory default settings. If the procedure does not follow the instructions, contact us for further instructions. Connecting a printer to a laptop is not much different from connecting to a computer. The only difference is that in the case of a laptop there is a wireless connection via Wi Fi.
To connect, you need to connect the USB cable that came with the printer to your laptop. Next, you need to insert the driver disk into the notebook drive. In the absence of such a disk driver can be downloaded from the official website of the manufacturer. If the laptop is installed operating system Windows 7, then it may itself find or update the driver for the printer via the Internet.
It is advisable to copy the driver separately to one of the laptop disks, so that later on it will always be at hand. Driver installation is simple, just follow the installation instructions. After that, the printer will be ready for operation. It should appear in the list of printers. Selecting the installed printer, you must run a test print. If the page is printed, then the installation was successful.
In order for the printer to be available on the local network, it must be connected to a computer on this network and open to it shared. To enable general access, go to the Start menu, then go to the Control Panel, and then to the Printers and Faxes menu. Having found the desired printer, go to its properties and select "access" to share the printer. After that, the printer will be available to other computers on the network.
Many modern printers are connected via Wi-Fi. In this case, you do not need to use cords, which is much more convenient when connecting the printer to several laptops. Wireless connection of the laptop through a router.
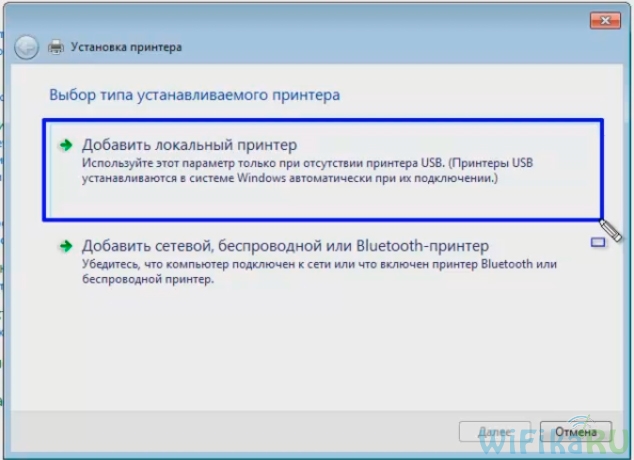
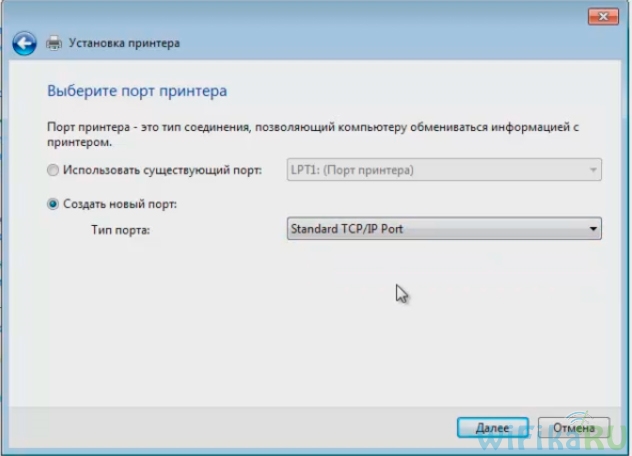
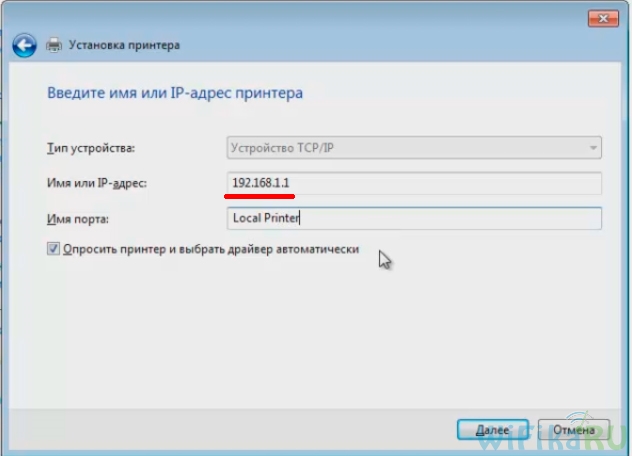
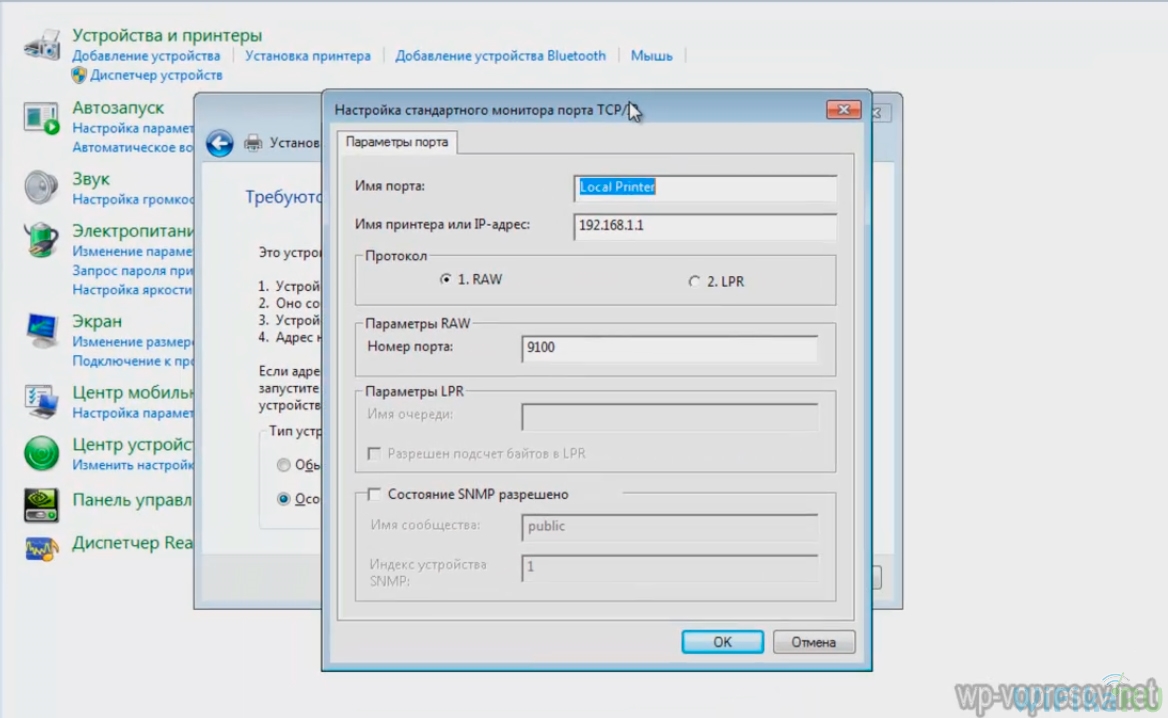
When you connect, you need to go to the "Control Panel" and go to the "Printer Setup" menu. Then you need to select in the new window “Add local printer”. Then put a tick on the item "Create a new port", and select "Standart TCP / IP Port". Then you need to register the local IP address of the router to which the printer is connected. After detecting the device, select the item “Special” and go to the “Parameters” menu. Opposite the menu "Port Name" we register "Local Printer". In the Ip-address menu, write the address 192.168.1.1. We select the Raw protocol. The port number is 9100. Then install the driver from the disk. Since the printer is connected to a wifi router, it is not necessary to share it. Therefore, we tick the "No public access".
The article was prepared with the support of the site shopciss.ru - printers in Dzerzhinsk.
The idea to write this article arose after a question from a blog reader. He referred to an article about the print server, in which I talked about what I had already told you, how to connect a printer to a local network via a router and make it network. However, as it turned out, I gave this information only in the video course. And now I decided to fill this gap and make a text illustration for my video tutorial.
This article will focus only on the most simple office printers or MFPs that do not have a network interface and are connected to a computer via USB. Despite their primitiveness, thanks to the versatility of modern routers, they can be turned into a full-fledged network device that could be used by all network participants. We could, of course, from some computer to which it was connected, but this would cause one inconvenience - the computer would have to work all the time so that the printer could have access. Agree, inconvenient, especially if we are talking about a working machine, and not a small computer, dedicated specifically for working with network devices.
The first thing that is required to connect the printer through a router is the router itself with a USB port.
We connect the cable from the printer to it and then begin making settings in the admin panel of the router. But before that, be sure to install the drivers on the printer - either from the disk that came in the kit, or by finding them on the Internet for your particular model.
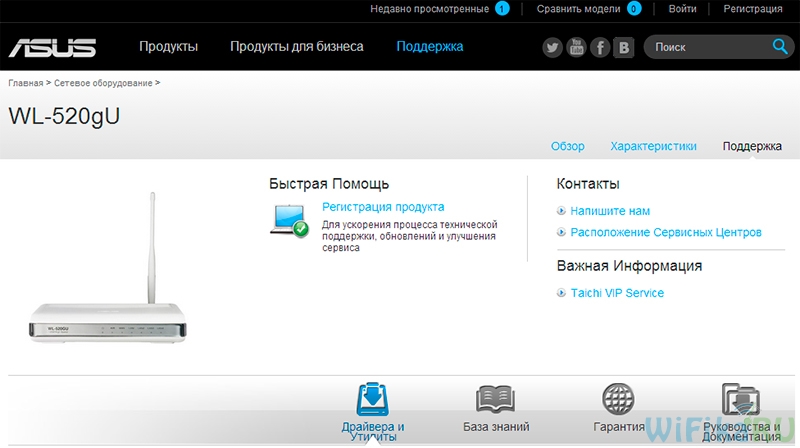
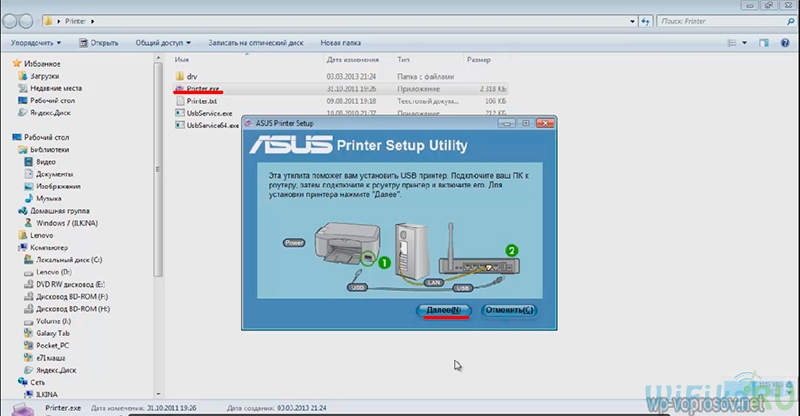
Now we need another disk - now the one that was in the box with the router. We insert it into the drive and look for a program to install the printer on the router. In Asus, it is called Printer Setup Utility (Printer.exe file). It can also be downloaded from the official website of the manufacturer - we find our model on it, open the section with drivers and programs and download the utility.
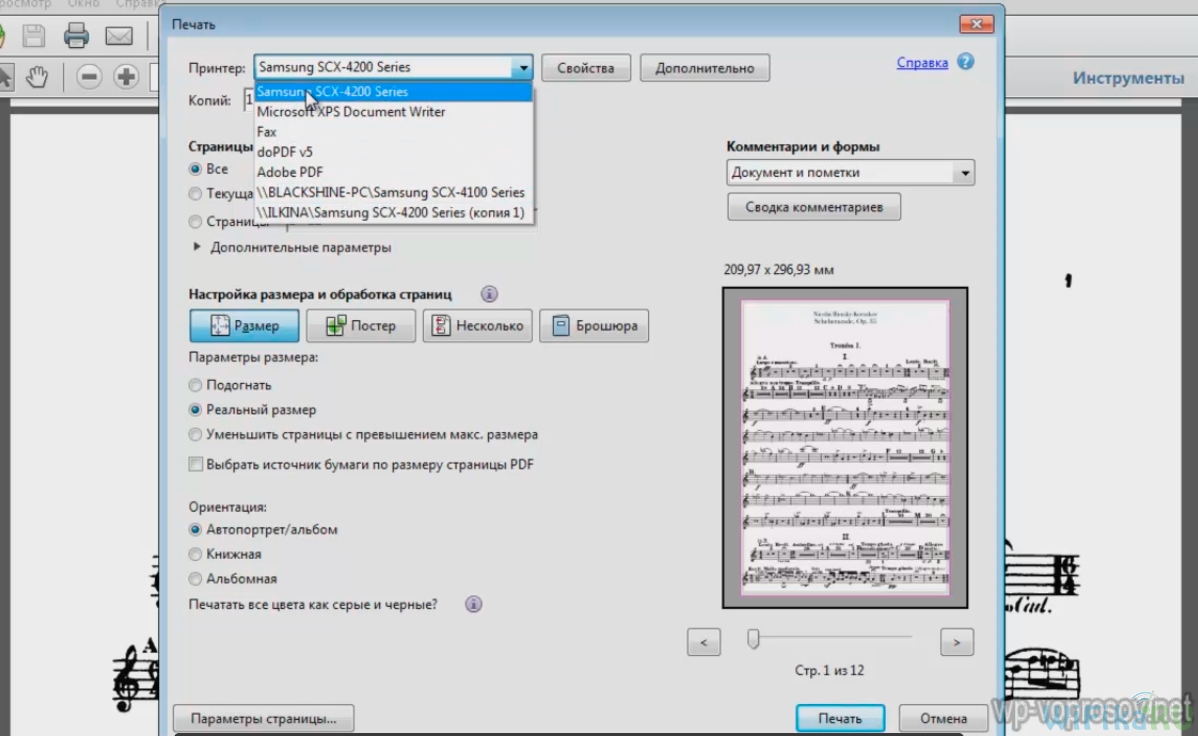
That's all - after this simple procedure, the computer will perceive the printer as if it is connected directly to it. In order for other computers and laptops inside the local grid to see this printer, they also need to just put the drivers from the installation disk.
And this is how it will look like when choosing a device for printing documents:
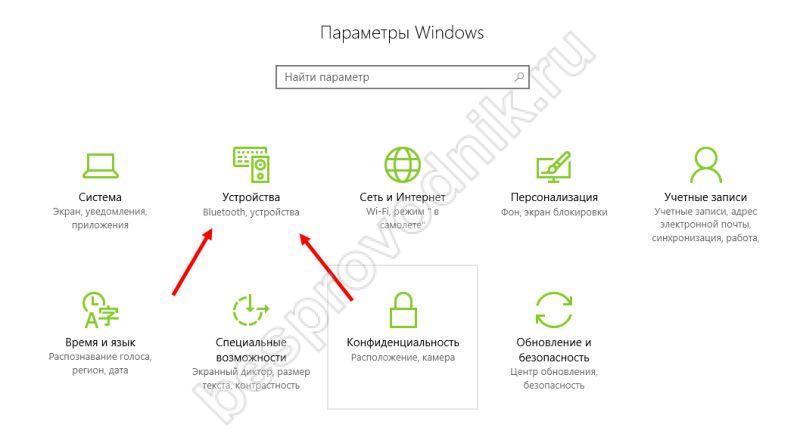
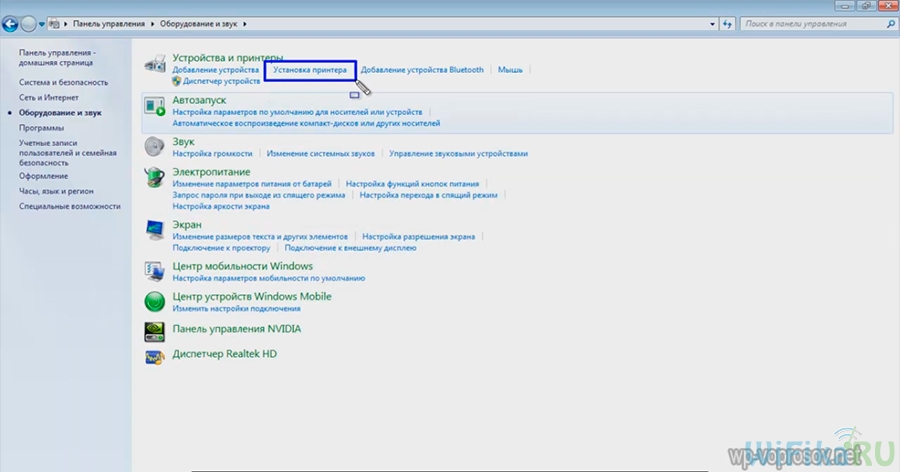
Now consider another way to connect - if you do not have a special utility, then this can be done using built-in Windows tools. Go to "Control Panel\u003e Hardware and Sound\u003e Install Printer."
In the next - put a checkbox on "Create a new port", from the list select "Standart TCP / IP Port".
After that, we register the local IP address of the router to which the printer is connected.
After detecting the device, we get to choose the type of device. We need the item “Special” and click the button “Parameters”. In the new window that opens, set the parameters as in the screenshot.
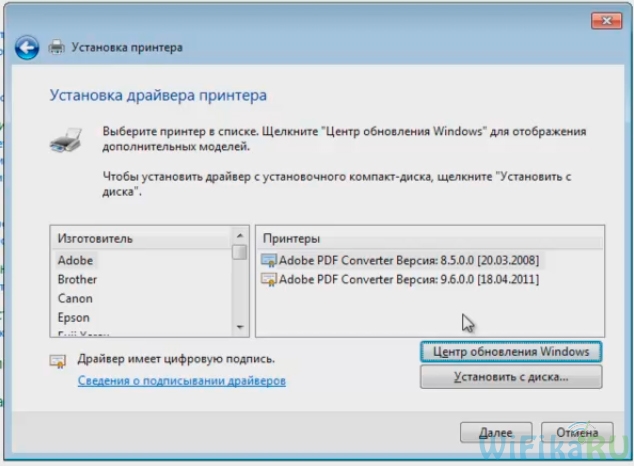
After that, a window will open in which you will be prompted to either use the firewood already in the system or install it again. Since we installed them at the very beginning, we leave the first option.
And finally, sharing - because the printer is connected to the wifi router and not the computer, it is not necessary for it to share it again - it will be so. Therefore, we tick the "No share".
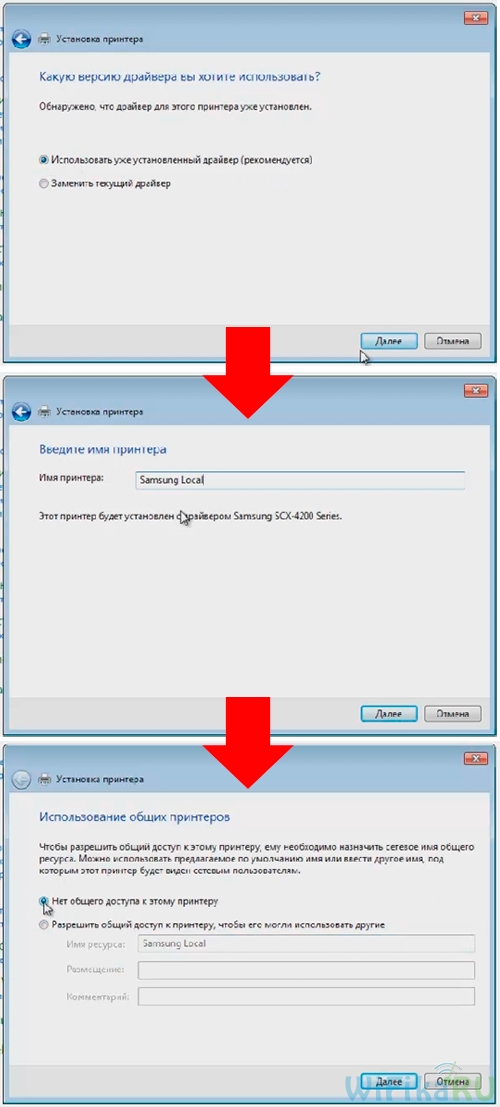
It remains only to make this printer the default and click the "Finish" button.
| Related articles: | |
|
Tea with milk: more good or all the same harm?
What is the use of this "cocktail", and also about whether it can harm, ... Skin antiseptic for hands
On the shelves of shops and pharmacies you can find various means for hygiene: ... Heavy tongue in mouth. Burning mouth
Dry mouth - in medicine is called xerostomia, it is a symptom ... | |


