Reader's Choice


Popular articles
Frankly, not all customers set themselves the goal to turn their apartment into a super-modern living space with a lot of flimsy designs and clever design solutions. Some unnecessary complications of the interior are considered not only expensive but also literally a tedious pleasure.
Whether people are so educated, or their state of health is such that it does not allow to evaluate modern ideas, and maybe everything is much simpler - there is not much money, and you simply want to save money. Anyway, the fact remains that the majority of customers who plan to finish GKL surface prefer simple single-level gypsum cardboard ceilings.
These ceilings, if they can surprise with something, only with their ideally even and smooth surface. By and large this is quite enough for the room to look decent, and it was not a shame to receive guests.
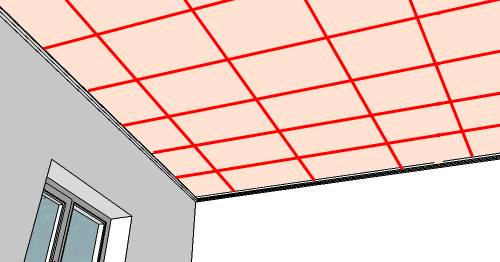
The classic version of the simplest is characterized by the presence of the following main components:

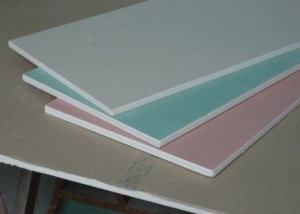
Whatever the constructed ceiling, simple or complex, the material for it needs the same quality. This is especially true for gypsum boards, which may have different purposes:
Most often, ceilings in houses and apartments are sheathed using ordinary or moisture-resistant plasterboard sheets.
Board: If after the delivery of the material to your home it seems to you that he is a little damp, there is nothing wrong with that. The main thing is to carefully bring it into the room and let it sit for a while. In a dry room, literally the next day, the sheets are completely suitable for further use.
The beginning of the main work is preceded by the preparation of the walls and the base ceiling:
The final view of any frame construction, including a single-level ceiling made of plasterboard, depends largely on how the frame is mounted. The mistakes made at this stage will not be able to be corrected by either the dressers or the painters, because if there is a skewed plane, the putty will not hide this drawback.
Remembering the responsibility, we proceed to work by performing the following actions:
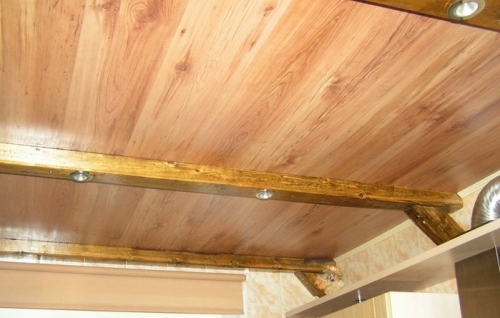
For conventional ceiling frame can be made of wooden beams. You just need to be sure that it will not be exposed to moisture and other deformations. The bar used for mounting the frame must be dry, otherwise it is possible that the ready-made construction will begin to deform after the wooden frame has dried. For reliability, the tree is pretreated with a moisture barrier and dried.
Perhaps this is the main thing that you need to know about the installation shown below in the photo frame single-layer coating of drywall.
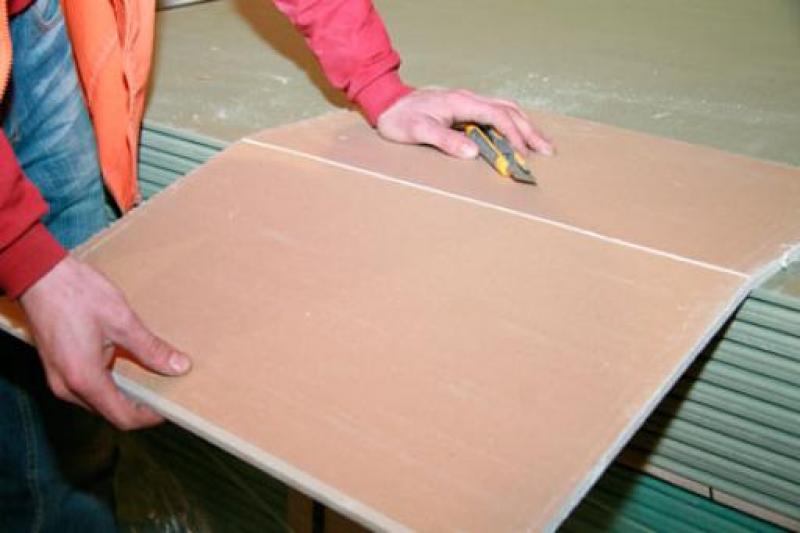
At the edges of the gypsum board where there is no technological groove for applying putty, it is necessary to cut the chamfer at an angle of 45 ° using a special plasterboard plane. This can be done even after the ceiling is installed, but processing the installed sheet is more difficult to carry out, and the garbage can fall down into the eyes.
On a note: It is easiest to cut drywall on a flat surface. To cut a whole sheet, first along the rule, ruler or other flat object used when cutting, to hold a knife, cutting through the outer layer of paper. Then, lifting the sheet, you just need to break it along the cut line.
Usually this is done without difficulty, and the fracture is obtained straight. Now it remains only to cut the second side of the paper with a knife, keeping the sheet from falling or shifting.

To reduce the load on the frame structure for covering the frame, it is better to use gypsum boards with a thickness of 9.5 mm. The fewer fragments will be used, the less seams will have to be patched. A construction made with a minimum number of seams is more durable, and the probability of cracks appearing on it is minimized.
We take into account some tips that help to perform the installation of drywall:
Now the ceiling is ready for sealing and final finishing.
As can be seen from many photos, a high-quality, simple, drywall ceiling looks simply exceptional. It remains to finish the design of the room, choosing a good wallpaper and reliable flooring.
Coffered ceilings in our time received a second birth. It cannot be said that caissons in modern architecture serve as a supporting structure, but as a decorative element in modern interior design, they are actually used for a very long time. You can see in many historical films, along with luxurious ancient castles, ceiling cassettes of a certain configuration and carved wooden beams that form distinctive cells and rectangular sections. Well, let's try to revive caisson ceilings of great beauty at home?
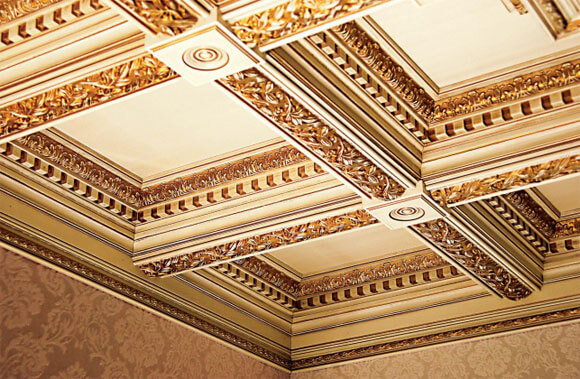
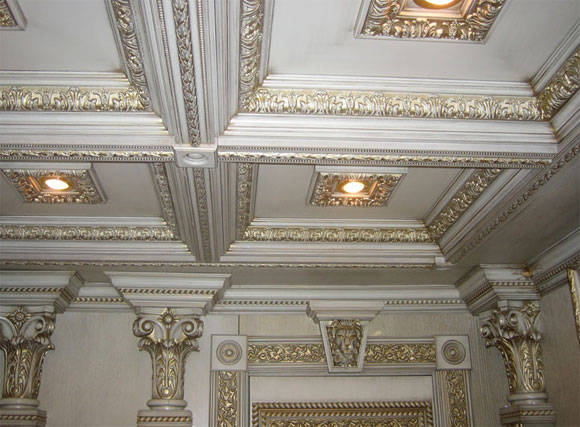
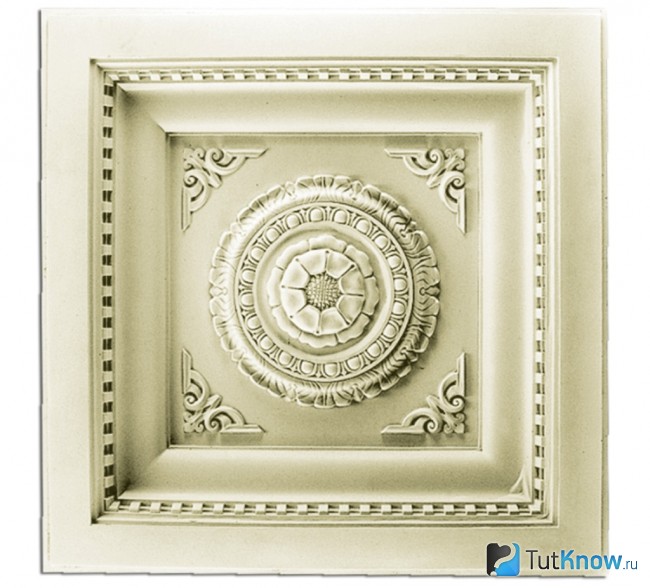
The caisson (lacunary) ceiling is a special type of ceiling that consists of recesses, beams and cells (a “caisson” is a polygonal recess). Still such ceilings are called decorative. As for the caissons, they can be not only square, but also round. Among the caissons are known transverse and longitudinal beams with an ornament, stucco rosettes, cornices, curbs, shaped transitions to the walls, painting on the surface of the ceiling.
Caisson ceilings invented in ancient Greece. At that time, they performed a practical function rather than a decorative one - they reduced the mass of the slabs, thereby making it possible to remove the excess load from the beams. For beauty, they were simply decorated with drawings and modeling. This technology is very old. This is evidenced by the findings of archaeologists found during excavations of the necropolis, when ceilings of this type, dated 7th century BC, were discovered. e. During the Renaissance, wooden coffered ceilings were popular. Then they trimmed the palaces.
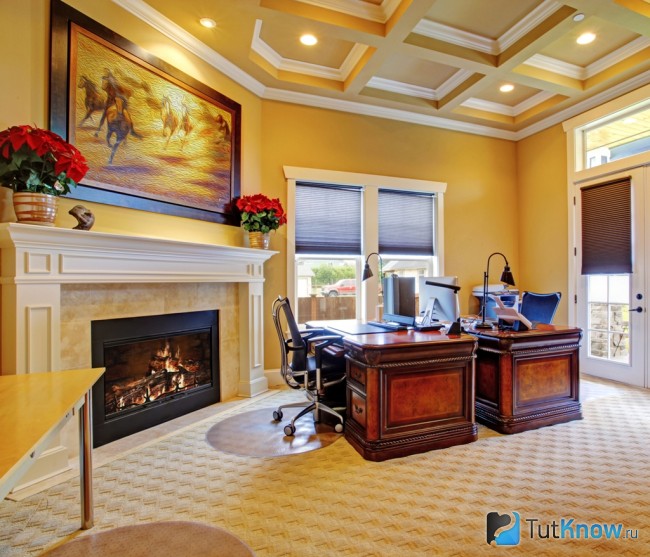
Caisson ceilings can undoubtedly give an inspiring look to any room, be it a living room, bedroom, study, billiard room or library. This type of ceiling decoration is also appropriate in a prestigious office, because it expresses the power and status of the company. In addition, the coffered ceiling looks great in a country house or cottage, decorated in a classic style. Such a ceiling allows you to make the design easier and create good acoustics.
Most often, this technique is used in rooms with high ceilings, where the impression of a huge space. Caisson ceilings are made in rooms whose height is not less than 2.5 meters. In small rooms such a ceiling will not look quite impressive. You should also take into account the architectural style, but if you like to experiment and create something new, you can choose caissons of different shapes and styles (but, of course, such styles as high-tech and pop art do not allow such a ceiling design).
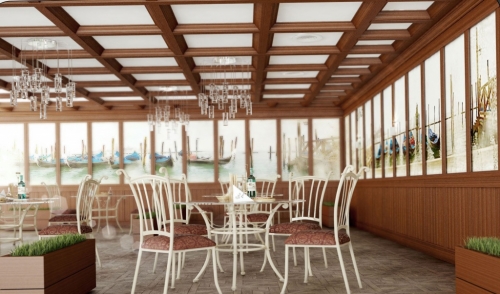
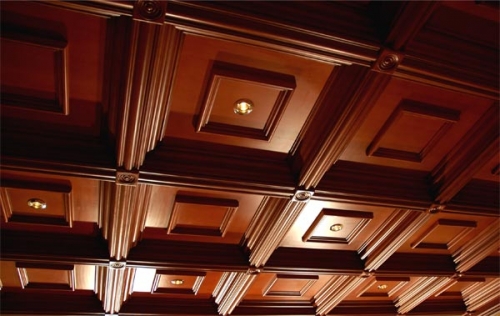
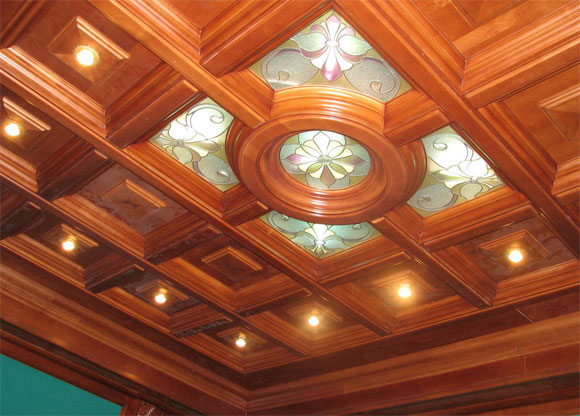
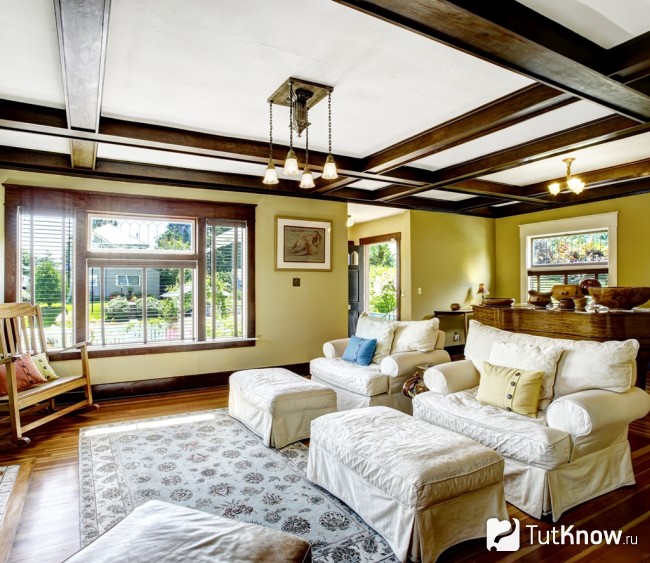
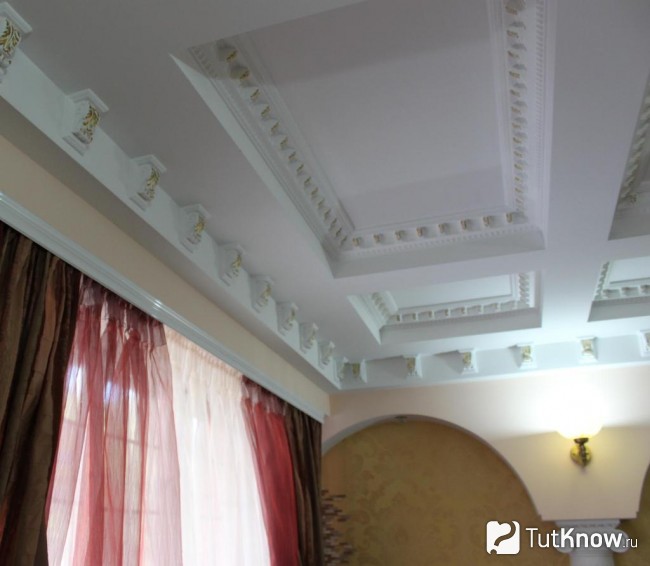
Caisson ceilings are an excellent solution for buildings of the old type, the height of which walls is close to 3 meters. However, in this case, another problem arises: sometimes you want to shift, lower the ceiling so that the room gets the correct proportions, and the person does not feel locked in a huge box. Decorative wooden plates of brown color will come to the rescue, as in the photo of the coffered ceiling.
Caisson ceilings can be used not only for decorating the ceiling vault, but also for decorating the internal surfaces of arches. The design of the coffered ceiling skillfully hides the irregularities of the existing bearing floors and eliminates the need to level the surface before finishing. With this ceiling design, it will be easy to hide the ventilation ducts, air conditioning pipes and electrical wiring to the luminaires. Ceilings are ideal in terms of geometry and protected from various kinds of deformations.
Making repairs in his apartment, few people think that the technologies and methods widely used today have an ancient history and were invented a long time ago. Coffered ceiling - one of these techniques. This interesting technique allows you to make a home original and cozy, in addition, it has a rich history. In their essence, caisson ceilings are a kind of favorite suspended ceilings, which are already a bit fed up and have lost their relevance.
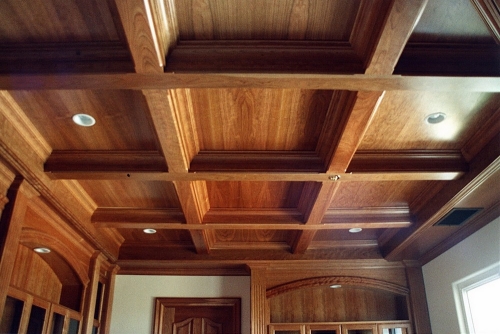
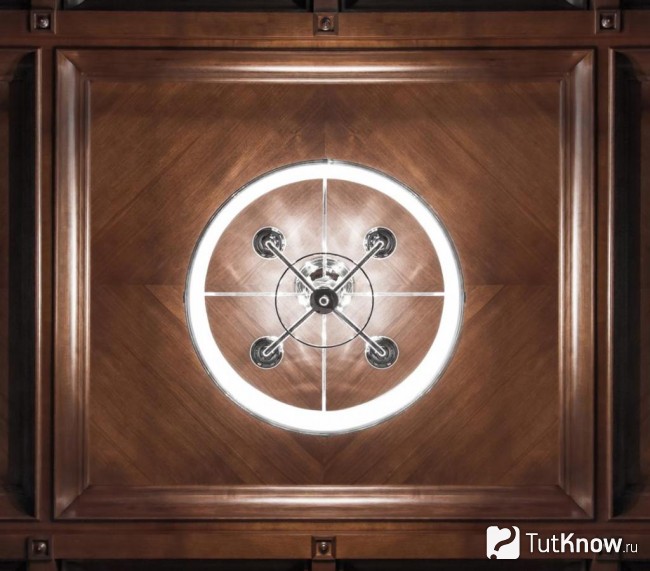
Coffered wood ceilings are very practical and beautiful. They look rich and unusual, creating an impression of luxury and comfort in your home. Wood is an environmentally friendly natural material that you can use while making repairs and not worry about the health of people close to you. Basically, for the manufacture of coffered ceilings used walnut, ash, oak, and sometimes materials that are much more expensive than the above. An unusual design is also created due to the fact that the natural pattern of the tree itself is always very beautiful and unique in itself, its texture is unique.
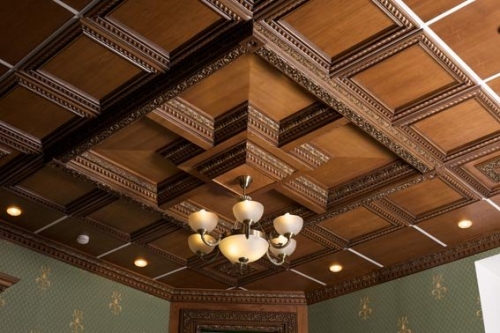
This ceiling will hide the irregularities of the ceiling (or ventilation system) and will serve as a unique decoration of the room. But the price of coffered wood ceilings is very high and depends on the type of wood and the complexity of the work. And if you have chosen inexpensive wood for the ceiling, then you can give the texture expressiveness and reveal its beauty even more by applying on cassettes, lining or panels of varnish or wood stain. It is this treatment that will give the most inexpensive types of wood an impressive and elite look.
The caisson ceiling from MDF panels is the cheapest construction, but at the same time it is also a great alternative to natural wood. If you properly handle the MDF panels, you will get an unrivaled and elegant result.
Another advantage is the ease of installation, which is not the case with wooden cassettes. However, MDF panels have such negative qualities as exposure to moisture, high flammability and low resistance to mechanical damage and deformation.
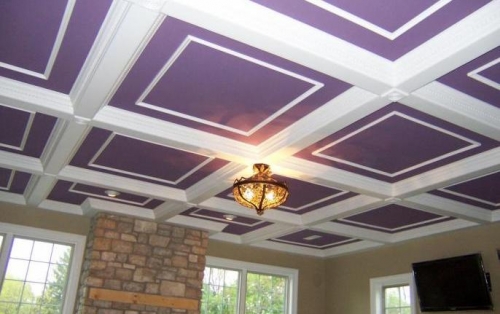
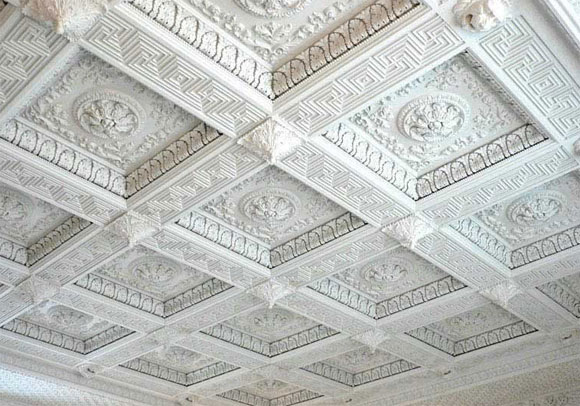
Gypsum plasterboard ceiling - a cheaper option that will allow you to save your budget (not to be confused with the plaster ceiling, because it involves manual modeling on the surface). This type of ceiling will suit you if your home is decorated in Empire style, Baroque and has large windows and high ceilings. A caisson ceiling made of plasterboard implies that a framework will be made from plasterboard, which can be decorated with plaster cornice.
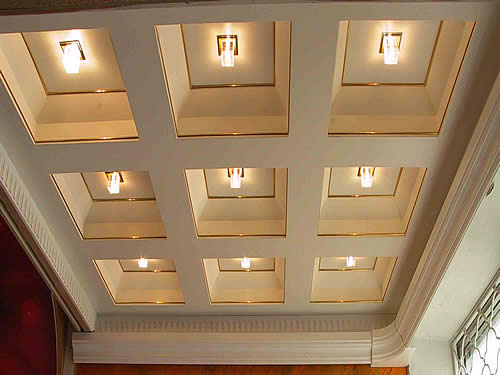
You can also provide sockets as an additional decoration material. Also in such a ceiling is convenient to sew the lighting system. There is another technique for creating such a ceiling - the absence of a frame, but the caissons are made of gypsum cardboard, all parts of the ceiling need to be joined in a puzzle style so closely that the design looks solid and complete.
Caisson polyurethane ceilings are used primarily for decorative purposes. They are very light, which can not be said about the designs of wood, but a little more expensive than them. You can make caissons for specific sizes to eliminate costly cutting and speed up the installation process.
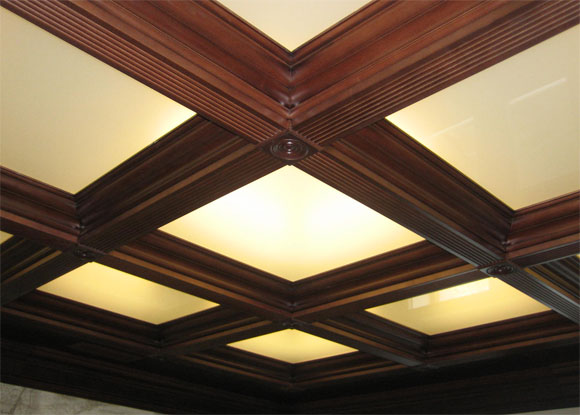
Caissons from polyurethane with correctly selected and located illumination will look very elegant. Also, these products have gained popularity due to the symmetry of all cassettes, the ease of giving them the desired shade, high moisture and fire resistance properties.
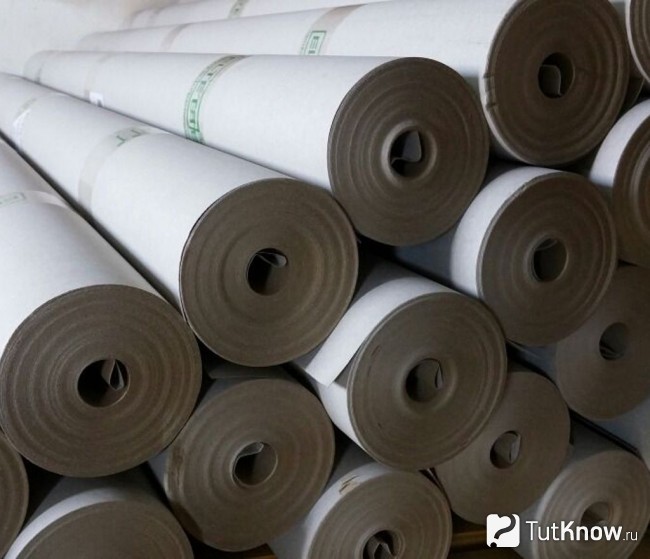
Widely used also caisson ceilings made of paperboard. Beams are made to glue on wood glue, you can cover them with self-adhesive film, which imitates some texture (wooden, for example). But you need to glue it when the ceiling is ready, that is, when all the beams will be glued.
If you do not wish to entrust such work to professionals, you can make a caisson ceiling with your own hands, carefully following the instructions and all the instructions.
Remember again that caisson ceilings can not be done in all modern homes, because such a design in homes with low ceilings would be superfluous, and even more - totally inappropriate. The height of the ceilings in the house should be at least 2.5 meters, then you will have a chance to experiment.
But if you have a great desire to create such a ceiling in your apartment, and the height of the ceiling makes you want the best, you can still take the risk, but choose thin panels and always light colors. When working on a coffered ceiling follow the general rule: the larger the room, the more you have to use beams for its design. For work they usually use standard strips that have a height and width of 12-15 centimeters, although it is necessary to take into account the height of the ceilings and the overall dimensions of the room.
Beams in apartments with low ceilings should be placed in the openings of doors and windows, which creates a visual contrast with the recesses present and “moves apart” thereby the space. Remember that it is not recommended to equip caisson ceilings in rooms with dark furniture and poor lighting, as they are able to create a depressing, unpleasant environment.
It is also important to remember some secrets of installing a caisson ceiling. For example, if you chose white color and decided to move the ceiling down a few centimeters, you risk creating an unusual effect that the ceiling falls on your head. Be careful and attentive when choosing the color of the future ceiling. If you need to make the room smaller and cozier, stop at the color brown, it will help to create warmth and harmony.
Think over the composition. You can buy wallpaper with a beautiful ornament or create moldings. You can use the application and stencil painting, paste flowers, architectural details. The center of the ceiling is better to make more elegant and bright.
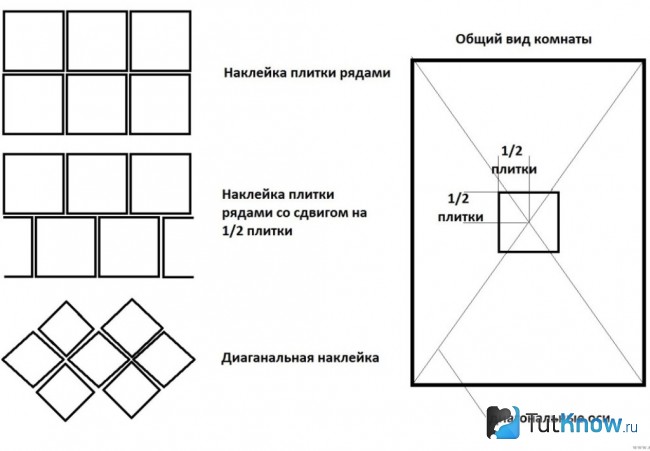
First, draw a sketch and decide on the composition of the future ceiling. Do not forget to take into account the height of the ceilings in your home and interior. Everything should be harmonious and neat. To determine how much material you need to create a coffered ceiling, find the center of the room and create a preliminary drawing by drawing the locations of the plates.
Going to the store for materials, take a drawing with you. Remember that to the ceiling you need to carefully select the wallpaper - they can be very simple, but you can stay on the wallpaper with a picture, as long as everything is combined. But the most win-win option - light wallpaper, which are glued before the arrangement of the ceiling.
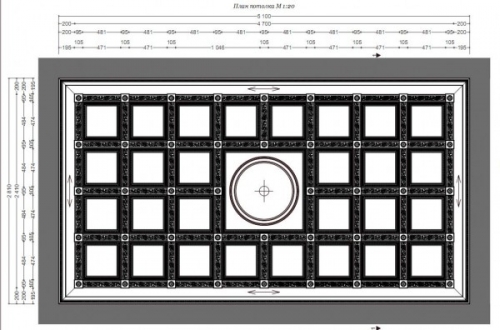
First of all, you need to buy blanks, of which you will create the design of the coffered ceiling. The simplest option in creating a coffered ceiling would be to buy ready-made individual squares (modules that will play the role of caissons) that glue onto the ceiling. Over time, of course, they can come off, and this is a big drawback of this option. The pitch of caissons should be approximately 80 to 100 centimeters for a standard ceiling height.
To create a coffered ceiling in the ceremonial rooms, pine or other natural wood is most often used, and chipboard is suitable for residential apartment ceilings, which is easier to use and process. Such material, which will be additionally upholstered with natural veneer of beech, spruce or oak, will acquire a bright texture and an attractive appearance. In addition to wood and light wallpaper, you will need glue paint, high-quality glue for wood, nails, a saw, a square and an exact ruler.
For greater reliability of fixing materials, it is necessary to prime the ceiling surface. If the primer is absorbed very strongly, then the surface should be coated after drying with another layer. Under caisson ceilings, it is recommended to glue the wallpaper. Pick a picture with a small structure or monophonic. It is better to glue wallpaper together, smooth them with a special plastic spatula.
To begin with on the surface of the ceiling, create labels on which you will apply the grid construction. First decide on the location of the central plank, which, depending on the configuration of the space, passes in the middle of the ceiling or deviates slightly to the side.
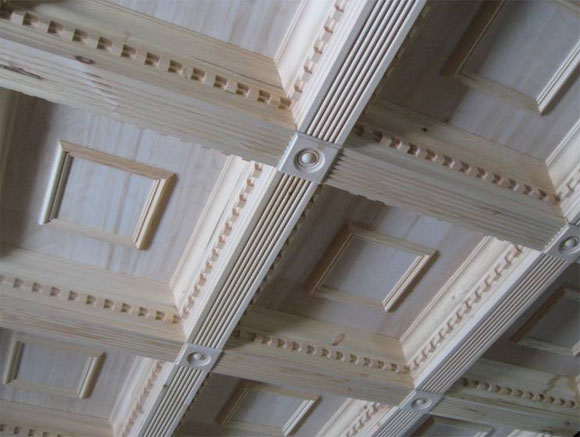
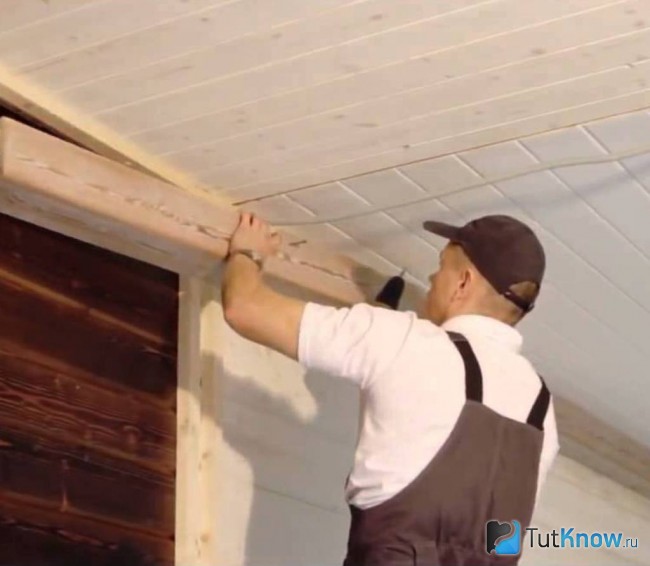
The main detail of the caisson ceiling is the supporting beams, which have a complex box-like structure: they are nailed to the ceiling in a certain order, creating an ornament. Having decided on the location of the main part of the coffered ceiling from wood, one should proceed to the manufacture of the box beam: cut along the length of the ceiling the bar, on the sides of which small planks are nailed at equal distances.
Then attach the assembled frame with nails to the ceiling, carefully checking the layout plan. After that, it is recommended to measure the dimensions and cut the slats that will cover the sides of the structure. Finish the work on the frame by closing it from below with a board that fits exactly. For fixing composite parts of the construction of the coffered ceiling, nails are used most often, however you can join small fragments with wood glue. The main thing is to choose reliable brands and perfectly follow the instructions for its use.
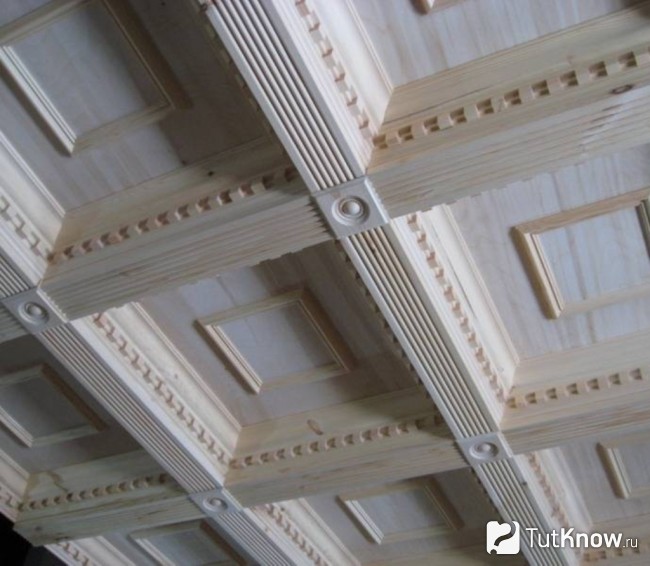
Next, make the box bars and place them to the central structure in parallel, according to the designed sketch. When all longitudinal planks are attached to the ceiling, it is necessary to proceed to the installation of transverse structures, work on this requires a lot of attention. Apply them strictly on the applied marks, attach special importance to processing the corners that are adjacent to the longitudinal details of the lattice. Wooden caisson ceilings only with careful processing of composite parts will look solid and festive.
You can also use thin profile slats for processing the gaps, which are used differently, but in any case, new expressive accents are added to the design of the housing. In addition, you have a few more options for finishing the surface. You can cover the entire caisson ceiling with paint. It is also possible to paint the structure partially or with several paints of different colors. In addition, for this purpose, you can use a specially designed film.
If you work with ready-made plates so that the patterns and drawings come out beautiful and even, attach the first tile in the center of the room, so it will be easier to navigate. It is necessary to glue the ceiling caissons with the help of mounting glue, at this time it is important not to stain the wallpaper. Check the proportionality of the corners of your room. If any angle is wrong, attach the caisson, retreating a few centimeters. You can draw lines on the ceiling where the beams will be placed. Fasten the plates with staples, and their connection - insert spikes.
Plug-in spikes will not be strong enough and reliable. For full fastening get decorative slats. They need to be inserted into the gap between the plates. It is best to pick up double slats. The thickness of the rails that will pass along the walls should cover all indents and flaws. This will help the room to find the right features. If you use plaster elements in your work, fix them with self-tapping screws, and use construction glue for cardboard beams.
Now you know how to make a coffered ceiling! Having created such a design with your own hands, you will understand many subtleties of this enthralling process and learn how to create unique ornaments - elements of the decor of your home. The presence of created beams and sculptures performs an exclusively decorative role, however, like the entire coffered ceiling, because in modern homes its practical function fades into the background.
Ceiling with caissons is becoming increasingly popular. Modern architecture uses caissons not as a supporting structure, but as an element of interior decor. Similar elements can be found in many historical films: these are carved wooden beams, and castle decorations. But what about the usual apartment? Let's try to figure out whether it is possible to equip a caisson ceiling made of polyurethane at home.
The coffered ceiling consists of cavities, beams and cells. In other words, a “caisson” is a polygonal groove. Similar ceilings fall into the category of decorative ceilings. Caissons can be both square and round. Its singularity emphasize transverse and longitudinal beams with an ornament.
Also in architecture are popular:
Coffered ceilings were first invented in ancient Greece. At that time, they performed more practical than decorative function. Caissons reduced the weight of the plates, thereby unloading the beams. To give the elements a beautiful look - they were decorated with drawings and modeling. Thus, the technology was invented in antiquity, as confirmed by archaeological finds in the necropolis. Not by chance were found ceilings of this type, dated VII century BC. er The next heyday of caissons fell on the Renaissance, when coffered wooden ceilings were popular. Of course, it was quite expensive, and the decoration took place only in the palaces.
Caisson ceilings significantly increase the floor space: living room, bedroom, study, billiard room or library. This type of ceiling decoration is also used in offices when they want to emphasize the solid status of the company. The caisson ceiling will be suitable for a country house or a cottage. By arranging coffered ceilings, you can reduce the overall weight of the structure and improve acoustics.
Often, the installation technique of caissons is used in rooms with high ceilings. Thus, an impression of impressive volume is created. Caisson ceilings can be found in rooms with a height of more than 2 meters. In small rooms, the ceiling will have no effect. Be sure to consider the architectural style. However, if you prefer something non-standard and modern, then choose caissons of different shapes and styles. It should be remembered that the high-tech and pop art styles do not allow for the coffered ceiling design.
Caisson ceilings are an excellent solution for old buildings, with a height of 3 meters. But in such cases, there is a desire to move or lower the ceiling. I want the room to get comfortable proportions for a person, and there is no feeling of being in a huge box. There is a way out - and this is a coffered ceiling made of wood.
Purpose of caisson ceilings - arrangement of the ceiling leaf. However, such ceilings can be used in decorating the internal surfaces of arches. The design of the caisson ceiling with ease will hide all the irregularities of the bearing floors. Thus, you will not need to level the surface before finishing. Also, the design of the ceiling acts as a "safe" for ventilation ducts, for air conditioning pipes and wiring to lamps. Ceilings will pleasantly surprise with their geometry and protect against various deformations.
Being engaged in repair in your apartment, you use a variety of techniques and technologies. However, you hardly know that they were invented back in antiquity, and are still relevant. Coffered ceiling - just one of the oldest techniques. In addition to its useful properties, ceilings have a fairly rich history. Caisson ceilings - this is one of the varieties of suspended ceilings. But they, of course, have differences.
Caisson wood ceilings are quite comfortable and aesthetic. Thus, your home acquires elements of unusual luxury. A tree in its essence is an environmentally friendly natural material that will in no way affect the health of people in the house. Most often, walnut, ash, oak or more expensive materials are taken as the basis for the production of coffered ceilings. Unusual design is primarily a natural pattern of the tree itself. Due to this, each wooden coffered ceiling will be unique, and will also have a unique texture.
The ceiling can easily hide the irregularities of the ceiling (ventilation system) and can be an innovation for a regular room. However, in terms of cost, wood ceilings are the most expensive of all coffered models. This includes the type of wood and work process. Applying lacquer (stain) on cassettes, wall paneling or panels will help to give an expression to inexpensive wood. Such processing is not costly, and the wood will get a solid look.
Caisson is the cheapest design. But at the same time, it is a successful alternative to natural wood. We recommend to refer to the photo to compare the main and alternative panels. With proper treatment of MDF panels, you will get the best result.
Perhaps the main advantage is ease of installation, unlike wooden cassettes. However, MDF panels are afraid of moisture, fire and all sorts of deformations. In other words, it is the most vulnerable of all coffered elements.
Gypsum plasterboard ceiling - in financial terms, not much hit on your wallet. Gypsum ceiling suitable for houses in the Empire or Baroque style (large windows and high ceilings). In this case, we are dealing with a plasterboard frame that can be decorated with plaster cornice.
Installation of sockets, as an additional element of a decor, will not be superfluous. The ceiling allows installation of the backlight. In the alternative, the frame itself may be missing from the ceiling. Plasterboard caissons and all parts of the ceiling need to dock as tightly as possible. Only then the construction will turn out to be uniform, and will not create additional inconveniences.
Caisson polyurethane ceilings - is primarily an element of decor. The whole structure is notable for its ease, which cannot be said, for example, of wood constructions. Polyurethane materials are quite expensive, but you can make caissons for specific sizes. Thus, you will eliminate costly cutting and speed up the installation process.
With proper combination of caissons from polyurethane and lighting, you will get a rich and practical element of decor. Polyurethane products have symmetrical cassettes, a wide range of colors, as well as high moisture and fire resistance characteristics.
Another type of caissons - ceilings made of cardboard. Beams are usually glued to wood glue. There is also the option of using self-adhesive film that mimics wood texture. It is important to remember that such a film should be applied only after the installation of all beams.
So, we figured out what a coffered ceiling. It's time to move on to the installation of such structures. For this, we have prepared a special instruction, which we will discuss below.
Thus, you learned about the creation of coffered ceiling of various materials. Happy repair!
The caisson ceiling is a classic, proven by time and not losing popularity in our days. Consider its features, materials used, as well as recommendations for installation.
This method of surface finish is very ancient, but it has not been forgotten until now due to the large number of advantages:

You need to choose a suitable model based on your budget and taking into account the characteristics of the room in which you plan to install. In particular, it is necessary to take into account the temperature and humidity conditions in it.
To avoid such problems, it is necessary to skillfully combine elements, adhering to the following rules:
Please note that in addition to the finished plates produced a wide variety of decorative elements: baguettes, rosettes, moldings. With their help, you can create interesting effects on the ceiling. Do not forget also about the organization of lighting, which will organically complement the design.
Although the suspended structure hides minor irregularities of the coating, you still need to prepare the base ceiling for this:
The color of the wallpaper and its texture must be thought out in advance. It is important that the background is not only combined with the beams, but also “echoes” with the individual elements of the decor in the interior. Usually choose wallpaper monophonic, but allowed products with a soft texture. Otherwise, the ceiling will look "overloaded."
In the process, follow these instructions:
Note that the ceiling can only be done in such a way only in rooms with a ceiling height of 2.5 meters, since the construction will take a length of up to 20-25 cm. Otherwise, you can choose thin strips.
Before installation, leave the tree for a few days in the room that you are going to finish. This is necessary to adapt the material to temperature and humidity. Also, wood should be treated with antiseptic formulations to protect against mold, fungus, rodents and insects.
It is necessary to work with them in this order:
Installation of caisson ceilings from MDF is as follows:
Works are performed according to the following plan:
Work must be done carefully so that the adhesive composition does not stain the wallpaper. It is not necessary to carry out further finishing of the caissons, since these models are made in different shapes and shades, and therefore you will definitely find a suitable option among the variety on the market.
Original beams are made in this order:
| Related articles: | |
|
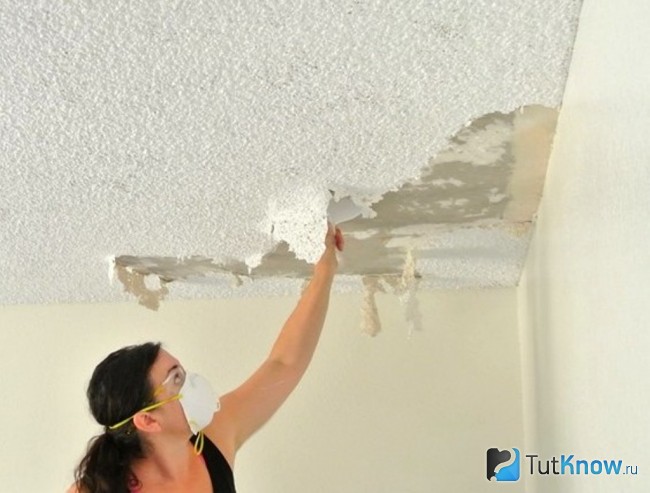
The ceiling of plasterboard do it yourself
Frankly, not all customers set a goal to turn ... How many minutes to cook the corn so that it becomes soft and tasty
But there is nothing better than freshly cooked corn on the cob. I cook ... Foot Polish: choose according to the rules
Feng shui has long been popular not only in their homeland, but also ... | |


