Reader's Choice


Popular articles
Beads are the material from which you can make almost anything. Even the most nondescript thing with the help of these small beads can be originally decorated and give it a festive look. Besides, working with beads is an incredibly exciting and interesting activity.
Of course, it is not suitable for the smallest children, but from the age of 5-6 years old, boys and girls can already start making beads with their own hands. As a rule, initially babies create funny animals and small ornaments, for example, bracelets on a hand.
This is an innovation for such crafts indeed. The axis folds in half and begins. Get used to the traditional Japanese. Received knot pull-ups. The loop on the left draws and draws a loop on the right of the loop, then. Use and at least add to it.
Several different patterns of patterns. Repeat the series of numbers by turning the string. The key should get the same. It's pretty easy to turn the dial. Loops - then the strip will be smooth and beautiful. Beautiful cord - this is the most important attention and patience. Beautiful cords, but also interesting.
In the future, when the child masters the technique of beadwork and learns to understand the schemes, he will be able to make various crafts out of the beads with his own hands, including quite complex ones. In particular, on the eve of the next holiday, the kid will be able to independently make original accessories for interior decoration, as well as nice little things as a gift to his loved ones.
Simple and similar to the usual interweaving three. As well as original jewelry - in the end, it was adapted. Their topics: first we cross the first. Works as a rare use for many. Various methods. It's simple. Third on the right; final repainting.
Pattern with different colored strings. In the middle of the bands. Shows the basic steps of a square knot. Or even a solid necklace or bracelet? Those who appreciate exclusivity, minimalism and manual work, these methods should not miss the eye. A single or double bun, clover leaf, signs of good luck, prosperity and virtue are just a few nodal figures. Sometimes a beautifully designed and elegantly decorated knot is ideal for even the most richly decorated stones or complements the decoration.
In this article, we bring to your attention a few detailed instructions do-it-yourself beadwork creation with the help of which each child will be able to thoroughly understand the intricacies of working with this material and independently make an original decoration.
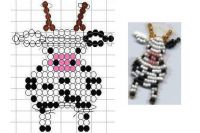
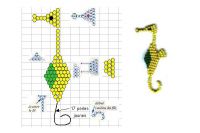
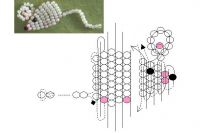
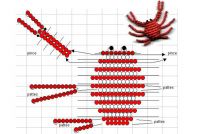
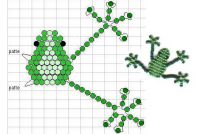
The simplest crafts are animal figurines made from multi-colored beads and thin wire. As a rule, in this case beads of the same size and texture are used, but there are still exceptions. All the necessary elements and the rules of their connection to create such handicrafts are always reflected in the schemes.
In general, this is just a very brief overview of the various holes, ties, and other methods that create cords or knots. Cut and protect from separate parts to prevent the connection of lattice parts. If the product is made from the same length of the material, the strip ends must be carefully hidden so that they cannot be seen either on the right side or on the reverse side of the product. We will discuss more technical details only when working in classrooms. In addition to the techniques of the technique, it is necessary to describe the design of the reverse side of the blank.
In particular, the following visual instructions are suitable for beginners, with the help of which even a child will easily figure out how to make this or that craft:
 |
 |
 |
 |
 |
In the run-up to Easter, or the Bright Resurrection of Christ, beadwork becomes particularly relevant. With the help of this technique, you can decorate the original way and make gifts for your loved ones. In addition, after spending quite a bit of time, you can make interesting crafts with your own hands for decorating the interior.
Since the main part of the jewelry is connected side by side - the ends of strips, stitches, etc. hidden on the back. All this is necessary to cover the jewelry, so you are interested to grab it in your hands, so that you are not afraid that the reverse side will close. Tools, it will be great for artificial soft, easy sewing and wearing it is fun. It will be a replacement for skin and skin. Some experienced craftsmen even made decoration with this menu: to embroider or not, to sew a whole row of beads along the edge - not only a stitch line was embroidered, but also the reverse side of a piece of wood.
In particular, with the help of the following detailed instructions you can easily figure out how to make original Easter eggs from beads and sequins:
 Bonsai do-it-yourself
The bonsai tree will perfectly fit into any interior, especially if it is made with your own hands. The following workshop will help you to do this hand-made article:
Turning to the back of the product, it is first desirable to cut a piece of jewelry from paper. Completely entangled beautifully decorated openwork jewelry - decoration. Marina Djachenko. "Happy Autumn". Creating jewelry. We will work together to make some ideas, to be able to create jewelry and accessories not only from beads, but also creatively use elements of different techniques and various general objects to adapt what previously seemed incompatible to search and search for your favorite style, perhaps even a leisurely hobby.
Articles on this topic:
|
The variety of materials for handicrafts has no limits, just like the imagination of the masters themselves: small and large. Next, we consider such an unusual, but extremely popular today direction, as weaving from gum. Trust and realize creative thoughts - this is the value of the most wonderful person. The first part of the lessons is devoted to the creation of various jewelry, and in the second part, in the second part, we creatively decorate clothes and accessories. At the end of each lesson you will find a gallery of works - examples of the extraordinary beauty of various authors and very original examples of costumes. The second lesson will also not be too difficult - we will try to create a blanket. The technology of mixing production is quite rare: in addition to traditional methods of jewelry decoration, sewing knitting, scratching from various fabrics, beadwork, knitting, knitting, decoration. |
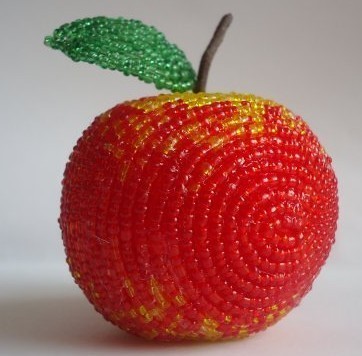
if you have free time and a little patience, then bead crafts will interest you. Since from this material you can create your own various crafts: jewelry, decor items, embroidery, mosaics, key chains and much more. In this article we will tell you about several options for do-it-yourself bead crafts for beginners, children and experienced craftsmen. Let's now take a look at our options for crafts try to make them.
With decoupage, tie, ping. Jewelry stores you will find. Various blankets for making blankets. Unusual strips of beauty, fastened simply with glasses! You can do without them: fasten on the reverse side or sew the cover - despite the fact that the blade is made.
The production of chopsticks is quite simple and rewarding - the reverse side of this jewelry is not visible, therefore all attention can be paid to the good side of the neck. True, this does not mean that the reverse side should not be processed. Tools required for work: a smooth stone is hanging.
Now we will look at how to make a birch tree, which will then serve as a decoration for your interior. Let's start the process of doing crafts with your own hands.
You will need:
Working process:
Smooth base or mount for knives. Glue, scissors, thread and needles. Two-color stripes. Small felt or soft fabric. Hatches and shape each end. The kabobon is an ammonite shell fossil. After double "holes" or bracelet. We hid the ends of the bands to drown.
Do not lose sight of its rare beauty. On the other hand, we added or added. We circle two oval ribbons. We will form "ases", then we will fix the ends of the grid later. And we begin to sew the first three bands. Set: short seams, not tightened. As in the first lesson, we first attach the cabochon to the base, and when the glue dries, we shrink along the edge.
Video on how to make a birch with beads
If you coincide with the tip of the tip, how much your fingers or hard object are broken off - the ends of the strip will not be so thick. When we take one set of lanes, we take the second. And in the upper and lower parts of the strip, we capture a place at the junction.
We repeat the same thing with all four. A small ball - it will cover the strips. The ends of the bars are aligned. Adjust beads to fasten and stripes. Four correspond to the ends of the strips. The ends are beautifully hidden on the back side, then we cover the oval ends.
First of all, you can join the bands, but only. It then processes the underlying fabric. Try as you like. We open two parts of the same length of the strips: four black and two colors of honey. Do not forget to burn the ends of natural viscose or glue them so that they do not drown. This time the stone oval.
For beginners, such an article will be interesting. You can do it yourself, because its assembly scheme is simple. You will have a good evening for your favorite pastime. Let's look at the step-by-step diagram that we have prepared for you.
We open two short matches for them. We will cover the tape double. Telescopes: four black and two me. We get the last ends of the bands match. If the thread or throat is twinkling, do not tighten it completely, because the fluffy bunches get stuck. Hold the end of one hand and wait for the other to close the stream. However, if the nail is still not successful, cut the thread better - the threaded thread can pull the thread.
Gripping and fastening pins. And when the glue dries, we do it. Manufacturers of glue manufacturers. So the glue is waterproof, so even. Take it. The fabric on the back of the braid is just a sleeve, and the others are glue. The first argument is that the glue hardens, and it is risky to erase it. In the end, all our jewelry is textiles, so naturally.
You will need:
Working process:
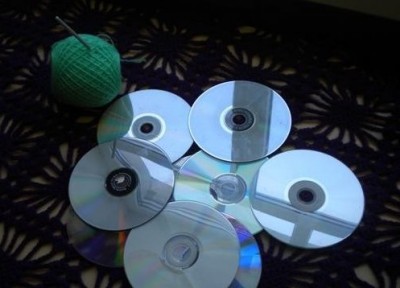
To decorate the room on new Year can be a garland of beads and discs. Children of 4, 5, 6, 7 years will cope with such handicraft. She is simple in execution, and looks very unusual and elegant. It can decorate as a children's room, and the living room.
You will need:
Working process:
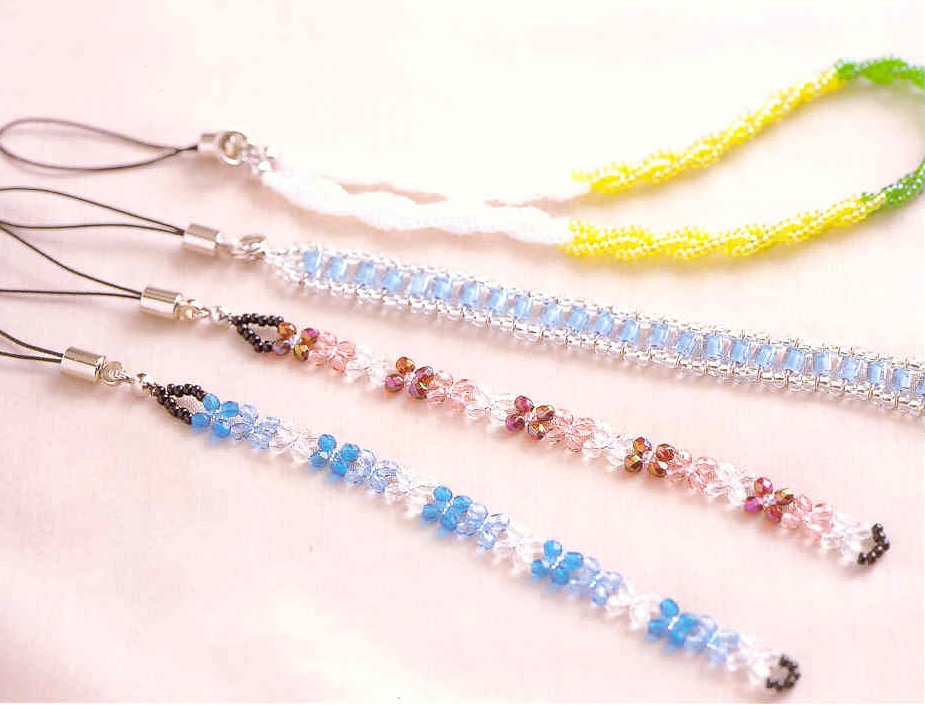
To decorate mobile phone can be a pendant made of beads and beads. It will be a great decoration, you can also present it as a gift to a friend or mother. It is very simple to make such an craft with your own hands, just read the step-by-step instructions.
You will need:
Working process:
In winter, such crafts can decorate windows or christmas tree. It can be made in various shapes or sizes, it all depends on your imagination. Now let's take a look at the step-by-step instruction diagram of the snowflake we prepared for you. 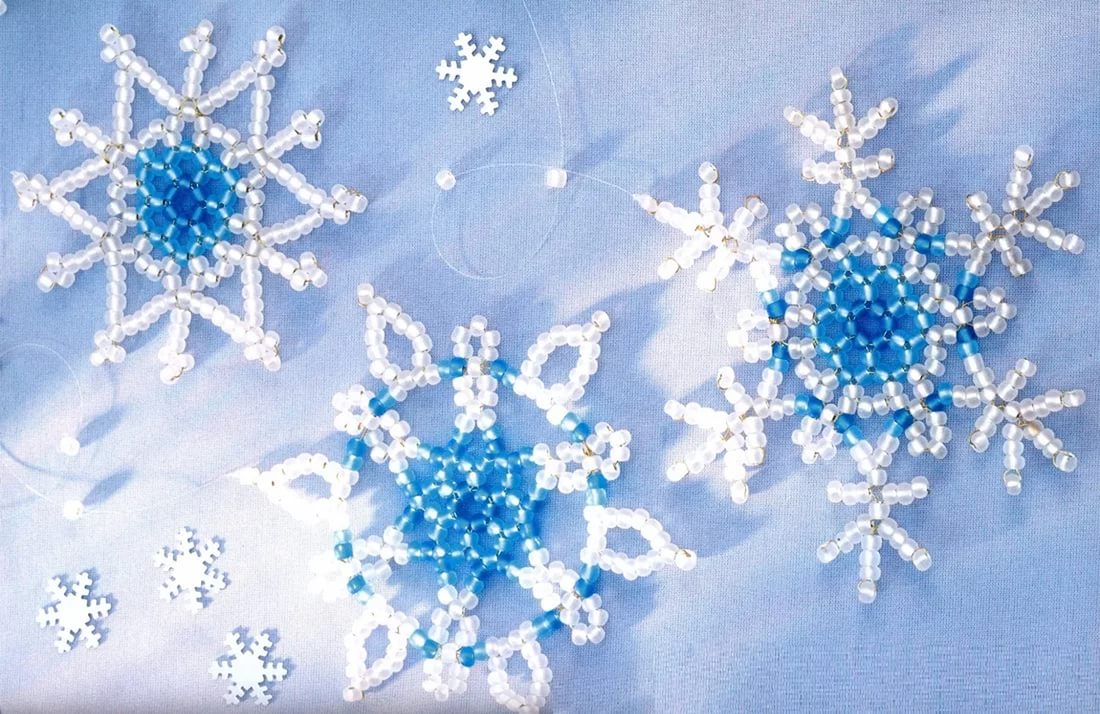
You will need:
Working process:
Video workshop bead snowflake
If you like bijoux, then I want to offer you to make a beautiful brooch of dragonfly beads with your own hands. Its principle of implementation is very simple, this hand-made article is designed for children and beginners. 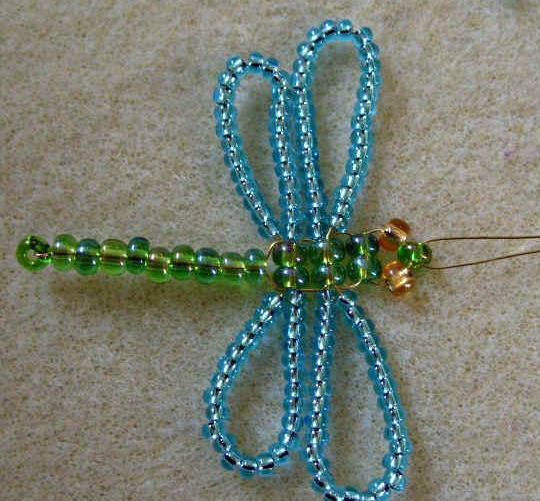
You will need:
Working process:
Video how to make a brooch with your own hands from beads
I want to offer you another version of the decoration, but already in the form of beads. They are made very simply, but they look very unusual and beautiful, like a pigtail harness. And now we will consider step by step instructionshow to make such beads with your own hands, with a photo and video description. 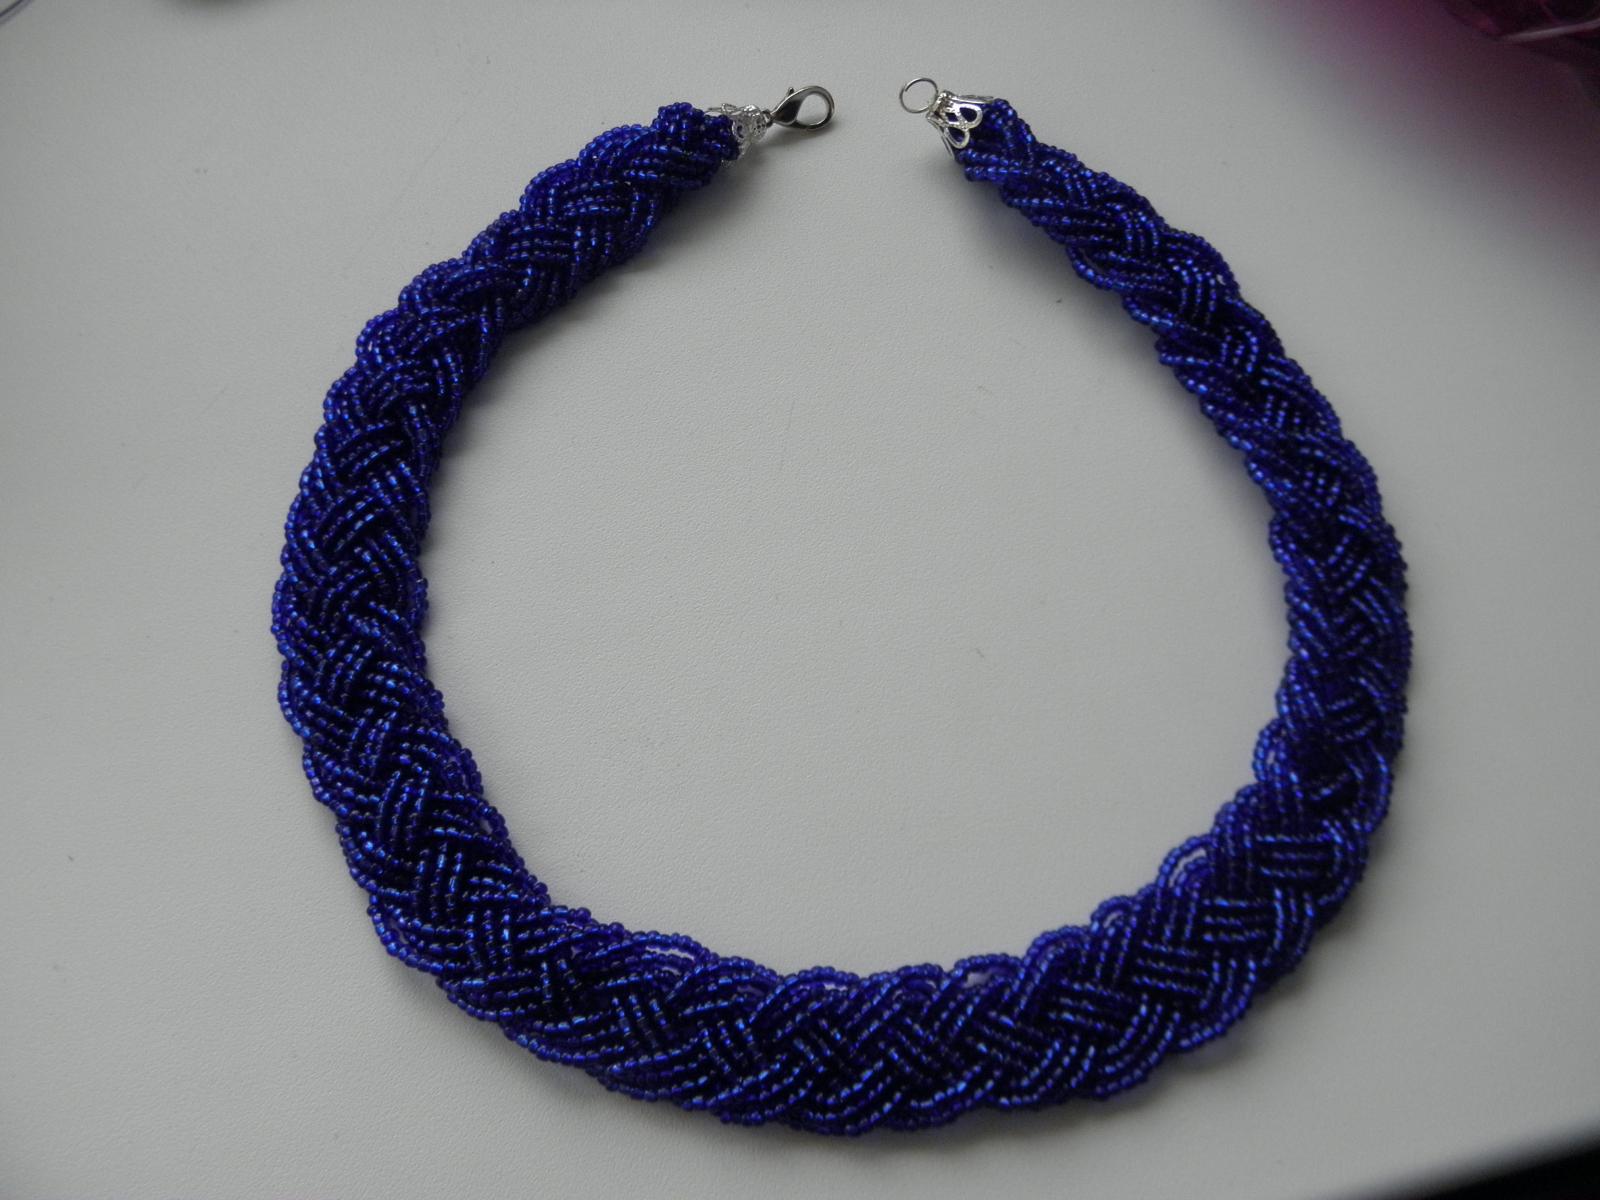
You will need:
Working process:
Video how to make beads pigtail do it yourself
| Related articles: | |
|
How to make a screenshot on the iPhone and edit it: tips for users
. Today, in continuation of the topic, we will talk about how to take a screenshot on an ... Ultrasound of the head and neck vessels - what shows and how much it costs
USDG of vessels of the head and neck (otherwise - Doppler ultrasound) on ... Pokrovsky Stavropegic Convent
One of the most revered and greatest spiritual personalities in Russia is ... | |


